Introduction
Have you ever watched a baker pipe delicate frosting rosettes onto a cake and thought, "I wish I could do something like that, but with paint"? The good news is, you absolutely can. Piped acrylic paint is a rising trend in the art world that borrows the tools and techniques of cake decorating to create stunning raised, dimensional designs on canvas. The result is part sculpture, part painting — a rich tactile surface that begs to be touched (even if the artist in you will whisper not to).
What makes this technique so special is its accessibility. You do not need years of formal training or a studio full of expensive supplies. A handful of acrylic paints, a few piping bags, and a canvas will get you started for well under thirty dollars. The dimensional effect is immediate and satisfying in a way that flat brushwork rarely is for beginners. Every squeeze of the bag leaves a raised ridge of color that catches the light and throws a tiny shadow, giving your work a presence that photographs struggle to capture.
In this article, we will explore everything you need to know to create your first piped acrylic painting. You will learn what materials work best, how to achieve different textures and patterns, and how to troubleshoot the common pitfalls that trip up nearly every beginner. By the time you reach the last page, you will have the confidence to pick up a piping bag and create something genuinely dimensional.
What Is Piped Acrylic Paint Art?
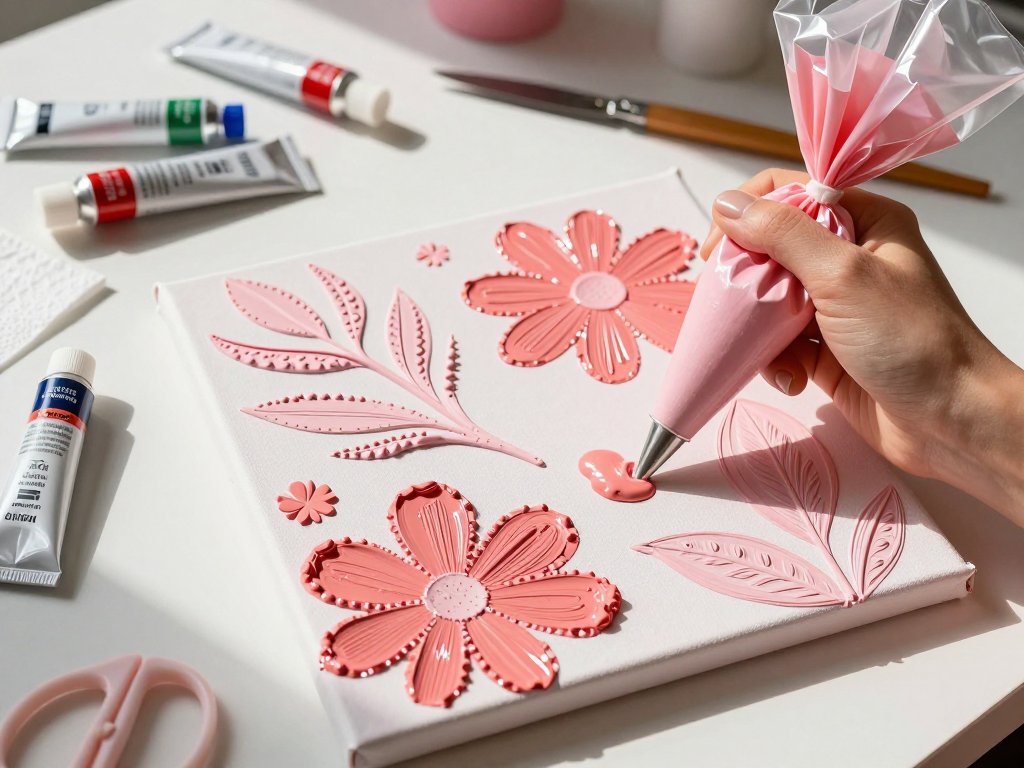
Piped acrylic paint art is exactly what it sounds like: you load acrylic paint into a piping bag fitted with a decorating tip, then squeeze the paint onto a canvas or other surface in controlled lines, dots, and swirls. The paint retains its shape as it dries, creating a raised, textured finish that sits above the canvas surface. The technique sits at the intersection of painting, drawing, and sculpture, and it produces results that look truly handcrafted in a way flat paint cannot replicate.
Artists have been experimenting with thick paint for centuries — think of Vincent van Gogh's heavily impastoed skies or the sculptural surfaces of Anselm Kiefer's mixed-media works. But the piping bag approach democratizes that effect. You do not need a palette knife and hours of practice to build up thick paint. The piping bag does the heavy lifting, depositing clean, consistent lines of paint with very little effort.
The technique has exploded in popularity on platforms like Instagram and TikTok, where creators share mesmerizing videos of paint being piped into floral patterns, abstract geometric designs, and even entire landscape scenes. But unlike trends requiring expensive specialty tools, piped acrylic paint is genuinely beginner-friendly. A set of basic piping tips costs about the same as a good cup of coffee.
Materials You Will Need
Acrylic Paint
Not all acrylic paints are created equal when it comes to piping. The ideal paint for piping has a thick, buttery consistency — think heavy body acrylics rather than the runny craft paints you may have used for school projects. Heavy body acrylics, such as those made by Liquitex, Golden, or Amsterdam, hold their shape beautifully when piped and dry with a satisfying matte or satin finish.
That said, you do not need to rush out and buy professional-grade paint to try the technique. Many brands offer medium-body or student-grade acrylics that work perfectly well for dimensional work. The key test is simple: dip a craft stick into the paint and lift it out. If the paint holds its shape on the stick without immediately dripping off, it will pipe well. If it runs like water, it is too thin.
For best results, choose paints labeled "heavy body," "high viscosity," or "professional grade" in the colors you want. A starter set of six to eight colors is more than enough to create a wide range of dimensional effects.
Piping Bags and Tips
This is where the technique borrows most heavily from the baking world. You will need piping bags — either disposable plastic bags or reusable cloth or silicone ones — and a set of decorating tips. The good news is that the same tips used for royal icing and buttercream work perfectly for paint.
Here are the tip shapes you will find most useful as a beginner:
Round tip (size 3 to 8): This is the workhorse of piped paint art. A round tip produces clean lines, dots, and beads. Use a smaller tip (size 3 or 4) for fine details and outlines, and a larger tip (size 6 to 8) for filling in areas or creating thick dimensional lines.
Star tip (open star, size 18 to 22): A star tip creates ridged, textured lines that look like twisted rope or braided trim. It is wonderful for borders, decorative edges, and adding texture to backgrounds. The ridges catch light beautifully and give your work a feeling of depth.
Leaf tip (size 65 or 352): A leaf tip is shaped like an angled teardrop opening. When you squeeze and pull, it creates a leaf-shaped ridge of paint. It is the secret to creating quick botanical accents, leaves, and petals that look natural and organic.
Petal or rose tip (size 102 to 125): These tips are wide and flat on one side, curved on the other. They are designed for piping frosting roses, and they work just as well for creating petal shapes and flower forms with paint. With practice, you can pipe an entire rose in one continuous motion.
You can find beginner piping tip sets online for around ten to fifteen dollars, typically including ten to fifteen tips in a plastic case covering all the shapes above plus a few specialty ones.
Canvas or Surface
The surface you choose matters more than you might think. Piped acrylic paint is heavy — much heavier than a flat painted layer — and it puts stress on its support as it dries. A flimsy canvas board may bow or warp under the weight of a heavily piped design, so it is worth investing in a sturdy foundation.
Stretched canvas: A standard stretched canvas with a heavy cotton or linen surface works well for piped paint, provided it is stretched tightly over a solid frame. Look for canvases labeled "gallery wrap" or "deep edge" — these use heavier fabric and more robust frames. For larger pieces, a canvas with cross-bracing (wooden bars that form an X on the back) provides extra stability.
Canvas panels: These are rigid boards with canvas fabric glued to the surface. They are inexpensive and do not warp under heavy paint because they are mounted on a solid panel. They are an excellent choice for practice pieces and smaller works.
Wood panels: Birch plywood or MDF panels primed with gesso provide the most stable surface for piped paint. They will not warp, they hold the paint's weight easily, and they give your finished piece a professional, gallery-ready feel. If you plan to create a large dimensional painting, a wood panel is the best foundation you can choose.
Other surfaces: Do not limit yourself to traditional canvases. Piped acrylic paint adheres well to primed wood, heavy watercolor paper (300 lb or heavier), thick illustration board, and even painted furniture. The only requirement is that the surface is primed or sealed so the paint grips properly.
Extras to Have on Hand
Keep a small spray bottle of water nearby to mist your paint if it starts drying out in the piping bag. Have paper towels ready for cleaning tips between color changes. A toothpick or fine skewer is invaluable for popping air bubbles and guiding small details. A small palette knife will help you load paint without making a mess.
Preparing Your Paint for Piping
Getting the paint to the right consistency is the single most important skill. Paint that is too thick will not flow through the tip, no matter how hard you squeeze. Paint that is too thin will ooze out in a runny puddle instead of holding a clean raised line.
Start with heavy body acrylic paint directly from the tube. Most heavy body paints are just stiff enough to pipe on their own, but they may need a very small amount of thinning. Add one or two drops of water to a quarter-sized dollop of paint and mix thoroughly. Test the consistency by dragging the knife through the paint: the paint should hold a clean edge where the knife passed, and it should not flow back to fill the gap. If it flows back, it is too thin. If the knife leaves a jagged, torn-looking edge, it is too thick.
An alternative to water is acrylic flow medium, which thins the paint without reducing color intensity or adhesive strength. It costs a few dollars more but produces a noticeably smoother piping experience. If you plan to do a lot of piped painting, a small bottle is a worthwhile investment.
Once your paint is at the right consistency, load it into the piping bag. Insert the piping tip and push it down until it is snug. Fold the top of the bag down over your hand to create a wide opening. Use a palette knife to scoop paint into the bag, filling it no more than half full. Unfold the top, twist the bag closed just above the paint level, and squeeze gently until paint emerges from the tip.
Pro tip: if you are using multiple colors, prepare each color in its own piping bag beforehand. Switching tips between colors mid-project is messy and wastes paint. Having each color pre-loaded lets you pick up and continue without breaking your flow.
Basic Piping Techniques
Lines and Strokes
The most fundamental piped technique is the continuous line. Hold the piping bag at a forty-five-degree angle to the canvas, with the tip barely touching the surface. Squeeze gently and steadily as you move your hand along the path you want the line to follow. The speed of your hand movement controls the thickness of the line: move slowly for a thick, bold line and more quickly for a thin, delicate one.
The most common beginner mistake is lifting the tip away from the canvas. Keep the tip in light contact with the surface — just brushing it, not digging in. When you reach the end of a line, stop squeezing and flick the tip away in a quick motion. This prevents a messy blob from gathering at the endpoint.
Practice drawing simple shapes first: straight lines, curved lines, spirals, zigzags. Do not worry about perfection. The slightly uneven quality of hand-piped lines is part of their charm. A line that wobbles gently looks more organic and handmade than a ruler-straight one.
Dots and Beads
Dots are the easiest piped element to master, and they are endlessly useful. Hold the bag vertically, tip pointing straight down at the canvas. Squeeze gently until the paint forms a small dome, then stop squeezing and lift the bag straight up. The paint should release cleanly from the tip, leaving a smooth raised dot on the canvas.
The size of the dot depends on how long you squeeze. A short squeeze produces a small bead; a longer squeeze creates a larger dome. Practice making dots of different sizes in rows, then try placing them in patterns — polka dots, concentric rings, graduated scales. Dots can be used to fill backgrounds with texture, create the centers of flowers, or add decorative borders to larger compositions.
You can also create teardrop shapes by squeezing and pulling the bag sideways before lifting. This is the basis for many floral petal shapes and is worth practicing until the motion feels natural.
Swirls and Rosettes
Swirls add an elegant, flowing element to piped designs. Start with a dot in the center. Without lifting the tip, move your hand in a slow spiral outward, keeping steady pressure on the bag. The result will be a continuous raised spiral that looks like a creeping vine or decorative scroll.
Rosettes are a more advanced swirl technique. Using a petal tip, start at the center of the flower shape and pipe a tight spiral outward. As the spiral widens, the flat side of the tip creates a ruffled edge that looks just like the petals of a rose. Do not worry if your first few rosettes look more like lumpy snails than flowers — this is a technique that rewards patience. After a dozen practice attempts, your hand will find the rhythm.
Filling Large Areas
What happens when you want to fill a large area with dimensional paint, like a sky or a background? Piping individual lines across the entire surface can be tedious and can create a pattern that looks too regimented. Instead, try these approaches:
Stippling: Pipe hundreds of small dots spaced closely together to create a textured field of color. From a distance, the dots blend into a solid area. Up close, the texture is rich and inviting.
Parallel lines: Pipe rows of straight or gently curved lines side by side, varying the spacing between rows. This creates a ribbed, corduroy-like texture that works beautifully for abstract backgrounds.
Cross-hatching: Pipe a set of parallel lines in one direction, then pipe a second set at an angle across the first. The overlapping raised lines create a woven, grid-like texture with deep shadows in the intersections.
Creating Your First Dimensional Painting
Let us walk through a simple project that puts all these techniques together: a dimensional floral bouquet on a small canvas. This project uses basic piped shapes and a limited color palette, making it perfect for a first attempt.
What You Will Need
- One 8-by-10-inch stretched canvas or canvas panel
- Acrylic paint in five colors: two shades of green (light and dark), two flower colors (for example, pink and coral), and a background color (soft cream or off-white)
- Piping bags (one per color)
- Round tip (size 5 or 6)
- Star tip (size 18)
- Leaf tip (size 65 or 352)
- Paper towels and a spray bottle of water
Step 1: Prepare the Background
Use a flat brush to paint the entire canvas with your background color. Let it dry completely — at least one hour, or use a hair dryer on low heat for five minutes if you are impatient. The background does not need to be perfect; it will be mostly covered by the piped design.
Step 2: Sketch Your Composition
Lightly sketch the outline of your bouquet with a pencil. Draw a rough oval shape for the overall bouquet, mark where the larger flowers will go, and indicate the stems with light lines. This sketch will guide your piping and prevent you from getting lost once the paint starts flowing.
Step 3: Pipe the Stems
Load a piping bag fitted with a round tip with your dark green paint. Pipe the stems as gentle curved lines running from the bottom of the bouquet up toward where the flowers will be. Do not make them perfectly straight — flowers in nature have organic, slightly uneven stems.
Step 4: Pipe the Leaves
Switch to the leaf tip filled with light green paint. Hold the leaf tip so the pointed end of the opening points away from the stem. Squeeze gently while pulling the tip away from the stem in a short, quick motion. The paint should form a raised leaf shape with a natural-looking pointed tip. Repeat for each leaf, placing them along the stems at different angles.
Step 5: Pipe the Flowers
Fill a bag fitted with a star tip with your first flower color (pink, for example). Pipe tight swirls or concentric dots at the flower positions you marked in your sketch. Do not worry if each flower looks slightly different — variety makes the bouquet feel natural and abundant. Repeat with your second flower color (coral), piping a few additional blooms in the gaps.
Step 6: Add Detail
Using a round tip with a very small opening (size 3 or 4), pipe tiny dots in a contrasting color in the center of each flower. Add a few loose petals that have fallen from the bouquet, piped as small teardrop shapes on the surface below the stems.
Step 7: Let It Cure
Set the canvas aside in a dust-free location and let it cure for at least 48 hours. Acrylic paint dries to the touch in an hour or two, but thick piped sections take much longer to cure all the way through. Rushing this step can result in the interior of the paint remaining soft, which will crack and deform if the canvas is handled.
Troubleshooting Common Problems
Even experienced piped paint artists encounter challenges. Here is how to handle the most common ones.
The paint will not come out of the tip. This usually means the paint is too thick. Take the tip off, return the paint to a container, add one or two more drops of water or flow medium, mix thoroughly, and reload. If the paint still will not flow, you may have a dried paint plug in the tip. Soak the tip in warm water for a few minutes and clean it out before continuing.
The paint is too runny. Add a small amount of acrylic thickening gel or mix the runny paint with a stiffer paint from the same color family. You can also let the paint sit uncovered for ten to fifteen minutes to let some water evaporate, which will thicken it naturally.
The piped lines have air bubbles. Air gets trapped when you load paint into the bag. Before you start piping, squeeze a small amount of paint out onto a paper towel to purge the air. If bubbles appear during piping, pop them with a toothpick and smooth the paint gently with your fingertip (wear a disposable glove to keep your hands clean).
The paint cracks as it dries. Cracking is usually caused by the paint layer being too thick in a single pass. Instead of piping one thick line, try building up your design in two or three thinner layers, allowing each layer to dry for at least an hour before piping the next. Adding a small amount of acrylic retarder to your paint can also help slow the drying time and reduce cracking.
The canvas warps under the weight of the paint. This is a surface-choice issue. If your canvas is already warping, you can reinforce it by gluing a piece of stiff cardboard or foam core to the back with a strong adhesive like E6000 or wood glue. For your next project, switch to a canvas panel or a wood panel to prevent the problem from recurring.
Preserving and Displaying Your Work
Piped acrylic paintings need extra care because the raised surface attracts dust and is vulnerable to pressure. Use a spray varnish designed for acrylics — apply two to three thin coats from twelve inches away, letting each dry for an hour. Frame in a shadow box with at least one inch of clearance between canvas and glass, or use a floater frame with no glass at all. For cleaning, gently dust with a soft dry paintbrush or compressed air — never use damp cloths, which can soften the paint. If shipping, place the painting face-up in a box with three inches of cushioning on all sides, using glassine or wax paper against the surface (not bubble wrap, which imprints into the paint).
Conclusion
Piped acrylic paint art is one of those rare techniques that feels both novel and deeply familiar at the same time. The tools come from the kitchen, the paint comes from the art supply store, and what emerges is something that looks like it took years of training to create. In reality, the learning curve is gentle and the rewards are immediate. Your first piped line may wobble, but it will also rise from the canvas in a way that will make you smile every time you see it.
The technique invites experimentation. Once you learn the basic motions of piping, you can apply them to virtually any subject: abstract compositions, botanical studies, typographic pieces, landscapes, portraits. Each project teaches your hand a little more about how the paint behaves, how the tips shape the flow, and how the light interacts with the raised surfaces.
If you feel inspired to try this technique, start small. Pick up a set of piping tips and a tube of heavy body acrylic in a color you love. Prepare a small canvas panel, load your first piping bag, and squeeze out a few simple lines. The tactile feedback of the paint forming beneath your hand is surprisingly satisfying — an art form that you can feel as well as see. Once you experience that, you will understand why this technique has captured the imagination of so many makers.
Happy piping, and may your lines always hold their shape.