Introduction
If you're looking for a summer craft that delivers big on color without requiring a kiln, a pottery wheel, or any prior art experience, alcohol ink art on ceramic tiles is exactly where you want to be.
This technique has taken the craft world by storm over the last few years, and for good reason: it's fast, forgiving, surprisingly affordable, and the results look like something you'd pay fifty dollars for at a boutique.
I first tried alcohol inks during a rainy June when my kids were bouncing off the walls and I needed something that would keep my attention without a multi-day commitment.
Three tiles later, I was hooked. By the end of the summer I'd made coasters for every aunt, neighbor, and babysitter on my list.
Now I want to walk you through everything I've learned so you can jump in with confidence.
What Is Alcohol Ink and Why Does It Work on Ceramic Tile?
Alcohol ink is a highly pigmented, fast-drying dye suspended in isopropyl alcohol. Unlike acrylic paint, which sits on top of a surface and dries as a plastic film, alcohol ink soaks into porous surfaces and bonds at a chemical level.
When applied to a glazed ceramic tile, the alcohol carries the pigment into microscopic surface pores.
As the alcohol evaporates — in seconds to minutes, depending on your climate — the pigment stays locked in place.
The result is a translucent, jewel-toned layer of color that looks completely different from anything you can achieve with paint.
You can layer inks, blend them, push them around with air, and lift color off with alcohol to create effects ranging from soft watercolor washes to sharp, crystalline patterns.
Glazed ceramic tile is a perfect substrate because its hard, non-absorbent surface gives you a wide working window.
Unlike paper, which soaks up ink immediately, a glazed tile lets the ink float and move while the alcohol evaporates.
This gives you time to tilt, blow, drop more color, and dab with a felt tool before the ink sets.
Unglazed quarry tiles work too but produce a more muted, matte finish. For beginners, I always recommend starting with glossy white tiles — the white background makes every color pop, and the slick surface gives you the most time to play.
Complete Materials List
Here is exactly what you need, with the specific brands I have tested and trust. Essentials are marked — you do not need every single item to start.
Essential Supplies
Ceramic tiles. Plain white glazed ceramic tiles from any home improvement store. Four-inch and six-inch squares are perfect for coasters. Go up to 8x8 or 12x12 for trivets and wall art. Look for smooth, glossy bathroom or subway tiles. Avoid heavy texture or visible grain.
Alcohol inks. The three most reliable brands are Ranger (Alcohol Ink line), Piñata (by Jacquard), and Jacquard's own alcohol ink line.
Ranger inks are medium-bodied and blend beautifully. Piñata inks are slightly thinner and more intense — a little goes a very long way.
For your first order, pick up a starter set of 6 to 12 colors. I recommend: bright yellow, tangerine, sunset orange, fuchsia, magenta, turquoise, sapphire blue, moss green, purple twilight, and white.
White is essential for mixing pastels and creating opacity on dark tiles.
Isopropyl alcohol (91% or higher). You need this for thinning inks, cleaning mistakes, creating blending effects, and preparing tiles. Do not use 70% — it has too much water and will behave unpredictably.
Felt blending tools and applicators. Ranger sells felt blending tools with handles and replacement pads. You can also use high-quality cosmetic sponges or wool felting pads. Have at least two so you do not cross-contaminate colors.
Squeeze bottles or dropper bottles. Fine-tip applicator bottles with metal needles give you the most control, but simple plastic dropper bottles work fine for beginners.
Drinking straws or a craft air blower. A simple plastic straw works surprisingly well — hold it about an inch from the surface and blow gently to push puddles of ink into branching patterns. A craft air blower gives you more control and does not require lung power.
Disposable gloves. Alcohol ink stains skin immediately and does not wash off easily. Nitrile gloves are best.
Work surface protection. Cover your table with a silicone craft mat, a plastic tablecloth, or wax paper. I use a silicone baking mat — it catches drips, wipes clean, and the ink does not stick to it.
Nice-to-Have Supplies
Heat tool or hairdryer. Speeds up drying between layers and creates interesting crackle effects when applied to wet ink.
Gold, silver, or copper metallic alcohol inks. Piñata makes excellent metallics. A single drop of gold turns an ordinary marble pattern into something that looks like a museum piece.
Rubbing alcohol in a spray bottle. Creates a fine mist that dilutes ink evenly for soft, ethereal effects.
Canned compressed air. Hold it upside down and spray — the cold blast creates stunning cellular patterns in the ink. This is one of my favorite techniques for galaxy tiles.
Disposable cups and pipettes. For mixing custom colors before applying them to the tile.
Sealing Supplies
UV resin or epoxy resin. For tiles that will be used as coasters, trivets, or any surface that needs to be waterproof and durable. UV resin cures in minutes under a UV lamp. Two-part epoxy resin takes 12 to 24 hours but is harder and more scratch-resistant.
Clear spray sealer. For decorative tiles that will not get heavy use. Krylon Kamar Varnish or Triple-Thick Crystal Clear Glaze work well. Apply at least three light coats.
Felt pads or cork sheet. For the bottom of finished coasters and trivets so they do not scratch your furniture.
Tile Preparation
Skip this step and your ink may bead up, refuse to spread, or lift off unevenly. Here is the process I use every time.
Step 1: Wipe the tile thoroughly with 91% isopropyl alcohol on a lint-free cloth. This removes manufacturing residue, dust, and oils from your hands.
Do not use soap and water — soap leaves a film that repels the ink.
Clean until the tile squeaks when you wipe it. Let it air dry completely, which takes about thirty seconds.
Step 2: Lay out your silicone mat and arrange your inks, alcohol bottles, applicators, and straws so everything is within easy reach. Alcohol ink dries fast — you do not want to hunt for a bottle while a puddle of ink is setting on your tile.
Step 3: Put one small drop of ink on a corner of the tile to make sure it flows freely. If it beads up, the tile still has residue. Clean it again. If it spreads nicely, you are ready to go.
Basic Application Techniques: Drop, Tilt, Blow, Blend
Every alcohol ink design, no matter how complex, is built from these four fundamental movements.
Drop. Start with one or two drops of your base color in the center of the tile. Hold the dropper tip about a quarter-inch from the surface so the ink does not splatter. One drop covers roughly a quarter-sized area on a glazed tile.
Tilt. Pick up the tile and gently tilt it in different directions to encourage the ink to flow.
The ink follows gravity and creates organic, branching paths. Tilt slowly — fast tilting makes the ink run off the edges.
For coasters, you want the ink to stop about an eighth of an inch from the edge so you have a clean border.
Blow. Put your straw or air blower about an inch from the wet ink and blow gently.
The ink spreads into thin, branching tendrils that look like veins, tree branches, or lightning bolts.
Move the straw in circular patterns to create swirls. Do not inhale through the straw while it is near the ink — you will get a mouthful of alcohol vapor.
Blend. Dip a felt blending tool into isopropyl alcohol and dab it gently at the boundary where two colors meet.
The alcohol reactivates the ink and allows the colors to flow into each other. You can also blend by dropping plain alcohol onto the tile and then dropping ink into the alcohol puddle — the ink spreads immediately in a soft, circular bloom.
This is called the "wet-on-wet" technique, and it is the foundation of most abstract alcohol ink art.
Color Mixing Tips for Summer Palettes
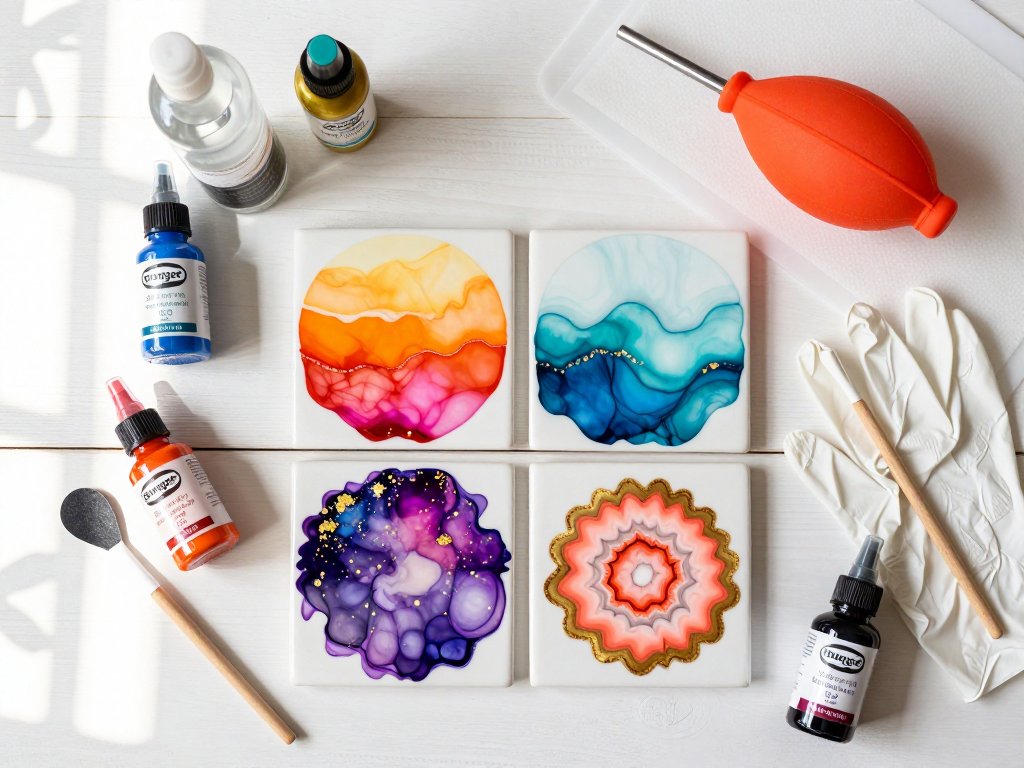
Sunset ombre. Start with bright yellow at one edge, add tangerine in the middle, and finish with magenta or fuchsia at the opposite edge.
Tilt gently so the colors meet. The yellow-to-orange transition is naturally smooth. The orange-to-magenta transition needs a tiny drop of alcohol at the boundary to prevent a hard line.
Ocean wave. Turquoise plus a single drop of sapphire blue, blended with a touch of white. Drop a tiny amount of plain alcohol in the center and blow outward to create a spray effect.
Tropical punch. Fuchsia, bright yellow, and tangerine dropped in alternating dots around the tile and blown toward the center. This creates a vibrant, confetti-like pattern that screams summer.
Citrus cooler. Lemon yellow and lime green blended with a drop of white. Add a tiny dot of orange in the center of each bloom for the "fruit" effect.
Berry burst. Magenta, purple twilight, and a single drop of turquoise. The turquoise reacts with the magenta to create unexpected purple-brown tones where they meet.
To create custom colors, mix drops of ink in a disposable cup with a few drops of isopropyl alcohol. Write down your ratios so you can reproduce the color later.
Creating Different Effects
Marble Effect
The marble effect is the most popular alcohol ink technique — it looks like polished stone and it is one of the easiest to achieve.
Start with a clean white tile. Apply several drops of your primary color (say, sapphire blue) in different spots around the tile.
Tilt to spread the ink into thin, irregular pools. While the ink is still wet, drop your secondary color (turquoise) into the center of the blue pools.
Then drop a few dots of isopropyl alcohol directly onto the wet ink. The alcohol pushes the ink outward in rings, creating the characteristic "eyes" and vein patterns of marble.
Blow gently through a straw to extend the veins. For extra depth, repeat with increasingly lighter colors — dark blue, then medium blue, then a blue-and-white mix — letting each layer dry for about a minute before adding the next.
For a warm summer marble, use terracotta, amber, and gold inks instead of blues.
Geode Effect
Geode tiles look much harder to make than they actually are. Start by dropping a ring of dark ink near the edge of the tile — charcoal, deep purple, or navy.
Tilt the tile so the ink runs inward, creating an irregular, jagged edge. Let this dry for about a minute.
Drop a second ring of a lighter color just inside the first ring. Tilt gently so it flows inward without covering the first ring completely.
Continue with a third and fourth ring, each lighter than the last, working toward the center.
Your innermost ring should be white or a very pale pastel. For the crystal center, drop plain isopropyl alcohol into the middle while the innermost ring is still wet.
The alcohol pushes the ink outward, creating jagged, crystallized patterns. For an even more dramatic effect, use canned compressed air held upside down — the cold blast creates sharp, spiky patterns that look exactly like quartz crystals.
Drop a tiny amount of gold or silver metallic ink into the center while the alcohol is still working, and your geode will look like it was cut from a real stone.
Galaxy Effect
Galaxy tiles evoke warm, starry summer nights. Cover the entire tile with a base layer of dark blue, purple, and a tiny bit of black ink.
Uneven coverage is fine — it gives the galaxy more depth. Use a felt blending tool dipped in alcohol to soften the transitions between colors.
Let this dry completely. Now drop small amounts of magenta, turquoise, and white ink in isolated spots.
Spray a mist of isopropyl alcohol over the whole tile from about six inches away to break up the drops into soft, diffuse clouds.
Let dry. For stars, dip an old toothbrush into white ink and flick the bristles over the tile.
For brighter stars, use a toothpick to place tiny dots of white ink by hand.
Add a few gold dots for distant galaxies. For a shooting star, drag a single drop of white ink in a straight, fast line with a palette knife or the edge of a piece of cardboard.
Floral Effect
Floral alcohol ink tiles take a bit more practice, but the technique is simple once you understand how alcohol shapes the ink.
Start with a drop of your flower color (say, fuchsia) in the center of the tile.
Do not tilt it. Take a felt blending tool dipped in isopropyl alcohol and touch it to the edge of the ink drop.
The alcohol pushes the ink outward in a ring. Move the tool around the drop in a circular motion to create a ring of petals.
For more defined petals, use the tip of a toothpick dipped in alcohol to drag small arcs outward from the center drop.
Make three to five flowers on a single tile, leaving space between them. Add small green dots (moss green ink) around the flowers for leaves.
Blow the green dots gently to create leaf shapes. Finish with tiny yellow dots in the center of each flower for the stamen.
Troubleshooting Common Problems
Muddy colors. This happens when you mix too many colors on the tile, especially complementary colors like blue and orange.
Limit yourself to three or four colors per tile. To fix mud, drop a generous amount of isopropyl alcohol on the muddy area and blot immediately with a paper towel.
Let it dry and start again with fresh color.
Uneven coverage. If your ink is patchy with bare spots showing through, you probably did not use enough ink or you tilted too aggressively.
Fix this by dropping more ink directly onto the bare spots while the surrounding ink is still wet.
Use a felt blending tool dipped in alcohol to blend the new ink into the old.
If the surrounding ink has already dried, drop alcohol on the bare spot first, then add ink — the alcohol reactivates the dry edges and helps the new ink blend in.
Ink pooling. Thick, dark puddles form when too much ink collects in one area. To prevent pooling, use fewer drops and tilt more gently.
If a puddle has already formed, use the corner of a paper towel to wick away the excess before it dries.
Touch the towel gently to the edge of the puddle — capillary action pulls the excess into the towel.
Do not press or rub.
Ink beading on the surface. If your ink refuses to spread and forms tight little beads, your tile is not clean enough or your alcohol percentage is too low.
Wipe with fresh 91% isopropyl alcohol and try again. If the problem persists, try a different tile — some ceramic finishes are more resistant than others.
Colors drying too fast. In hot, dry summer weather, alcohol ink can dry in seconds.
To slow it down, work in a cooler room or add a drop of Ranger blending solution to each drop of ink.
You can also mist the tile lightly with alcohol before applying ink to create a wet surface that extends your working time.
Sealing and Protecting Finished Tiles
Alcohol ink is surprisingly durable once dry, but it is not waterproof. If you plan to use your tiles as coasters, trivets, or any surface that will encounter moisture or heat, you must seal them properly.
UV resin (best for coasters and small tiles). UV resin cures in two to five minutes under a UV lamp, produces a hard, glass-like surface, and is food-safe once cured.
Pour a thin layer — about one to two millimeters thick — over the tile and spread it evenly with a disposable brush or silicone spreader.
Pop any air bubbles by blowing on them gently or touching them with a toothpick.
Cure under a UV lamp. Coasters sealed this way have survived months of use on my coffee table, including condensation rings from iced tea and the occasional splash of coffee.
Two-part epoxy resin (best for large tiles and high-use items). For tiles larger than 6x6 inches or trivets that will encounter hot dishes, epoxy resin is the stronger choice.
Mix resin and hardener according to the manufacturer's instructions. Pour over the tile and spread with a silicone spatula.
Let cure for 12 to 24 hours in a dust-free area. Most epoxies handle up to 150 to 200 degrees Fahrenheit.
Clear spray sealer (best for decorative wall tiles). For tiles that will hang on a wall or sit on a shelf, a spray sealer is sufficient.
Use Krylon Kamar Varnish or Minwax Clear Gloss Spray. Apply three to five light coats from about ten inches away, letting each coat dry for 15 to 30 minutes.
For a smooth finish, sand very lightly with 400-grit sandpaper between the second and third coats, then wipe clean before the next coat.
Finishing the back. Regardless of your sealer, finish the back of your tiles with self-adhesive felt pads or cork sheets cut to size. This prevents scratching and gives the tiles a professional, store-bought appearance. For trivets, use heat-resistant cork instead of felt.
Summer Project Ideas
1. Drink coasters (4-pack). Make a set of four 4x4-inch coasters, each with a different summer palette: one sunset, one ocean wave, one tropical punch, and one citrus cooler.
Seal with UV resin and add felt pads to the back. Total cost per set: about three to five dollars in materials.
Perfect hostess gifts for summer barbecues.
2. Pitcher trivet. Use a single 6x6-inch tile with a geode design. Seal with two-part epoxy resin for heat resistance. This trivet is perfect for summer lemonade pitchers and iced tea jars on the patio. Cork the bottom for heat protection.
3. Patio wall art set. Arrange six 4x4-inch tiles in a 2x3 grid on a wooden board.
Create each tile with a different galaxy design — the variations in star patterns and nebula colors create a cohesive but dynamic display.
Seal with three coats of UV-resistant spray sealer so the colors do not fade in direct sunlight.
Attach the tiles to exterior-grade plywood using construction adhesive, frame the board, and hang on a covered patio or porch wall.
4. Garden plant markers. Use 2x2-inch mosaic tiles for charming herb and vegetable markers. Create a single-color marble pattern.
After sealing with spray sealer, write the plant name with an oil-based paint pen (Posca or Sharpie Oil-Based work well).
Apply one more coat of sealer to protect the lettering. Mount each tile on a wooden stake or bamboo skewer with construction adhesive.
These are nearly indestructible outdoors and perfect for labeling tomatoes, basil, mint, and peppers.
5. Candle tile base. A 4x4-inch tile makes a beautiful, heat-safe base for pillar candles.
Create a floral design or warm marble pattern in summer colors. Seal with UV resin.
Place a pillar candle on top — the tile catches wax drips and looks elegant on a coffee table or outdoor dining table.
Final Thoughts
Alcohol ink art on ceramic tiles is one of those rare crafts where the learning curve is gentle but the ceiling is sky-high.
You can make something beautiful on your very first tile, and you will still be discovering new techniques a hundred tiles later.
Keep a practice tile handy to test color combinations before committing to a project tile.
Work in a well-ventilated area — open a window or set up on a covered porch.
Embrace imperfection: some of the most beautiful tiles I have ever made were the result of "mistakes" where a drop landed where I did not intend it.
Alcohol ink has a mind of its own, and that is half the fun.
Batch your work for efficiency. I do "production days" where I clean ten tiles, spend two hours creating designs, and seal them all in one go the next day.
This approach uses materials efficiently and gives you a stack of finished projects in a single weekend.
Summer is the perfect season for this craft — the warm weather helps the ink flow, the bright colors match the season's energy, and handmade tile coasters and decor make your home feel like a vacation destination.
Grab some tiles, pick your colors, and start creating.