Introduction
I still remember the first portrait I drew that I truly loved. The face came out soft and kind, the eyes sat right, and the hair fell just so.
Then I reached the hands. I spent twenty minutes on one wrist, gave up, and quietly tucked both of her hands behind her back.
For years that was my solution. Pockets, sleeves, crossed arms, a mug held just out of frame. Anything to avoid those five stubborn fingers.
Here is what finally changed things for me. Hands are not a detail problem. They are a structure problem.
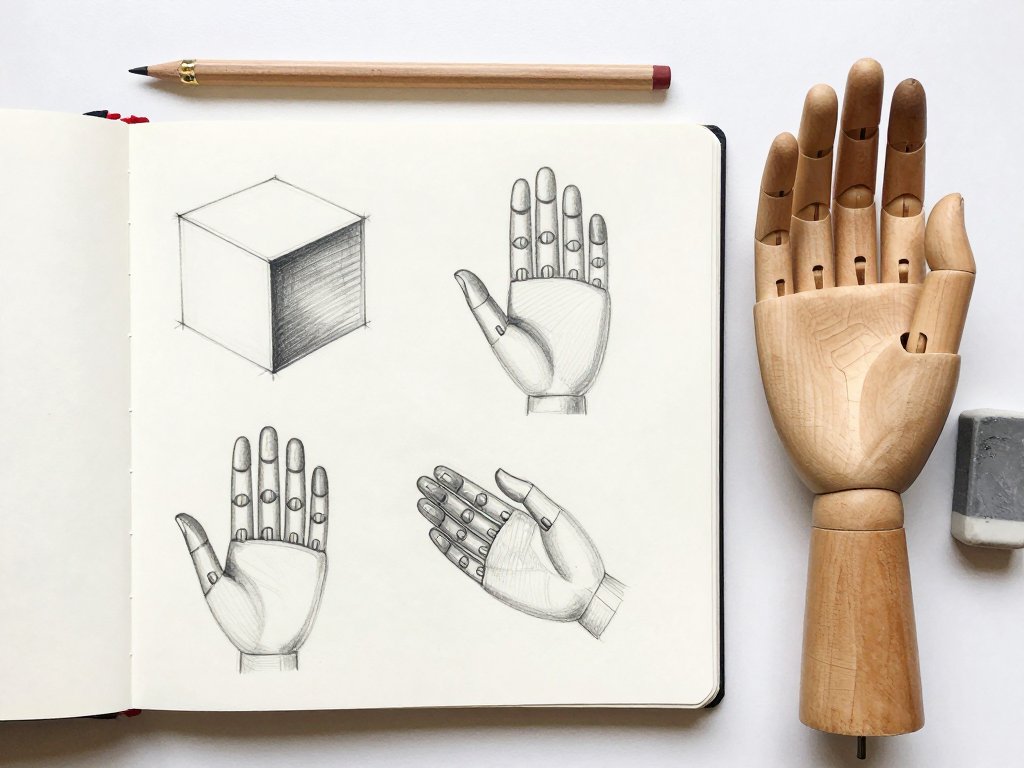
Once you learn to block a palm as a flattened box, a thumb as a wedge, and fingers as short tubes, the fear loosens its grip.
This is the method I use now, and it is gentle enough for a slow Saturday morning at the kitchen table.
Why Hands Feel So Hard
Part of the difficulty is real anatomy. Each hand holds twenty-seven bones, and every finger carries four joints of its own.
That is a lot of moving parts. When the fingers curl or spread, each joint shifts the shape of everything below it.
Foreshortening makes it worse. When a finger points toward you, it compresses into a stubby stack of circles instead of a long tube.
But the biggest reason is simpler, and a little unfair. We read hands constantly, all day, without thinking about it.
You know instantly when a hand in a drawing is wrong. Your eye catches it before your brain can explain why.
That instant recognition is not a curse. It means that once your structure is right, the same eye will trust the result.
What You Need to Draw Hands
You do not need much, and you probably own most of it already.
- A soft pencil. A 2B is my everyday choice for construction, and a 4B gives you darker, looser gesture lines.
- An HB pencil. Keep this one sharp for refining contours and for the few creases you decide to keep.
- A kneaded eraser. It lifts construction lines without smudging, and you can pinch it into a fine point.
- Smooth sketch paper. Heavier paper takes erasing better and lets the pencil glide instead of catching.
- A ruler edge. Not for drawing straight lines, but for measuring one landmark against another.
- Your own non-drawing hand. It is free, portable, and always available as a model.
That last item matters most. Your left hand can hold a pose while your right hand draws, and it never tires of sitting still.
Think in Three Shapes
This is the heart of the whole method. Before you draw a single finger, you build the hand from three simple forms.
The palm becomes a flattened box or slab. The fingers become segmented tubes. The thumb becomes a wedge that sits low on the side.
None of these shapes looks like a hand yet. That is completely fine, and it is exactly the point.
You are building a small piece of architecture. Details come later, after the frame stands up on its own.
The Palm Box
Picture a thick slice of bread, only squarer. That is your palm box.
It has a top face, a bottom face, and two side walls. In a three-quarter view you see two of these surfaces at once.
Draw it as a box, not an oval. An oval has no corners, and corners are what tell you which way the hand is turning.
The palm box also tapers. It is widest across the knuckles and slightly narrower at the wrist, which gives the hand its wedge feel.
Hold your own hand up and compare the thickness. The palm is much thicker front to back than most beginners assume.
Finger Tubes
Each finger is a tube bent in two or three places. Think of a short length of drinking straw with soft hinges along it.
Draw the whole tube first, then mark where the joints fall. Do not draw the outline of each segment separately at this stage.
The segments grow shorter toward the tip. The first bone from the knuckle is the longest, and the last one is the shortest.
Watch the curve at rest. Relaxed fingers bend gently inward, and they never sit perfectly straight and rigid.
The Thumb Wedge
The thumb is the shape that trips people up most, so give it its own form.
It is a wedge, thick where it meets the palm and narrowing toward the tip. It has two segments, not three.
It also points in a different direction from the fingers, roughly forty-five degrees away from the palm.
The thumb base sits low on the palm, near the wrist. Place it too high and the hand looks like a mitten with a strange bump.
The Mitten Approach vs. Boxing
Two beginner strategies are worth knowing, and they work best together.
The mitten approach means you draw the whole hand as one soft shape first, like an oven mitt. It captures the big gesture fast.
Boxing means you place the palm as a box with corners, then hinge the finger tubes onto it.
Start with the mitten to feel the pose, then box it in for structure. The mitten gives you movement, and the box gives you proportion.
Whatever you do, resist finger detail until the palm and wrist feel solid. This one rule saves hours of fussing.
Proportion Landmarks to Memorize
Proportion is just a handful of checkpoints you can measure against, and there are only five that really matter.
- The knuckle line is an arc. It curves like a shallow smile, never a straight ruler line, because the palm is curved.
- The middle finger is longest. Index, ring, and pinky follow in a gentle slope down on either side of it.
- The thumb base sits low. Its joint lands near the wrist end of the palm, not up at the knuckles.
- The wrist is a narrower box. It is slimmer than the palm and slightly thicker from front to back.
- A hand is about the length of the face. From chin to hairline roughly matches wrist to fingertip.
You can check that last one on yourself right now. Rest your palm against your chin and see where your fingertips land.
That quick measurement will train your eye faster than any diagram, because it uses your own body as the ruler.
The Step-by-Step Build
Here is the full sequence I follow. Work loosely with your 2B and keep your lines light and searching.
- Block the palm box in perspective. Draw a flattened box, angling the top and bottom edges to show which way the hand turns. Keep the lines light.
- Add the wrist box. Attach a narrower box below the palm, offset slightly toward the pinky side. This sets the tilt of the whole hand.
- Place the thumb wedge. Wedge it onto the low side of the palm, angled away from the fingers. Check that its base sits near the wrist.
- Lay in the knuckle arc. Draw a curved line across the top of the palm box. Mark four evenly spaced points for where the fingers attach.
- Draw the fingers as tubes. From each point, run a two- or three-segment tube down toward the pose you want. Keep them loose and even.
- Refine the contours. Switch to your HB and trace the final outline over the construction. Press lightly and let the shapes guide your hand.
- Add only the creases that matter. Draw the knuckle dimples, the thumb crease, and a few palm lines. Skip everything else.
That last step is where beginners overwork a drawing. A hand with five well-placed creases reads better than one covered in faint scratches.
Foreshortening and Simple Poses
Foreshortening sounds advanced, but the fix is practical. When a form points at you, you shorten it and stack the segments.
A finger aimed toward the viewer becomes a row of small curved bands, not a long tube. Draw each band as a shallow arc.
Then pick one pose and repeat it until it feels familiar. Changing poses every drawing keeps you at beginner level forever.
A Relaxed Three-Quarter View
Turn your hand slightly away and let the fingers curl a little. This is the friendliest pose for a first study.
You see the top of the palm box and one side wall, and the fingers fan out with visible gaps between them.
The thumb points toward you, so foreshorten it. Keep it shorter than you think it should be.
A Hand Holding a Pencil
Wrap your pinky and ring finger loosely around the pencil for balance. The index and thumb do the actual holding.
Block the pencil as a thin box first, then build the hand around it. That way the grip looks natural and the object stays straight.
Watch the negative space between thumb and pencil. That little triangle of air is a reliable proportion check.
A Hand Resting Flat
Lay your hand palm down and notice the tunnel your palm makes. The knuckles touch the table while the middle lifts slightly.
Draw that arch. A truly flat hand looks dead, because real hands are never completely flat.
The fingers spread in a fan from the knuckle arc, and the middle finger reaches furthest of all.
Using a Photo Reference or Your Own Hand
Your own hand is the best reference, because you can turn it until the shape finally makes sense.
Light it from one side with a lamp or a window. A single clear light source shows you form without confusing double shadows.
If you photograph your hand, take the picture from the same angle you plan to draw. Hold the phone at your own eye level, not above.
On the photo, trace your landmark checks with a finger. Find the knuckle arc, the wrist line, and the thumb base.
If something still looks off, use the mirror trick. Flip your drawing or hold it up to a mirror and the error usually jumps out.
Mirrors work because your eye gets used to your own mistakes. Reversing the image breaks that familiarity instantly.
Gesture First
Before any box or landmark, spend thirty seconds on a loose gesture sketch with your 4B pencil.
Scrawl the whole hand in a few sweeping lines. Capture how it moves and leans, not how it measures.
This is the same principle behind our gesture and proportion guide: block the pose before the parts.
A hand built straight from boxes with no gesture underneath tends to look stiff and frozen, like a wooden mannequin.
The gesture sketch gives your structure a direction to follow. Then you box it in, and the result still feels alive.
Keep these gesture lines light. They are meant to be drawn over and mostly erased, not admired.
Common Mistakes to Watch For
Nearly every beginner hand drawing fails in one of a few predictable ways. Knowing them in advance saves whole evenings.
- All four fingers the same length. The middle finger is longest, and the pinky is much shorter than you expect.
- A straight knuckle line. Real knuckles sit on a curve, and a ruler-straight line flattens the whole palm.
- A thumb that starts too high. Move the base down toward the wrist and the hand instantly looks more natural.
- Ignoring palm width. Beginners draw palms too narrow, which makes the hand look like a claw.
- Detailing too early. Nails and creases added before structure just bury the flaws under clutter.
If your hand looks wrong, check this list in order. The problem is almost always one of these five, and each is easy to fix.
A Weekend Practice Plan
You do not need hours. You need repetition, and repetition is kindest in small doses.
Start with five-minute hand studies. Set a timer, draw one hand, and stop when it rings, finished or not.
Then fill a page with ten hands. Keep each one tiny and loose, and do not erase anything on that page.
Next, repeat the same pose five times. Same hand, same angle, five drawings. This is where real improvement quietly happens.
When a drawing looks wrong, resist the urge to start over. Instead, ask which landmark slipped and correct just that one.
Then turn the page and draw the next hand. Consistency beats intensity every single time.
Keep your practice pages in one cheap sketchbook. Flipping back through a month of hands is the best motivation there is.
Final Thoughts
That portrait with the hidden hands still hangs in my mother's hallway. I used to wince at it, and now I am fond of it.
It marks the exact place where I decided hands were too hard, right before I learned they were just a box with tubes.
Your first hand this weekend will not be your best one. Your tenth will be better, and your fiftieth will surprise you.
So draw the box. Add the wedge. Curve the knuckles and hang the fingers. Then do it all again tomorrow.
Your non-drawing hand is resting right there, patient and ready. Pick up the pencil and give it a try.