Introduction
The first time light and shadow really clicked for me, I was twenty-six and drawing a coffee mug at the kitchen table.
I had outlined it carefully. I had matched the curve of the handle and the ellipse of the rim. And it still looked like a flat sticker floating above the page.
Then my husband walked past, turned off the overhead light, and switched on the small lamp beside the sink. The mug changed completely.
It had a bright side, a dark side, and a soft grey place in between where the surface turned. I drew that instead of the outline, and for the first time the thing on my page had weight.
That is chiaroscuro, and it is the oldest trick in drawing. Shadow is not the absence of a drawing. Shadow is what gives the drawing its form.
You do not need talent for this. You need one lamp, one pencil, and the willingness to look longer than feels comfortable.
What Chiaroscuro Actually Means
Chiaroscuro is an Italian word, and it is almost embarrassingly literal. Chiaro means light. Scuro means dark.
Say it slowly: kee-ah-roh-SKOO-roh. Art historians use it for the deliberate arrangement of light and shadow inside a picture.
The term entered art vocabulary during the Renaissance, when painters began treating light as a subject rather than a necessity. A well-lit figure mattered as much as an accurate one.
Here is where beginners lose the thread. Ordinary shading is something you add at the end, to make a finished drawing look rounder.
Chiaroscuro is a decision you make at the start. You choose where the light comes from, and every value in the drawing follows from that choice.
Shading fills in a shape. Chiaroscuro builds a shape out of light and dark, the way a sculptor carves form out of stone.
Why Value Matters More Than Line
Most beginner drawings are maps of edges. You trace the outline of the apple, the rim of the cup, the boundary of the shadow.
A chiaroscuro drawing is a map of light instead. Edges matter far less than the question of how bright or dark each patch of surface is.
Line tells the viewer what a thing is. Value tells the viewer where it sits in space, how solid it feels, and which way it is turning.
This is why a loose, almost untidy drawing with accurate values reads as more convincing than a crisp outline with no light in it at all.
Value, not line, is what makes a flat page look like a room.
A Short History: From Leonardo to Rembrandt
The technique did not appear all at once. It developed over roughly two centuries, mostly at the easel rather than in a classroom.
Leonardo and Sfumato
Leonardo da Vinci pushed light and shadow into something softer than anyone had managed before. He called the result sfumato, from the Italian word for smoke.
Sfumato is the deliberate blurring of transitions, so a shadow slides into a highlight without a single hard line. Look closely at a Leonardo face and you struggle to find where one value ends.
He built it with dozens of translucent glazes, each one barely visible, layered until the surface seemed to breathe.
Caravaggio and Tenebrism
A century later, Caravaggio went the opposite direction. His tenebrism drops most of the canvas into near-black and then strikes one figure with hard, theatrical light.
It is dramatic, almost violent, and it changed painting permanently. Tenebrism is chiaroscuro turned up until the shadows swallow the room.
Rembrandt and the Etching Plate
Rembrandt took the idea onto the copper plate. His etchings prove that chiaroscuro does not need oil paint at all.
Using nothing but crosshatched lines and bare paper, he built candlelit interiors with a depth that still looks impossible in print.
From Oil Painting to Drawing
Academic studios later stripped the drama back and made light and shadow the first thing a student learned. Drawing a plaster cast under one lamp became the standard training.
That is the tradition you are stepping into, and it costs nothing but a lamp, a pencil, and paper.
The Five-Value Scale
Before you draw a single apple, learn to see five values. Almost every solid object under one light shows all five of them.
Highlight
The brightest spot on the object. It sits where the light hits closest to straight on, and it is usually smaller than you expect.
Halftone
The mid-grey area between highlight and shadow. It covers most of the lit surface and deepens gradually as the form curves away.
Core Shadow
The darkest band on the object itself. It falls just past the terminator line, the edge where lit surface becomes shadow.
Reflected Light
Light bouncing off the table, wall, or paper back into the shadow. It is dimmer than the halftone, but it keeps shadows from going flat black.
Cast Shadow
The shadow the object throws onto the surface beneath it. It is usually darkest right where the object touches down.
A Five-Minute Exercise
Put an egg or a mug on the table tonight and set one lamp to the side. Keep the room light off.
Now find each value with your finger before you touch a pencil. Point to the highlight, then the halftone, then the core shadow.
Look for the thin bright strip of reflected light inside the shadow, and the separate shape of the cast shadow on the table.
Do that with five different objects and your eye starts doing it automatically. That is the whole training.
Materials for Your First Chiaroscuro Study
You can start this tonight with what is already in a kitchen drawer. A pencil is enough to carry the entire lesson.
- Graphite pencils in 2H, HB, 2B, and 6B. The 2H keeps highlights and light halftones clean. HB is your workhorse, 2B builds midtones, and 6B goes dark in the core shadow.
- Charcoal and charcoal pencils. Willow charcoal smudges into broad soft shadows quickly. A compressed charcoal pencil gives a matte black that graphite cannot quite reach.
- Toned paper in grey or tan. A mid-tone sheet hands you the halftone for free. You draw darks with charcoal, lights with white, and the paper does the middle.
- A kneaded eraser. Kneadable erasers lift value without scraping the page. Pinch one to a point and you can pull out a highlight or knock back an area that went too dark.
- A blending stump. Paper stumps smooth transitions without the oil and grime of a fingertip. Fingers leave skin oil that seals the paper and repels later layers.
- A sheet of white paper. Hold it beside your drawing to compare values. If your highlight is not brighter than the white sheet, the drawing is flat.
That is the whole kit. Add a white charcoal or pastel pencil if you work on toned paper, and nothing else.
Setting Up a Single Light Source
Two lights cancel each other out. This is the most common reason a still-life drawing ends up muddled and uniformly grey.
Switch off the ceiling fixture. One small lamp on one side of the object will do more for your drawing than any new pencil.
Place the lamp slightly above the object and about forty-five degrees to one side. The height matters, because it pulls the cast shadow out toward the viewer.
Move the object, not the lamp, when you want a different shadow shape. Keeping the light still teaches you to see how the same form changes as it turns.
Darken the rest of the room as much as you reasonably can. A dim surround also makes it far easier to judge your own values.
Take one photograph of the setup before you begin drawing, framed the way you intend to draw it. Photograph the object and your thumbnails in the same frame if you can.
If you only have window light, work at the same hour each day and sit so the window is on one side of you, never behind the object. North light is steady and cool; a south window at noon is harsh and changes every ten minutes.
The Sphere Study: Your First Chiaroscuro Drawing
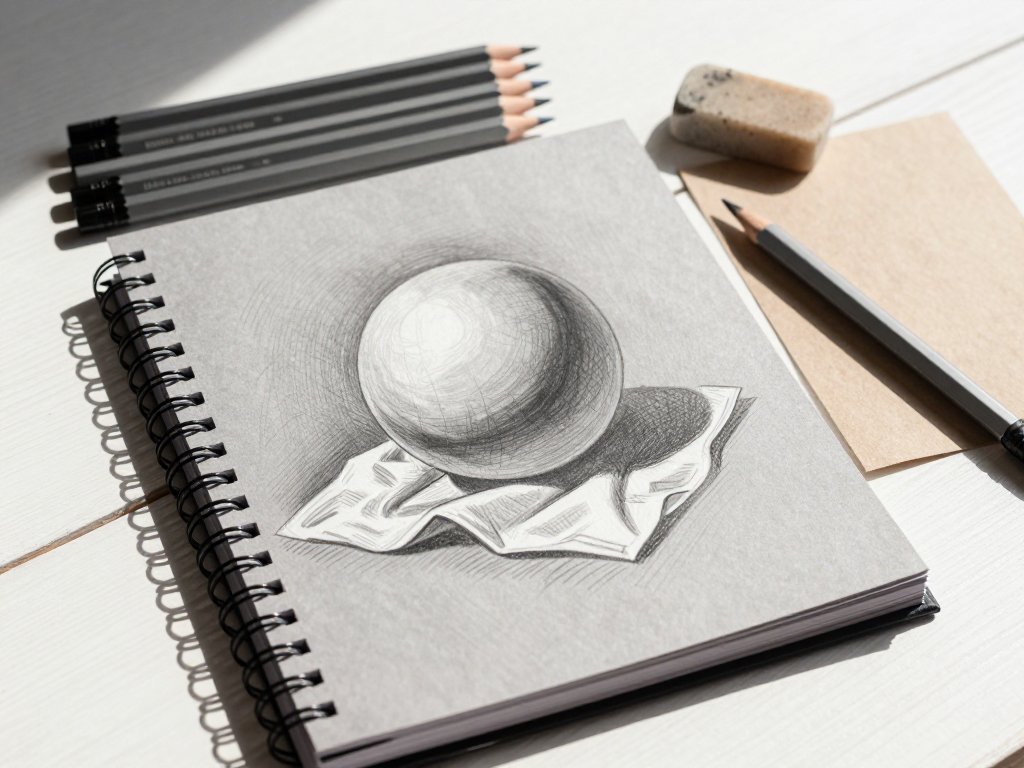
A sphere is the honest teacher. It has no corners to hide behind, and all five values are visible on it at once.
Set a ball on white paper under your single lamp and work through these steps.
- Draw a circle lightly with your HB pencil. Keep the line thin, because you will erase most of it later.
- Mark where the light is coming from with a small arrow in the corner of the page. This is your reference, not decoration.
- Block in the shadow side as one flat shape in a light 2B tone. Do not blend yet.
- Locate the terminator line, the edge where the lit surface meets the shadow, and soften it just slightly.
- Darken the core shadow just inside the terminator line with your 2B, leaving the very edge alone.
- Lay in the halftone across the lit side, keeping the highlight area as clean paper for now.
- Add the cast shadow on the table, darkest where the sphere touches down and lighter as it stretches away.
- Lift reflected light inside the shadow with a kneaded eraser, just a thin strip near the bottom edge.
- Blend the halftone with a stump, working in one direction along the curve of the sphere.
- Sharpen the highlight only after everything else is finished. The brightest paper on the page should be there.
Step eight is the one everyone skips. Without reflected light the shadow side goes dead black and the sphere looks like a hole cut in the page.
Do this study five times on five sheets. The fifth is where it starts to feel easy.
A Second Study: Draped Fabric or a Simple Still Life
Once the sphere makes sense, stretch the same five values across a more complicated form. A draped white cloth is the classic next step.
Fabric folds are only cylinders and spheres stitched together. Each fold has a lit side, a core shadow, and a strip of reflected light in its deepest trough.
The same logic serves you later when you draw clothed figures, which is why the old studio sequence ran from cast, to cloth, to Figure Drawing Basics: Gesture and Proportion.
Here is the cloth study, step by step.
- Hang a white tea towel over a chair back and set your lamp to one side, as before.
- Draw the overall silhouette of the cloth in a light HB line and ignore the folds at first.
- Divide that silhouette into light and shadow with a single flat 2B tone. Commit to the split rather than hedging.
- Find the deepest trough of each fold and press your 6B there. Those dark anchors hold the whole drawing together.
- Work the halftones across the lit planes of each fold, turning them gradually as the fabric curves.
- Check every trough for reflected light before you blend. Fabric catches a surprising amount of bounce from neighbouring folds.
- Lay in the cast shadow under the chair with a soft, wide tone that fades outward at the edges.
- Lift a small highlight along the top ridge of each lit fold with a kneaded eraser.
- Blend only the halftones, and leave the deepest darks untouched so they stay crisp.
If fabric feels like too much, draw an apple or a mug instead and follow the same nine steps. An apple's dimple holds a core shadow, the bright shoulder is a highlight, and the shape on the saucer is cast.
Choose one object and give it forty minutes. Rushing this stage is what keeps drawings flat.
Edge Control: Lost and Found Edges
Values alone will not finish a drawing. How sharply one value meets the next does the rest of the work.
A found edge is a crisp boundary, where a dark value stops hard against a light one. It grabs the eye and holds it.
A lost edge is a gradual transition, where one value melts into the next with no visible seam. It lets the eye travel on without stopping.
You cannot use both everywhere. Save your hardest, highest-contrast found edges for the focal point, the single place you want the viewer to look first.
Everything away from that point can soften. This is how Rembrandt pulls your eye to a face in the middle of a very dark room.
Practise it deliberately. Draw one crumpled paper bag and make exactly one edge crisp while the rest blur away.
Common Beginner Mistakes
Shading With an Outline
The most common habit is drawing a dark outline and then filling it in. Chiaroscuro has no outline. The edge of the form is simply where the value changes.
Making Everything the Same Grey
If every shadow on the page is the same darkness, the drawing reads as a flat silhouette. Halftone, core shadow, and cast shadow each need their own strength.
Ignoring Reflected Light
Shadows are never pure black. A thin bounce of light inside the shadow is what makes the shadow side feel solid rather than empty.
Over-Blending Until It Looks Like Plastic
Blending everything with a stump destroys the pencil texture and the tooth of the paper. Blend the transitions, then leave the darks and the highlight alone.
Using Too Many Pencils at Once
Reaching for four pencils in one shadow turns it to mud. Use two, get the value right, and add a third only if the drawing truly needs it.
A Simple Practice Routine
Skill here comes from repetition, not from long sittings. Twenty focused minutes a day will outrun a three-hour weekend session.
Start with ten-minute thumbnail studies. Draw a small box roughly two inches wide and fill it with the five values of whatever is on your desk.
Choose one object a day and draw it under your single lamp. A mug, a shoe, a garlic bulb, a folded sock. Keep the same lamp position for a week.
Keep a value sketchbook where you draw only light and shadow, with no outlines and no erasing. Date each page so you can see the change a month later.
Spend the first minute of every study simply looking. The looking is the practice; the pencil is only the record.
What Shadow Teaches You About Seeing
That mug still sits in my old sketchbook, badly drawn and completely honest. It was the first object I ever saw as light instead of as an outline.
Chiaroscuro is not really a drawing technique, or not only one. It is a habit of noticing where light falls and what it leaves dark.
You will start seeing it in shop windows, in your child's face at the dinner table, in the curve of a curtain at dusk. That is the real reward.
So put a mug under a lamp tonight. Draw the shadow before you draw the mug, and see what your hand already knows.