Introduction
Can you draw a face that looks happy, sleepy, or a little bit mischievous, without any art training?
Yes, and it is easier than you think. Cartoon faces are built from simple shapes, not perfect lines.
Once you know where the eyes sit, how the mouth curves, and where the eyebrows rest, emotion almost draws itself.
In this guide you will learn a calm, repeatable method for cartoon drawing: faces and expressions that actually feel alive.
We will cover the basic head shape, facial guidelines, eyes with highlights, tiny noses and expressive mouths, and the brow trick that changes everything.
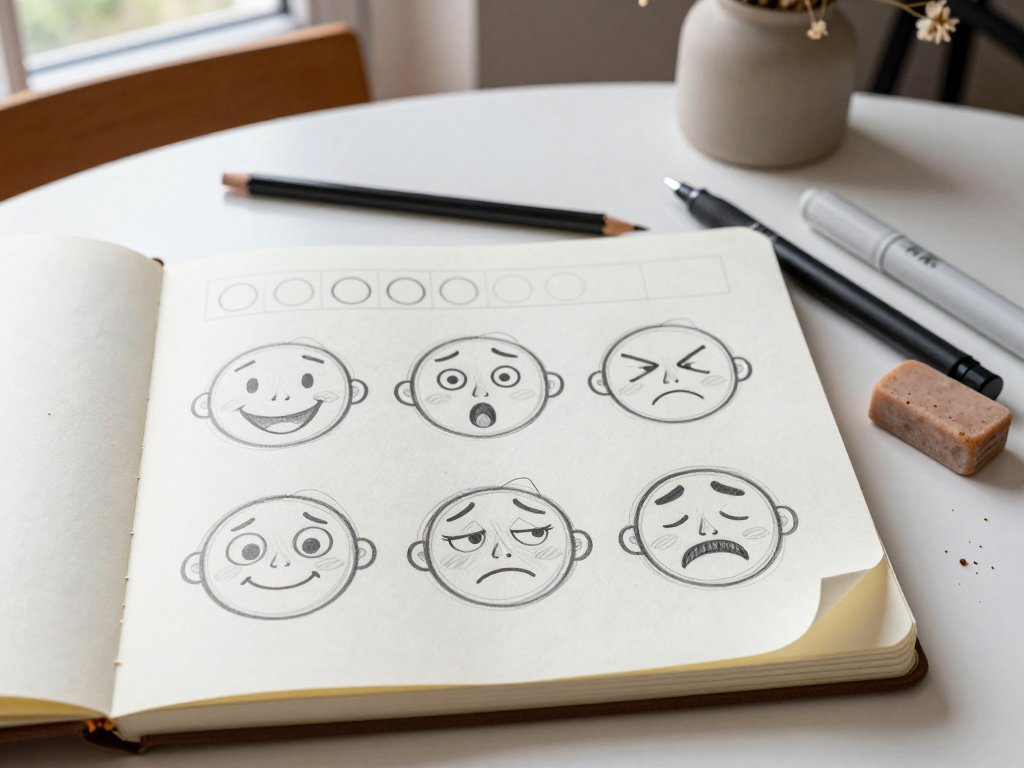
Then we will walk through six core expressions: happy, surprised, angry, sad, sleepy, and mischievous.
You will finish with a short daily practice routine, a list of mistakes to skip, and a few ideas for drawing at the kitchen table with your kids.
Nothing here needs talent. It needs a pencil, paper, and ten quiet minutes.
What You Need: A Simple Supplies List
You do not need a studio. A short list of supplies is enough to draw hundreds of cartoon faces.
Everything below fits in a pencil case, so you can draw while the pasta boils.
- A pencil (2B). Soft enough for light construction lines, dark enough for finished details.
- A fine-liner or black pen. For inking your best lines once the pencil sketch feels right.
- Smooth drawing paper or a sketchbook. Smooth paper keeps small features like pupils crisp and clean.
- A kneaded eraser. It lifts light pencil without smearing or tearing the page.
- A light grey marker (optional). One soft grey adds gentle shading under the chin, nose, and hair.
Keep the eraser handy, but use it less than you expect. Beginners erase far too much.
It is usually faster to draw a lighter guideline than to scrub one out.
The Basic Head Shape: Circle Plus a Tapered Jaw
Every cartoon head starts with two shapes: a circle for the cranium and a tapered shape for the jaw and chin.
Draw the circle first. Add a rounded wedge below it that narrows toward the chin.
The join between the two is the cheek line, and it decides a lot about personality.
A wide, short jaw reads young and friendly. A long, narrow jaw reads elegant or more grown up.
A pointed chin reads sly or clever. A round, soft chin reads gentle and sweet.
Why build from shapes instead of outlines? Because an outline is a guess, and a shape is a structure.
When you draw an outline first, every mistake is baked into the silhouette and hard to fix.
When you build from shapes, you can slide the jaw left, widen the cranium, or shrink the whole head before committing to anything.
Think of it as scaffolding rather than drawing. You set up the building, then decorate it.
Keep those construction lines light — barely visible. They are notes to yourself, not the final art.
Many cartoonists draw the cranium as a circle that is slightly flattened on top.
That small flattening makes hair sit better later, and it stops the head looking like a balloon.
If you would like a more realistic starting point for the same ideas, this guide to portrait drawing face proportions walks through a full adult head step by step.
Facial Guidelines: Center Line and Eye Line
Two light guidelines turn a blank head into a face that sits correctly.
The vertical center line runs from the top of the cranium down through the chin. It marks where the nose, mouth, and hair parting belong.
The eye line is a gentle horizontal curve across the face. In cartoons it usually sits low, around the middle or below.
That low placement is the single biggest reason cartoon characters look young and appealing.
Adult humans have eyes close to the middle of the head. Toddlers have eyes much lower, with a large forehead above.
So when you move the eye line down, your character becomes younger, rounder, and cuter.
Move it up and the character grows up. A high eye line with a longer chin reads as a parent, a teacher, or a villain.
Try this experiment. Draw one head shape, then draw it four more times with the eye line at different heights.
Same shapes, same hair, five different ages. That is a fast lesson in character design.
Because the face is round, your eye line should be a curve, not a ruler-straight line. It wraps around the head.
Add a small vertical mark between the eyes for the nose bridge if you want the features to sit more precisely.
Eyes: Ovals, Pupils, and One Small Highlight
Cartoon eyes are simple, but they carry most of the emotion, so give them a moment of care.
Draw each eye as an oval or a rounded almond, sitting on your eye line.
Add a thick top lash line. That heavier curve above the eye instantly reads as eyelashes and depth.
Inside, draw the pupil as a filled circle or a small dark oval.
Then leave one tiny white dot inside the pupil or at its edge.
That highlight is the trick that makes eyes look alive instead of flat and glassy.
One dot per eye is usually enough. Two or three can look wet or strange.
Eye size controls style more than any other feature:
- Large eyes read cute, young, and sweet — think children's picture books.
- Medium eyes read friendly and neutral, ideal for everyday family characters.
- Small eyes read adult, sharp, or comedic — perfect for grumpy neighbours and clever villains.
A useful shortcut: the space between the two eyes is roughly one eye wide.
Even in loose cartoons, that rule stops faces looking crowded or oddly spaced.
Let the eye shape change with the emotion, too. A happy eye squints. A surprised eye opens wide into a circle.
Nose and Mouth: Tiny Shapes, Big Feelings
Cartoon noses are almost nothing, and that is the point.
A small curve, a dot, or a soft comma shape says "nose" without competing with the eyes.
Place it on the vertical center line, between the eye line and the chin — usually closer to the eyes.
For a younger character, a tiny dot works. For an older one, a longer curve adds character.
The mouth changes emotion faster than any other feature, and it takes a single line.
A shallow upward curve reads as a small smile. A deeper one reads as delight.
Flip it downward and the same character looks sad.
A flat line reads neutral, bored, or unimpressed. An open oval reads surprise or singing.
A wavy line is instant worry. A small "o" reads as a gasp.
Notice how much work one curve does. The eyes set the mood, and the mouth confirms it.
You can also shift the mouth sideways for a smirk, or push it toward one cheek for a lopsided grin.
Keep the mouth on or near the center line unless you deliberately want the face turned to one side.
The corners of the mouth carry most of the emotion, so draw the line first and set the corners last.
Eyebrows and the Brow-to-Eye Gap
If you learn only one thing from this guide, learn this: the eyebrows and the space above the eyes drive expression.
Most beginners draw eyebrows sitting right on the eyes. Lift them and the face becomes instantly more expressive.
Lowered brows, close to the eyes, read angry, determined, or annoyed.
Raised brows, with a generous gap, read surprised, worried, or excited.
One brow up and one brow down reads skeptical, confused, or playful.
That asymmetry is the fastest way to make a face feel like a person with thoughts.
Brows can also tilt. Inner ends angled down toward the nose read angry or focused.
Inner ends angled up toward the forehead read sad or concerned.
Both ends level and gently arched read calm and friendly.
No other feature is this economical. Two short lines, endless emotion.
Draw the brows last, after the eyes, so you can see the gap you are creating.
Six Core Expressions, One Character
Here is the exercise that teaches expression fastest: one character, six emotions.
Use the same head, the same hair, and the same eye shape. Change only the eyes, brows, and mouth.
Happy
Brows level and slightly raised. Eyes curved into soft arcs, or full ovals with bright highlights.
The mouth is a wide upward curve with visible corners, often slightly open.
The cheeks lift, so the lower eyelids push up a little. That is what makes a smile look genuine.
Avoid a perfectly symmetrical grin. Shift it a hair to one side for warmth.
Surprised
Brows jump high with a big gap above the eyes. Eyes open wide into near-circles.
The pupils sit small, which makes the eyes look startled.
The mouth becomes an open oval, or a straight line with an open shape beneath it.
Everything goes up and outward. Surprise is the tallest, widest version of a face.
Angry
Brows drop low and tilt inward, pressing down toward the nose. The brow-to-eye gap shrinks to almost nothing.
Eyes narrow into slits or half-covered shapes, and the top lash line gets heavy and straight.
The mouth curves down hard, or flattens into a tight line.
Add a small crease between the brows for extra intensity, and tip the chin slightly forward.
Sad
Inner brow ends lift while the outer ends droop — the classic worried tilt.
Eyes look soft and slightly downcast, with a heavy upper lid and highlights sitting low.
The mouth is a small downward arc, with the corners pulled down.
Try a little asymmetry: let one side of the mouth fall further than the other.
Sleepy
Eyelids cover the top half of the eyes, so only a slice of pupil shows.
The lash line becomes a heavy, flat curve. Brows sit relaxed and low, but not angry.
The mouth is a small open oval, as if mid-yawn, or a soft wavy line.
Often the whole head tilts a little. Sleepiness is about weight, so let everything sag.
Mischievous
One brow lifts while the other stays level. That single asymmetric brow does most of the work.
Eyes narrow slightly and slide to one side, looking out of the corner.
The mouth curls up on one side into a small smirk, with one corner tucked higher.
Add a tiny dimple or a raised cheek for charm. Keep it playful, never mean.
Lay the six drawings side by side when you finish.
Notice how little actually changed — a brow here, a mouth corner there. The head stayed exactly the same.
Ears, Hair, and Silhouette
Hair is what makes a character recognisable at a glance. Faces blur together; silhouettes do not.
Before adding details, squint at your drawing. If you cannot tell who it is from the outline alone, the hair needs more shape.
Build hair from a few simple blocks instead of individual strands:
- A cap or helmet shape for short, neat hair that hugs the cranium.
- A larger mass with one swoop for long hair, giving a clear parting.
- Two side shapes for buns, pigtails, or braids — these read instantly as "child".
- A few loose strands at the edges to soften the outline and add movement.
Ears are small half-circles or soft ovals. Place them on the eye line, and let hair cover them if you prefer.
Cartoon ears can also be pointed, exaggerated, or almost hidden — whatever serves the character.
Accessories do more silhouette work than any other detail: a bow, a bun, glasses, a cap, or big earrings.
Give each character one signature shape they always wear. Readers will recognise them instantly next time.
Body-to-Head Ratio: Cute or Grown Up
How large you draw the head compared to the body instantly signals age and personality.
A big head on a small body reads as cute, childlike, and comedic.
A smaller head on a longer body reads older, calmer, or smarter-coded.
Picture-book toddlers are often only four heads tall overall, with a head that is huge relative to the body.
An adult cartoon character might be six or seven heads tall, with a narrower head.
Changing the ratio is the fastest way to turn a child into a parent — or into a teenager.
Try drawing the same face twice: once with a big round head and stubby body, once with a smaller head and long limbs.
Notice how your mind invents a different voice for each one.
A Ten-Minute Practice Routine
Short daily sessions beat long, rare ones. Here is a routine that fits a busy household.
- Two minutes of head shapes. Fill a quarter page with circles and tapered jaws. No features yet — just loosen your hand.
- Two minutes of guidelines. Add a center line and an eye line to each head, at different heights. Let the ages change.
- Six minutes of expressions. Pick one character and draw all six emotions from this guide on a single page.
That is it. Ten minutes, one page, most days.
After a week, try the "same face, different emotion" challenge.
Draw one character sheet — head, hair, eyes — then copy it four times and give each copy a different mood.
Keep them all on one page so you can see the pattern.
Another variation: draw one expression, then a second version that is only slightly stronger.
The difference between "a bit sad" and "very sad" is often two degrees of brow tilt. Learning that range is real skill.
Keep your pages in order. In a month, flip back to week one. The improvement will be obvious, and quietly encouraging.
Common Beginner Mistakes to Skip
These are the habits that slow beginners down. Each one has a quick fix.
- Drawing outlines instead of construction shapes. Light shapes first, then refine. The shapes are temporary scaffolding.
- Two identical flat eyes. Vary the lid, the highlight position, and the tilt. Real eyes are never perfectly matched.
- Ignoring the brow gap. Brows resting on the eyes kill expression. Lift them and let the gap work.
- Hard, symmetrical mouths. A mirror-image mouth looks stiff. Nudge one corner and it comes alive.
- Erasing instead of drawing lighter. Add a lighter guideline rather than scrubbing. Less damage, faster progress.
- Placing the eye line too high. A high eye line makes characters look old before their time.
- Over-detailing. Ten clean shapes beat forty fussy lines. Simplify and let the viewer fill in the rest.
If a face looks wrong and you cannot say why, check the eye line first, then the brow gap. Those two fix most problems.
Drawing Faces Together at the Kitchen Table
Cartoon faces are one of the best crafts to share with children, because everyone can play straight away.
Set out two sheets of paper and draw the same head shape side by side.
Then take turns calling out an emotion: grumpy, sleepy, excited, sneaky. Both of you draw it at the same time.
No judging and no corrections — just laughter at whatever appears.
A few things that help:
- Keep it short. Ten minutes is plenty for young children.
- Celebrate brave lines. Praise their bold mouths and wild hair, not accuracy.
- Let them invent the character. A child who designs their own hero will draw them again and again.
- Make a family sheet. Everyone draws the same character, then compare versions at dinner.
You do not need an art room. A cleared table, a pencil each, and a few minutes together is enough.
Conclusion
Cartoon drawing comes down to small moves: a circle and a jaw, an eye line set slightly low, a lifted brow, a mouth corner that curls just a little.
Learn those few moves and you can draw almost any emotion you can name.
Start with the shapes. Add the guidelines. Keep the eyes simple and give the brows generous room.
Then practise one character, six expressions, ten minutes at a time.
Be patient with your early pages. Every wobbly face is practice, and practice is the whole secret.
So pick up your 2B, open a fresh page, and draw a happy face. Then draw the same face tired, and see what changes.
Happy sketching!