Introduction
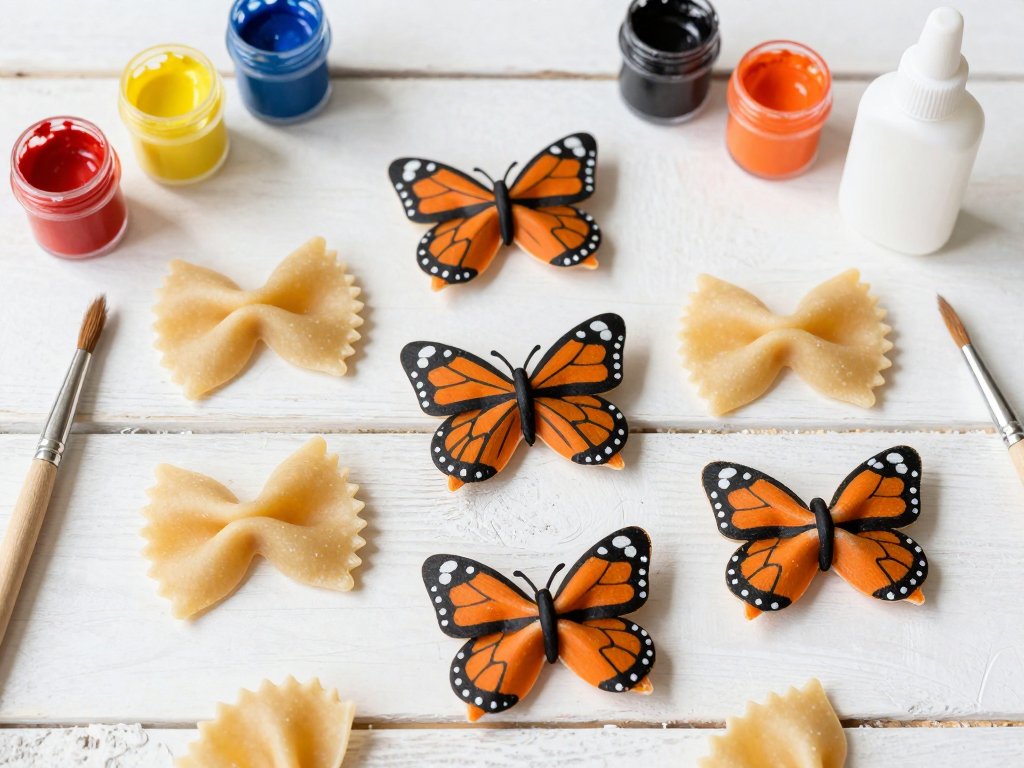
Have you ever looked at a piece of pasta and seen more than just dinner? What if those humble bow‑ties could become wings—vibrant, delicate, and fluttering with color? In this project, we’ll transform simple bow‑tie pasta into painted monarch butterflies that look almost real.
This craft is perfect for anyone who wants to dip a brush into something joyful without needing years of experience. It’s beginner‑friendly, budget‑conscious, and wonderfully quick—you can finish a whole flock in an afternoon. Whether you’re crafting with kids, looking for a meditative solo activity, or simply want to add a touch of handmade magic to your home, these pasta butterflies deliver.
We’ll walk through every step, from choosing the right paints to adding those signature monarch details. By the end, you’ll have a collection of butterflies that are surprisingly lifelike—and a renewed sense of what’s possible with everyday materials.
The Inspiration Behind the Project
This idea was born from a simple observation: bow‑tie pasta, with its pinched center and flared ends, already resembles butterfly wings. The ridges and texture of pasta add a natural organic feel that smooth paper or clay can’t replicate. When painted, the ridges catch the light and create subtle shadows, making the butterflies appear more three‑dimensional.
Monarch butterflies were chosen not only for their iconic, easily recognizable patterns but also for their symbolic meaning—transformation, resilience, and beauty emerging from humble beginnings. What better metaphor for a craft that turns pantry staples into art?
You don’t need to be an artist to succeed here. The process is forgiving, and each butterfly will have its own unique character. That’s part of the charm.
What You’ll Need
Gathering your supplies is half the fun. Here’s everything you’ll want to have on hand before you start painting.
- Bow‑tie pasta (farfalle) – About 10–20 pieces, depending on how many butterflies you’d like to make. Look for pieces that are intact, without cracks or broken edges. Whole‑wheat or regular semolina pasta both work; the whole‑wheat variety has a slightly rougher texture that holds paint well.
- Acrylic paints – Orange, black, and white are the monarch’s signature colors. Choose artist‑quality acrylics for richer pigment, but craft‑store brands work perfectly well. If you’re painting with children, consider non‑toxic, washable acrylics.
- Paintbrushes – A small round brush (size 2 or 3) for details, a flat brush (½ inch) for base coats, and a tiny liner brush (size 0/1) for the finest lines. Synthetic brushes are fine; you don’t need expensive sable.
- Palette or plate – Any non‑porous surface for mixing paints. A white ceramic plate, a piece of wax paper, or a dedicated plastic palette all work.
- Water cup and paper towels – For rinsing brushes and blotting excess water. Keep two cups if you’re switching colors frequently.
- Clear glue or Mod Podge – To seal the painted surface and give it a slight sheen. Mod Podge Matte or Gloss are excellent choices; plain white school glue thinned with a little water also works.
- Optional: toothpicks, tweezers, and a foam block – For holding the pasta while you paint and drying without smudges. A foam block (like the kind used for floral arrangements) with toothpicks inserted makes a perfect drying rack.
That’s it! You likely have most of these items already. If you’re missing something, a quick trip to the dollar store or craft aisle will have you covered for under $10.
Choosing the Right Paints: A Quick Guide
Not all acrylics are created equal. For this project, you want paints that are opaque enough to cover the pasta in one or two coats, but fluid enough to flow into the ridges without clumping.
- Heavy‑body vs. fluid acrylics – Heavy‑body paints are thick and retain brush strokes; they’re great for impasto but can fill the pasta’s texture. Fluid acrylics are thinner and smoother, ideal for detailed work. A middle‑ground “soft‑body” acrylic is perfect.
- Brand recommendations – For beginners, Apple Barrel, Craft Smart, or FolkArt are affordable and widely available. If you want richer pigment, consider Liquitex Basics or DecoArt Americana.
- Mixing your orange – Monarch orange is a warm, slightly reddish orange. Start with a base of cadmium orange, then add a touch of crimson or scarlet to warm it, or a hint of yellow to brighten. Test on a scrap piece of paper until you’re happy.
- Opacity matters – Check the label: “opaque” pigments (like titanium white, carbon black, most cadmiums) will cover better than “transparent” ones. If your orange is too transparent, mix in a tiny bit of white to increase opacity.
Don’t stress about having the exact shades. Part of the fun is seeing how your personal color choices affect the final butterflies.
Step‑by‑Step: From Pasta to Butterfly
Follow these steps slowly—there’s no rush. Enjoy the process of watching plain pasta become something magical.
Step 1: Prepare Your Workspace
Lay down newspaper or a craft mat to protect your table. Arrange your paints, brushes, water, and paper towels within easy reach. Place the bow‑tie pasta pieces on a clean, dry surface. If you’re using a foam block, insert toothpicks into it to act as drying stands.
Tip: Good lighting is crucial. Set up near a window or use a bright lamp so you can see the subtle textures of the pasta.
Step 2: Paint the Base Coat
Using your flat brush, apply a thin, even layer of orange acrylic paint to one side of a bow‑tie piece. Cover the entire surface, including the edges. Let it dry completely—this usually takes about 10–15 minutes. Flip the piece over and paint the other side the same way.
Why thin layers? Thick paint can fill the pasta’s ridges and make it look lumpy. Two thin coats are better than one thick one.
If you notice the paint pooling in the center pinch, use the tip of your brush to wick away the excess. Aim for a smooth, even coverage that still lets the pasta’s texture show through.
Step 3: Add the Black Veins
Once the orange is fully dry, switch to your small round brush and black paint. Look at a photo of a real monarch butterfly’s wing—notice the delicate black veins that branch out from the body. Gently paint these lines onto your pasta, following the natural curve of the “wings.”
Start with the main vein that runs down the center of the bow‑tie (where the pasta pinches). Then add shorter veins that curve outward toward the edges. Don’t worry about perfection; monarch veins are organic and slightly irregular.
If you make a mistake, simply wipe the paint off with a damp paper towel and try again. The dried orange base will stay put.
Pro tip: Thin your black paint slightly with water (about one part water to ten parts paint) to make it flow more easily. This helps you create fine, consistent lines.
Step 4: Paint the White Spots
Monarch wings have distinctive white spots along the edges. With your tiny liner brush and white paint, dot these spots onto the black veins. They’re usually small and round, clustering near the wingtips.
You can also add a few white speckles in the orange areas for extra realism. Let the white dots dry for a few minutes.
If your white paint is too thick and doesn’t dot nicely, dilute it with a drop of water until it flows but still holds its shape.
Step 5: Seal with Glue
Mix a small amount of clear glue with a drop of water to thin it slightly. Using a clean brush, apply a thin, even coat over the entire painted surface. This will protect the paint from chipping and give the butterfly a subtle gloss that mimics the sheen of real wings.
Place the finished butterfly on a toothpick stand or a piece of parchment paper to dry completely—about 30 minutes.
Alternative sealers: Mod Podge (Matte or Gloss), clear nail polish, or a spray acrylic sealer. Each gives a different finish; experiment to see which you prefer.
Step 6: Repeat and Experiment
Paint as many butterflies as you like! Try varying the orange shades (add a little yellow for highlights, or a touch of red for depth). You can even create “blue morph” versions with blues and purples, or make fantasy butterflies in any color you dream up.
Once you’ve mastered the classic monarch pattern, challenge yourself with other species’ markings—swallowtails, painted ladies, or even imaginary butterflies with metallic accents.
Brush Techniques for Perfect Details
Good brush control makes a huge difference in the final look. Here are a few techniques to practice.
- Loading the brush – Dip just the tip into the paint, then gently roll it against the side of the palette to shape the point. Too much paint will blob; too little will dry too quickly.
- Steadying your hand – Rest your painting hand on the table or use your other hand as a brace. For super‑fine lines, hold the brush closer to the bristles (like a pencil) for more control.
- Pulling vs. pushing – Pull the brush toward you for smooth, even strokes. Pushing can cause the bristles to splay and create uneven lines.
- Cleaning between colors – Rinse thoroughly in water, then blot on a paper towel until the water runs clear. Residual paint can muddy your next color.
If you’re new to detailed painting, practice on paper first. Draw a few bow‑tie shapes and try replicating the vein pattern until you feel confident.
Drying Times and Environmental Factors
Acrylic paint dries quickly, but humidity, temperature, and thickness affect the timeline.
- Low humidity / warm room – Paint may dry in 5–10 minutes per layer.
- High humidity / cool room – Allow 20–30 minutes per layer. You can speed things up with a fan on low speed, but avoid pointing it directly at the pieces (dust can stick).
- Testing dryness – Gently touch an inconspicuous edge. If it feels tacky, wait longer. If it’s smooth and no paint transfers, it’s ready.
- Stacking dried butterflies – Once fully sealed and dry, store them in a shallow box with tissue paper between layers to prevent scratching.
Patience is key—rushing leads to smudges and frustration.
Common Mistakes and How to Fix Them
Even experienced crafters run into hiccups. Here’s how to solve the most frequent issues.
- Paint cracking after drying – Usually caused by too thick a layer. Sand lightly with fine sandpaper (600 grit) to smooth, then repaint with thinner coats.
- Veins look too thick or blobby – Thin your paint slightly and use a lighter touch. You can also paint the veins with a fine‑tip permanent marker after the orange layer is dry.
- White spots won’t show up on orange – Let the orange layer dry completely, then apply two thin coats of white, allowing the first to dry in between.
- Glue drying cloudy – Too much glue or humidity can cause cloudiness. Apply thinner coats and work in a less humid environment. If it’s already cloudy, a thin layer of clear gloss varnish can sometimes restore transparency.
- Pasta breaking during handling – Handle dry pasta gently. If a piece cracks, you can glue it back together with a tiny dab of clear glue before painting.
Remember, imperfections add character. No two real butterflies are identical, either.
Involving Kids: Age‑Appropriate Tasks
This project is fantastic for family crafting. Adjust the tasks based on age and skill level.
- Ages 3–5 – Let them paint the orange base coat (with assistance). Use washable paints and cover everything—clothes, table, hands. Focus on the fun of color, not precision.
- Ages 6–9 – They can paint both sides, help mix colors, and maybe attempt simple vein patterns with a thicker brush. Supervision still recommended for clean‑up.
- Ages 10+ – Can handle all steps independently, including fine details. Encourage them to research real butterfly photos and try to match patterns.
Emphasize process over product. Praise effort and creativity, not just the final result.
Display Ideas for Your Pasta Butterflies
Once you have a collection, how do you show them off?
- Mobile – Attach clear thread to each butterfly and hang from a embroidery hoop or twig branch. Hang near a window where they can catch the light.
- Shadow box – Arrange butterflies on a fabric‑covered backing inside a deep frame. Add pressed flowers or leaves for a natural diorama.
- Greeting cards – Glue a butterfly to the front of a blank card for a unique, handmade note. Write “Just fluttering by to say hello!” inside.
- Magnets – Glue a small magnet to the back and stick to your fridge, filing cabinet, or magnetic board.
- Jewelry – Glue a pin back or earring post to create wearable art. Seal with extra layers of glue for durability.
Get creative with presentation—your butterflies deserve a beautiful stage.
Gift‑Giving Suggestions
Handmade pasta butterflies make heartfelt, personal gifts. Pair them with:
- A small note explaining the project and its symbolism.
- A packet of bow‑tie pasta and a set of acrylic paints so the recipient can make their own.
- A tiny vial of glue and a brush, tied with ribbon.
- A framed butterfly with an inspirational quote about transformation.
These gifts are especially meaningful for teachers, friends going through a transition, or anyone who appreciates handmade charm.
Sustainability and Clean‑Up
Crafting can be environmentally friendly with a few thoughtful choices.
- Use leftover pasta – If you have broken pieces or near‑expiry pasta, this is a perfect way to give them new life.
- Choose non‑toxic paints – Look for AP‑certified non‑toxic acrylics, especially if children are involved.
- Clean brushes properly – Rinse thoroughly with water immediately after painting. Left‑over paint can harden and ruin brushes. For stubborn paint, use a mild soap.
- Compost unpainted pasta – Plain, unpainted pasta is compostable. Painted pasta should go in the trash (paint can interfere with composting).
- Reuse containers – Save small jars or lids as paint palettes. Use old newspapers as drop cloths.
Small steps add up to a greener craft practice.
Share Your Creations
We’d love to see your painted pasta butterflies! Share them on social media with the hashtag #Pastabutterflies so we can find and celebrate your work. You can also tag us @arttools for a chance to be featured on our inspiration page.
Join our online community of crafters for more ideas, support, and friendly challenges. Sometimes the best part of a project is connecting with others who share your passion.
Tips for Success
Every craft has its little secrets. Here are a few we’ve learned along the way.
- Let each layer dry fully before moving to the next. Patience prevents smudging and muddy colors.
- Use a magnifying glass or reading glasses if you struggle with fine details. The small size of the pasta makes precision easier with a little magnification.
- If your paint feels too thick, add a drop of water and mix thoroughly on your palette. Thinned paint flows better and doesn’t obscure the pasta texture.
- For a more durable finish, consider spraying the finished butterflies with a clear acrylic sealer (in a well‑ventilated area). This adds extra protection if you plan to handle them often.
- Involve kids by assigning roles: younger children can paint the orange base coats, while older kids or adults tackle the vein details. It becomes a lovely collaborative activity.
Beyond Monarchs: Creative Variations
Once you’ve mastered the classic monarch, why stop there? Bow‑tie pasta is a blank canvas for countless winged wonders.
- Swallowtails – Use yellow and black with long, trailing “tails” painted on the outer edges.
- Luna moths – Pale green and creamy white with delicate eye‑spots.
- Blue morphos – Iridescent blue and black, with a hint of metallic paint for shimmer.
- Seasonal themes – Orange and black for Halloween, red and green for Christmas, pastels for spring.
- Abstract butterflies – Throw realism out the window and paint rainbow stripes, polka dots, or galaxy patterns.
Each variation teaches you something new about color mixing, brush control, and design. There’s no wrong way to paint a butterfly.
Conclusion: The Magic in the Everyday
What began as a simple bowl of pasta is now a flutter of color and creativity. These painted butterflies remind us that art doesn’t require expensive supplies or advanced skills—just a willingness to see potential where others might not.
Hang your butterflies from invisible thread to create a mobile, glue them to cards for handmade notes, or simply scatter them on a shelf as a cheerful accent. Wherever they land, they’ll bring a smile and a sense of accomplishment.
We’d love to see your creations! Share them with us on social media using the hashtag #Pastabutterflies—we’ll be looking for your winged masterpieces.
Happy crafting, and remember: the next time you’re stirring a pot of farfalle, keep a few pieces aside. You never know what might take flight.