Introduction
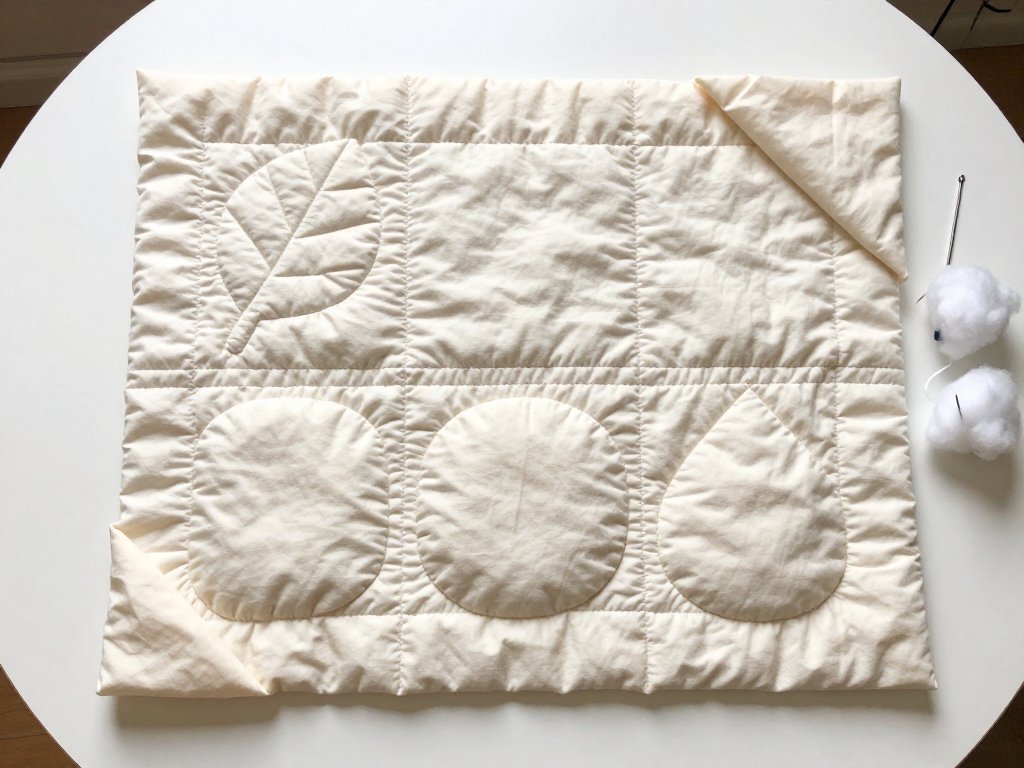
A trapunto cushion does something ordinary quilting cannot. Run your fingers across it and the surface lifts: a leaf, a circle, a teardrop, each one soft and rounded, sitting proud of a background that is quilted almost flat.
The name comes from the Italian trapungere, "to quilt". The technique is older than the word and simpler than it looks. You stitch closed shapes through two layers, then fill them from the back so the front rises.
None of it needs a machine, a frame, or a spare room. It needs shapes that will hold filling, a little patience, and the willingness to stop stuffing before you think you should.
I will give you the design rules first, because they decide whether the panel works at all. Then the supplies, the stitching, the stuffing and the finishing, with honest timings for each stage.
What Trapunto Is, and What It Is Not
Trapunto is stuffed quilting. Two layers of fabric, a top and a backing, are stitched together along the outline of a closed shape. That shape is then opened from the back and filled, so the front rises into relief.
That is the whole mechanism. There is no trick beyond it: a stitched pocket, a small opening, a pinch of filling at a time.
How it differs from flat quilting
In ordinary flat quilting, the stitches are the texture. The surface stays level and the pattern lives in the lines of thread and the shadows they throw. It is beautiful, and it is two-dimensional.
In trapunto, the stitching is only the edge of the shape. The texture is the shape itself, lifted above the cloth. Fold a trapunto panel and the leaf bends like a padded thing. Fold a flat quilted panel and it bends like fabric.
Where boutis fits
Boutis is the French cousin, from Provence. It also works on two layers and also fills from the back, but it packs narrow stitched channels with yarn or thick cotton cord rather than wadding. The result is a firm, rounded line instead of a soft dome.
If dense wholecloth patterns with every line standing up like piping appeal to you, boutis is the technique to learn. If you want soft shapes that catch the light, you want trapunto.
Two layers or three
You can add a thin layer of batting between top and backing. It gives the whole panel a slight loft and makes the background quilting look softer. It also makes the shapes less crisp, because the batting has already filled the space.
For a first panel I would skip the batting. Two layers give you the clearest before-and-after, and the relief reads best against a genuinely flat background.
The Design Rules That Decide Everything
Four rules govern whether a panel will stuff well. They matter more than the neatness of your stitching.
- Closed shapes only. Every shape must return to itself: a circle, a leaf, a teardrop, a simple heart, a four-petal flower. An open line has nowhere to hold filling.
- Nothing narrower than about half an inch across in the finished relief. Half an inch is roughly 1.3 cm, and it is a minimum, not a target.
- Leave a finger-width between shapes. About 2 cm of clear background stops neighbouring shapes from merging into one soft mass.
- Simple silhouettes beat fussy detail. A leaf with a clean outline reads. A leaf with a serrated edge and a stem notch will not.
Why a long thin shape stuffs badly
Filling moves by being pushed, and fabric resists being pushed. In a narrow channel, the walls grip the wadding within the first centimetre. It packs into a hard little knot at the mouth of the slit and refuses to travel.
Even if you force it along, there is no width for it to loft into. The shape rises as a wrinkle or a cord rather than a cushion, and the surface above it looks pinched. This is the single most common reason a beginner's panel disappoints.
If a design wants a thin line, do not stuff it. Either widen it to half an inch, or leave it flat and let the quilting stitch be the detail.
What You Need: The Full Supplies List
Here is exactly what a panel about 10 inches square requires. None of it is expensive, and most of it is already in a sewing basket.
- Top fabric: firmly woven cotton. Quilting cotton, poplin, or a smooth cotton-linen blend. A loose weave lets filling migrate between the threads and leaves a speckled surface.
- Backing: the same weight of cotton, cut 2 inches larger all round than the top. It must be strong, because it takes the slit and the ladder stitch.
- Filling: one of three. A thin cotton or wool batting, loose polyester fibrefill, or a smooth cotton yarn if you want corded lines. More on choosing below.
- A water-soluble marking pen. It draws the shapes and disappears at the first wash. Test it on a scrap first; some brands ghost on cream fabric.
- A tapestry needle. Blunt tip, large eye. It teases the wadding through the slit without catching the backing threads.
- A blunt tool. A chopstick, a wooden manicure stick, or the wrong end of a paintbrush. This is what opens the batting and pushes filling into corners.
- Small sharp scissors. Embroidery or appliqué scissors with a fine point, for a controlled slit and for trimming threads close.
- A hand-sewing needle. A sharp, in a size that suits your thread. This does the stitching and the ladder stitch at the end.
- Thread matched to the fabric. Cotton or a cotton-poly blend, one shade lighter than the top if you cannot match exactly. Darker thread shows every wobble.
Two things you do not need: a walking foot, and a hoop. Trapunto is worked flat on a table, in your hands, at whatever pace the day allows.
Choosing Your Filling
The filling decides the character of the relief. Match it to the effect you want before you cut anything.
Batting: the low, soft raise
A single thin layer of cotton or wool batting gives a gentle dome, maybe an eighth of an inch high. It looks like a quilt that has settled, and it is the most forgiving option for a first attempt.
Tear it into strips rather than cutting. Torn edges are feathered and blend into each other, so the surface stays smooth and you are less likely to see a ridge.
Loose polyester fibrefill: the high, puffy raise
Fibrefill gives a much higher dome, closer to a quarter inch, and it springs back after washing. It is the filling for a cushion you want people to touch.
It is also the least forgiving. A little goes a long way, it clumps if you push it hard, and it shows every uneven patch through the cotton. Use it in smaller pinches than feels reasonable.
Yarn: the firm rounded line
A smooth cotton yarn, threaded on a tapestry needle and drawn through a stitched channel, gives a firm corded line. This is the boutis effect, and it suits stems, borders and long curves that would fail as wadding.
Choose a yarn no thicker than the channel is wide. If it takes force to pull through, it will pucker the backing and leave the line lumpy.
Stitching the Shapes
This stage is quiet and repetitive, which is most of its charm. Work at a table with good light and the panel loose in your hands.
- Mark the shapes on the top layer. Draw them on the front with the water-soluble pen. Keep lines single, closed and confident; a doubled outline will stitch as a wobbly one.
- Layer top and backing. Backing underneath, right side down, top face up. Smooth both flat and pin around the edges, well outside the shapes.
- Stitch all the way around each shape. Use a small, even backstitch, or a running stitch with eight to ten stitches per inch. The stitches must be tight enough to stop filling escaping between them.
- Leave the thread tails long. Four to six inches, at both the start and the end of each shape. Short tails pull through the fabric when you tug the stitching later.
Backstitch gives a stronger wall and a crisper outline. Running stitch is faster and softer, and it is perfectly adequate if your stitches are small and close.
Do not knot the tails. Bring both ends to the back, tie them loosely, and leave them hanging until the panel is stuffed. Then you can tighten any gap the filling has opened.
Stuffing From the Back
Turn the panel over. Everything from here happens on the backing, where the mess will be hidden for the life of the piece.
- Make a small slit in the backing only. About half an inch, inside the shape's outline, well away from the stitching. Cut between two stitches if you can, and cut along the grain so the edges do not fray.
- Open the layer with the blunt tool. Slide the chopstick under the backing and lift it clear of the top fabric. Never push until you can feel the top layer separate.
- Tease in a tiny pinch of filling. With the tapestry needle or the tip of the tool, push a piece no bigger than a thumbnail through the slit and into the middle of the shape.
- Work from the middle outward. Fill the centre first, then nudge filling toward the points and curves with the blunt tool. Corners need less than you think.
- Check the front after every few pinches. Lay the panel flat and look at it straight on, not at an angle. Stop when the shape reads as raised.
Keep the slit small. A large opening feels easier to work through and then shows as a dent, because the backing cannot sit flat over a wide gap.
How Much Filling Is Enough
The difference between raised and lumpy is not the amount of filling. It is whether the filling is evenly distributed. Two pinches placed well beat five pinches crammed in.
Add a pinch, smooth it with the tool, look at the front. Add another only if the shape still looks underfilled at its centre. When the outline starts to look strained or the background puckers around the stitching, you have gone past the point.
Telling raised from lumpy
A raised shape has a smooth dome and a clean edge where the stitching sits. Light rolls across it without a break. A lumpy shape has a hard spot you can feel, a shadow in the middle, or a ridge along one side.
If you feel a lump, do not add more. Work the existing filling outward with the blunt tool, through the slit, until it spreads. Overstuffing is the most common failure in trapunto, and it cannot be undone by adding.
Closing the Slit
Close the slit with a ladder stitch, using the same thread you used for the outlines. Work from the back, with the panel flat on the table and the shape supported underneath by your hand.
Bring the needle out at one end of the slit, take a tiny horizontal bite directly opposite, then another on the first side, alternating like the rungs of a ladder. Keep the bites small, two or three backing threads each.
Pull the thread gently every four or five stitches. The edges should close like a seam, not gather like a purse. If the backing starts to dimple, you are pulling too hard; let the thread back and continue looser.
Finish with two small backstitches buried in the backing, and run the tail inside the fabric before trimming. Do not knot it on the surface.
The Step Most Beginners Skip: Dense Background Quilting
Trapunto only looks three-dimensional because the area around the shapes is quilted flat and closely. The contrast does the work. A stuffed shape on an unquilted ground looks like a rumple, not a relief.
Quilt the background in small even lines, a quarter inch or less apart, in thread that matches the top. Echo the shapes, or fill with a simple grid or a soft meander. The stitching needs to be dense enough that the background reads as a firm, flat surface.
If you can, quilt the background before you stuff. It is easier on your hands, and you cannot squash relief that is not there yet.
If the panel is already stuffed, work flat on a table with no hoop and light tension, and keep your hands away from the filled shapes.
Never press a stuffed panel with an iron. The steam collapses the filling and the relief never fully returns. Finger-press seam allowances and let the weight of the cloth do the rest.
Finishing: Squaring, Binding and Washing
Square the panel by measuring from the centre outward, not along the edges. Trim the backing and any batting flush with the top, then check that opposite sides measure the same before you cut.
Bind with a double-fold strip, stitched to the front and wrapped to the back, then slip-stitched down by hand. Keep the binding relaxed over the edge; a tight binding pulls the corners and flattens the outer quilting.
Washing changes the relief, and you should know that before you gift it. Cotton wadding settles and the shapes soften slightly on the first wash; they plump back as the panel dries. Fibrefill rebounds almost completely. Yarn cording does not move at all.
Wash cool, on a gentle cycle, and dry flat, patting the shapes back into shape while the cloth is damp. Never tumble hot, and never wring a stuffed shape.
When Something Goes Wrong
Almost every fault in trapunto has a cause you can see, and most have a fix that does not involve unpicking.
- Lumps. Filling was pushed in one place and never spread. Work it outward through the slit with the blunt tool, then close up again.
- Thin spots where the filling did not reach. Usually a corner or a narrow end. Open the slit a little further and use the tool to steer a small pinch into the gap, rather than adding bulk at the centre.
- A slit that shows. The opening was too wide, or the ladder stitch was pulled too tight. Ease the stitches, press the backing flat with your thumb, and quilt a little closer around that edge.
- Filling working its way out. The outline stitches are too long, or the slit was left with a gap. Tighten the shape's stitching from the back with the long tails, then close the slit again.
- Puckered backing. Either the backing was stretched when it was pinned, or the filling is too dense for the space. Remove a pinch and smooth the backing flat while it is still damp from a light spritz.
- Shapes that read as flat. Nearly always insufficient background quilting, not insufficient filling. Quilt the ground closer and the same shapes will suddenly look raised.
How Long It Actually Takes
For a practice panel about 8 inches square with three shapes, plan on seven to nine hours in total. It splits comfortably across three or four sittings, which suits the way most of us actually craft.
- Designing and marking: 20 to 30 minutes.
- Stitching the shapes: 1.5 to 2 hours.
- Background quilting: 2 to 3 hours. This is the long stretch.
- Stuffing: 60 to 90 minutes, including the checking.
- Closing the slits: 20 minutes.
- Squaring and binding: 45 minutes to an hour.
A 12-inch cushion panel with three larger shapes runs closer to ten or eleven hours. None of it is difficult; it is simply handwork, and handwork takes the time it takes.
Your First Panel: Leaf, Circle, Teardrop
Three shapes, each teaching something different. The circle is the easiest to fill evenly. The leaf teaches you to work toward a point. The teardrop shows you where filling wants to collect.
- Cut a top and backing about 12 inches square, both firmly woven cotton in a light plain colour.
- Draw a leaf about 4 inches long, a circle about 3 inches across, and a teardrop about 3 inches tall. Space them a finger-width apart.
- Layer backing under top, pin well outside the shapes, and stitch each outline in small backstitch. Leave long tails.
- Quilt the background densely in lines a quarter inch apart, echoing each shape. Work right up to the outline stitching.
- Turn the panel over and cut one half-inch slit in the backing inside each shape.
- Stuff the circle first, from the middle outward, checking the front every few pinches.
- Stuff the leaf next, working from the wide end toward the tip, using less filling as you go.
- Stuff the teardrop last, filling the round base before the narrow end.
- Close all three slits with a ladder stitch, pulling gently and often.
- Square the panel, bind the edges, and press only the binding with a cool iron.
If you would rather turn this into a cushion, add a plain envelope back before binding and insert a 12-inch pad. The panel is stiff enough to hold its shape without any extra interfacing.
A Last Word Before You Start
Your first panel will not be your best one, and that is exactly how this craft works. The second one takes less time because your hands already know the amount of filling a shape wants.
Ask yourself as you work: does this shape look raised from arm's length, or only up close? Can I feel a hard spot anywhere? Is the ground around it genuinely flat? Those three questions will catch almost every problem before it is stitched in.
Small wins count here. One shape that reads beautifully is a real result, even if the second one needs reworking. Leave the panel out where you can see it for a day before you judge it.
And if you find yourself drawn to hand-stitched patchwork next, that is a different pleasure altogether — Kawandi Quilting covers it properly. If pieced shapes are what you want rather than stuffed ones, English Paper Piecing is where that technique lives.
Trapunto rewards the reader who stops early. Stuff a little less than you want to, quilt the background a little more than you think is needed, and the relief will do the rest.