Introduction
There is a particular quiet in hand applique. You are not counting stitches or following a chart. You are persuading one piece of cloth to lie flat and beautiful on another, one small edge at a time.
The word comes from the French appliquer — to apply, to lay on. A plain name for a plain act: cut a shape, place it, stitch it down. Almost everything difficult about applique lives in the edges.
This guide walks through the two hand methods beginners actually finish. Needle-turn applique folds the seam allowance under with the needle as you stitch. Fusible web applique uses an iron-on adhesive to hold the shape while you work.
Both are learnable in an evening. Neither requires a machine, and neither requires you to be naturally tidy. In this craft, neatness is a technique rather than a temperament.
What Applique Is, and Where It Came From
Applique means attaching a cut fabric shape to a larger ground fabric. The shape is usually stitched along its turned edge, so the raw edge hides underneath and only a clean line of stitching shows.
It differs from patchwork, where pieces are joined edge to edge to build a whole cloth. In applique the background stays whole, and the design sits on top of it like a pressed flower on paper.
That distinction matters when you read patterns, because the two techniques are often sold together as "pieced and appliqued" quilts. They ask for different hands and different patience.
A Short, Honest History
Layering and stitching cloth is ancient and appears in many textile traditions. But the applique most of us picture, printed motifs on a light ground, has a traceable lineage in the eighteenth and nineteenth centuries.
One thread of that history is broderie perse, a French term meaning "Persian embroidery." It describes cutting printed floral motifs out of imported chintz and reapplying them to a plainer background.
Chintz was expensive, and a whole bedcover of it was out of reach for most households. Cutting out the flowers let a maker use an expensive fabric sparingly and still have something lavish.
In the eighteenth and nineteenth centuries, American and British quiltmakers used exactly this approach for medallion quilts, a central motif with borders around it, and for album quilts, where separate blocks were contributed and joined.
Applique also had practical work to do. It covered worn patches, extended the life of a garment or quilt, and used up oddments too small for anything else. Economy and beauty were never separate ideas in a working household.
I would rather say "roughly" than invent a date. Surviving quilts vary enormously by region and family, and the honest version of this history is a broad span of decades rather than a single moment.
The Two Methods Side by Side
Both methods arrive at the same visible result: a shape with a crisp outline sitting on a background. They get there very differently, and the difference shows in the hand of the finished cloth.
Needle-turn is slow and entirely manual. The edge is folded under with the tip of the needle, a few threads at a time, and stitched as you go. The result is soft, pliable, and unmistakably hand-made.
Fusible web is fast. You bond the shape to the background with an iron, then stitch it down or leave it. The result is flat, stable, and a little firmer to the touch.
- Feel: needle-turn drapes with the quilt; fusible has a faint papery body.
- Speed: a small needle-turn motif may take an evening; the same shape takes minutes with fusible web.
- Finish: needle-turn hides its edge entirely; fusible shows a cut edge until you stitch it.
- Stiffness: one layer of web is barely noticeable; three layers in the same block are not.
- Forgiveness: needle-turn lets you adjust as you go; fusible is committed once the iron touches it.
Most experienced makers keep both in the cupboard. Needle-turn for heirloom work and anything that must still feel like cloth. Fusible for small motifs, quick gifts, and shapes too fiddly to turn by hand.
Materials That Actually Matter
You do not need much, but the few things you use should be right. Poor materials are the most common reason a first applique disappoints.
Fabric
Use quilting cotton for both the shape and the background. It has a tight, stable weave that holds a folded edge and does not slide while you work.
Slippery fabrics such as satin, rayon, or polished chintz wander under the needle. Loosely woven linen frays faster than a beginner can manage. Save both for a later project.
Pre-wash and press your fabric before cutting. Shrinkage after the fact will pucker work you spent an evening getting flat.
Thread
A fine cotton thread, around 50 weight, in a colour that matches the applique shape. Matching thread makes stitches disappear; a neutral beige is a decent second choice.
Contrasting thread is a design decision, not a beginner's default. Save it for when you deliberately want the stitching to be seen.
Needles
Use a fine, sharp hand-sewing needle, a sharp or milliner's needle in a small size. The point must be sharp enough to turn a fold without snagging the weave.
Blunt tapestry needles will not do this work. Keep a spare needle threaded and nearby, because threading is where most evenings are quietly lost.
Fusible Web
Look for paper-backed, double-sided fusible webbing. The paper carries the adhesive on one side, which lets you draw on it and cut cleanly before fusing.
A lighter weight web is better for applique than a heavy one. Heavy web stiffens the shape noticeably and can leave a visible shadow through pale fabric.
The Rest of the Kit
- Template plastic or sturdy card for shapes you will use more than once.
- A pressing cloth, so the iron never touches adhesive directly.
- Small sharp scissors for clipping curves and cutting shapes accurately.
- Fine pins or a needle and basting thread.
- A fine marking pencil or chalk that lifts off the fabric cleanly.
- An iron and a padded pressing surface, which do more for your results than any gadget.
Needle-Turn Applique, Step by Step
Needle-turn is the older of the two hand methods and still the standard for fine work. It asks for patience, but it asks in small instalments.
1. Make the Template
Draw your motif on template plastic or card at its finished size, with no seam allowance. Cut it out accurately, because every later step trusts this outline.
If your shape is not symmetrical, mark which side faces up. A leaf drawn one way and pinned the other is a small, maddening surprise halfway around a curve.
2. Trace and Add a Seam Allowance
Place the template on the wrong side of your applique fabric and trace around it. Then add a seam allowance of about a quarter inch, drawn freehand or with a second, larger template.
Consistency matters more than precision here. An allowance that varies between an eighth and a quarter inch will still turn under; one that tapers to nothing will fray.
3. Baste or Pin in Place
Position the shape on the background and hold it with fine pins placed well inside the seam line, or with a line of basting stitches just inside the fold line.
Basting is slower to set up and faster to sew. If the shape is large or strongly curved, baste, because pins catch your thread and distort the edge.
4. Clip Inside Curves, Notch Outside Curves
Where the edge curves inward, snip the seam allowance almost to the traced line at intervals of roughly a quarter inch. The slivers spread and the fold lies flat.
Where the edge curves outward, cut small V-shaped notches instead. They remove bulk so the allowance turns without pleating or a lumpy outline.
Never clip through the traced line. A thread cut there becomes a hole, and no amount of stitching closes it invisibly.
5. Turn the Allowance Under with the Needle
Bring your needle up through the background at the fold line and use its point to roll the seam allowance under, a few threads at a time, just ahead of your stitching.
The needle acts as a third hand. You are not folding the whole edge at once; you are folding the next eighth of an inch and stitching it while it is still under control.
6. Work the Blind Applique Stitch
Take a tiny bite of the background fabric directly beneath the fold, then pass the needle through the folded edge from underneath. Pull gently and evenly.
The stitch should vanish into the fold. Worked well, the join reads as a drawn line rather than a seam, and no thread shows on the front of the work.
7. Stitch Length and Tension
Keep stitches short, roughly an eighth of an inch apart and closer on tight curves. Long stitches let the edge lift between them and look untidy from a distance.
Tension should be snug, not tight. If the background dimples around the shape, you are pulling; let the thread relax and the fabric will settle.
8. Where to Start and Stop
Begin on a straight or gently curved section, never at a sharp point. Points are the hardest part of any shape and deserve your settled attention, not your first nervous stitches.
To finish, take two small back stitches under the fold, bury the thread tail between the layers, and trim. Otherwise the work is continuous around the motif, with no reason to stop at a corner.
Fusible Web Applique, Step by Step
Fusible webbing trades some softness for speed, and for many beginners that is a fair trade. It also makes very small or intricate shapes genuinely possible.
1. Trace the Shape in Reverse
Draw your motif on the paper side of the fusible web, remembering that this side becomes a mirror image. For a leaf or a heart, reverse the template before tracing.
Leave a small margin around the shape so the web does not extend past your cutting line and gum the iron plate.
2. Fuse the Web to the Fabric
Press the paper-backed web onto the wrong side of your applique fabric with a hot, dry iron, following the manufacturer's timing, usually around ten seconds.
Press down and hold rather than sliding the iron. Sliding shifts the web and smears adhesive into places you did not intend to stiffen.
3. Cut Cleanly
Let the fabric cool, then cut along your traced line with small sharp scissors. The web stiffens the cloth slightly, which makes a clean cut easier than it would be on loose fabric.
4. Peel the Backing and Place
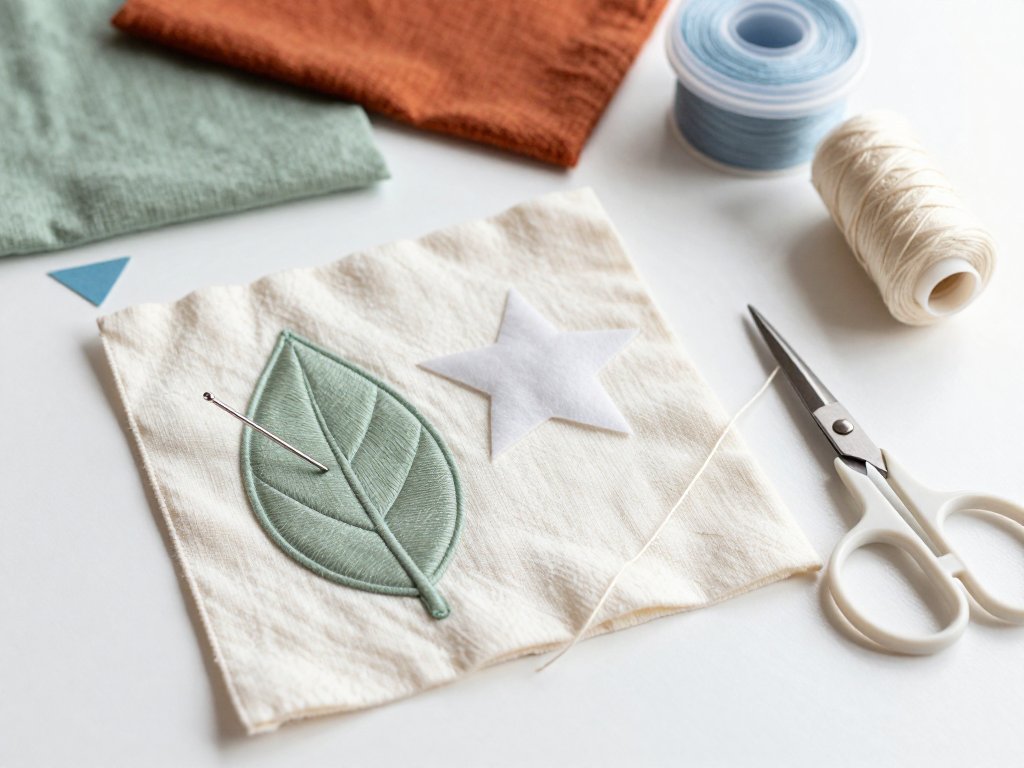
Peel the paper away; the adhesive now sits on the back of your shape. Position it on the background and press firmly with a hot iron under a pressing cloth.
You get one good placement. Warm adhesive grabs quickly, so decide before you press. If you must move it, reheat gently and lift slowly from a corner.
5. Should You Stitch It?
You can leave a fused shape unstitched, and for a stretched hoop or a greeting card that is perfectly fine. But an unstitched edge will eventually lift with washing and handling.
A stitched edge lasts longer and looks more finished. A small running stitch, a blanket stitch, or a line of tiny stab stitches around the outline will hold the shape for years.
Stitching also closes the cut edge, which is the part that frays in the wash. Treat the fusible as a positioning tool and the stitching as the real join.
Choosing a First Motif
Your first shape should be chosen for its edges, not its charm. Gentle outward curves are kind to beginners; tight inward curves are not.
A leaf is close to ideal. It has two long convex sides, one soft point, and no deep notches. A heart teaches one inward notch, which is a useful lesson in a controlled dose.
A simple circle is a good third exercise, an unbroken curve with no points at all. A flower with rounded petals adds repetition without adding new difficulty.
Tight inside curves, such as the inner corner of a star or the cleft of a heart, are harder because the allowance has nowhere to go. It must be clipped finely and turned in tiny increments.
Points need the same patience in reverse: the allowance is folded into a neat triangle and held with the needle while you take the first stitch. Start blunt and small.
Keep the first motif roughly three to four inches across. Larger shapes are easier to handle, and very small ones punish imprecision you have not yet learned to see.
Troubleshooting Applique Problems
Puckered Background
Usually caused by stretching the background as you stitch, or by too few pins. Baste the shape, let the fabric rest flat on the table, and stitch with a relaxed thread.
On large shapes, a lightweight fusible interfacing behind the background adds stability without stiffness. It is a quiet fix that has saved many a block.
Frayed Edges
Fraying points to too narrow a seam allowance, a fabric with a loose weave, or a dull needle sawing at the threads. Check all three before blaming your technique.
Handle the shape less. Every pass through your fingers roughs up a raw edge, and needle-turn asks you to touch the allowance constantly.
Stiff or Shadowing Fusible
Heavy web in a large shape makes cloth feel like card. Switch to a lighter web and trim the interior of the web away, leaving a border of about a quarter inch.
A pale background over dark fabric can show a grey shadow through the web. Trimming the interior solves this as well as the stiffness, and the fused border still holds.
Visible Stitches
If stitches show, the bite into the background is too deep or the thread is too dark. Shallow bites and matching thread hide nearly everything.
Some visibility is normal in raking light. Hold the work at arm's length, the way anyone else will see it, before deciding it has failed.
Fabric Shifting
Pins alone rarely hold a large shape. Baste it, or use a light spray starch to give the fabric a little body before you begin.
Starching also helps the fold hold itself while the needle works, which many beginners find reassuring.
Finishing a Small Project
A single applique block has more uses than it looks. Choose a finish that lets you handle the work without undoing it.
A pillow cover is the classic first project. Applique a front panel, then sew it to a plain back with a simple envelope opening. The shape is protected and the pillow gets used.
A stretched hoop turns one motif into a wall piece in an afternoon. Centre the design, stretch the fabric snug, and back it with felt or card.
A tote bag or tea towel puts applique where it will be washed, which is exactly why stitching the edge matters. Both take a small motif beautifully.
Whichever you choose, leave generous margins. Applique near a seam allowance is awkward to finish and easy to clip by accident.
Pressing and Caring for Applique
Press from the back, on a padded surface, with the applique face down on a towel. This keeps the shape from flattening into the background and protects any fusible.
Never drag a hot iron across a fused edge. Lift and press, straight down and straight up, and let the piece cool before you move it.
Wash finished applique in cool water on a gentle cycle, or by hand if the piece is precious. Tumble drying on high heat is what lifts fused edges and shrinks cotton.
Dry flat or on low, then press again from the back while the cloth is slightly damp. Applique cared for this way stays crisp for decades.
Where to Go Next
Once your edges are clean, applique becomes a way of drawing with cloth. The next step is usually a small sampler: four shapes, four fabrics, one honest record of what your hands learned.
When you want another precise hand technique, try Hardanger embroidery; its counted stitches reward the same patience.
Read a little of the history too. Knowing that a quiltmaker once cut flowers from expensive chintz to make something beautiful from a little changes how the work feels in your hands.
Conclusion
Applique rewards the maker who is willing to work one edge at a time. Neither method is difficult; both simply refuse to be rushed.
Start with a leaf and a quarter inch of allowance. Baste it, clip it, turn it, and stitch it down, and you will have learned a technique that has dressed beds and babies for two hundred years.
Then make the second one. That is where the calm arrives.