Introduction
The first time I tried to draw a portrait, I was sitting at my grandmother's kitchen table with a stubby pencil and a stack of her old grocery receipts.
I was maybe nine, and I was trying to draw her face from memory — the way her laugh lines curved, the soft pouches under her eyes, the way her hair fell in silver waves around her shoulders.
The result looked less like my grandmother and more like a worried potato with glasses.
She hung it on the refrigerator anyway, bless her heart.
Decades later, I still think about that drawing whenever a beginner tells me they cannot draw faces.
The problem was never my ability. It was that nobody had shown me the simple, reliable rules that make a face look like a face — and more importantly, like a real person.
Those rules are called facial proportions, and they are the single most useful thing you can learn as a portrait artist.
Here is the good news for the busy mom who wants to capture her children's faces or create a meaningful gift: you do not need years of art school.
You do not need expensive supplies. You just need a pencil, some paper, and a handful of measurements that have guided portrait artists for centuries.
Let me share them with you the way I wish someone had shared them with me, back at that kitchen table.
Why Facial Proportions Matter
Think of facial proportions as the map before the journey. When you look at a face, your brain is incredibly good at recognizing what looks right and what looks wrong — even if you cannot articulate why.
A portrait with accurate proportions feels instantly recognizable, even before you add any shading or detail.
A portrait with skewed proportions feels unsettling, even if every individual feature is perfectly rendered.
The classic approach to facial proportions has been used by artists for hundreds of years, from Renaissance masters to modern illustrators.
It is based on the observation that human faces, despite their infinite variety, follow predictable measurement patterns.
The distance between the eyes equals the width of one eye. The bottom of the nose sits halfway between the eyes and the chin.
The corners of the mouth line up with the center of each eye. These are not rigid laws — every face is unique and beautiful precisely because it deviates from the average — but they give you a reliable starting point that keeps you from drawing that worried-potato face ever again.
For the beginner, learning proportions removes the guesswork. Instead of wondering "where does the nose go?" you place it with confidence and spend your creative energy on the things that matter: expression, likeness, and the personality of your subject.
What You Will Need
One of the lovely things about portrait drawing is that the barrier to entry is almost nonexistent. You probably have everything already.
- A pencil. A standard HB or 2B pencil works beautifully. If you have access to a set, an HB for light sketching and a 4B for darker lines gives you flexibility.
- Paper. Any smooth drawing paper or even printer paper will do. Avoid heavily textured sketch paper for now — it can make clean proportion lines harder to see.
- An eraser. A kneaded eraser is wonderful because it lifts graphite without damaging the paper, but any soft eraser works.
- A reference photo. Choose a front-facing portrait with good lighting. Magazines, free stock photo sites, or a photo of a family member all work. Start with a face looking straight at the camera.
- A ruler (optional). Some beginners find it helpful to measure with a ruler at first. Eventually your eye learns to estimate, but there is no shame in using a tool while you build confidence.
That is genuinely all you need. No special paper, no fancy pencil sets, no expensive art supplies. The whole point is to practice the skill, not to buy gear.
The Basic Map: Placing the Features
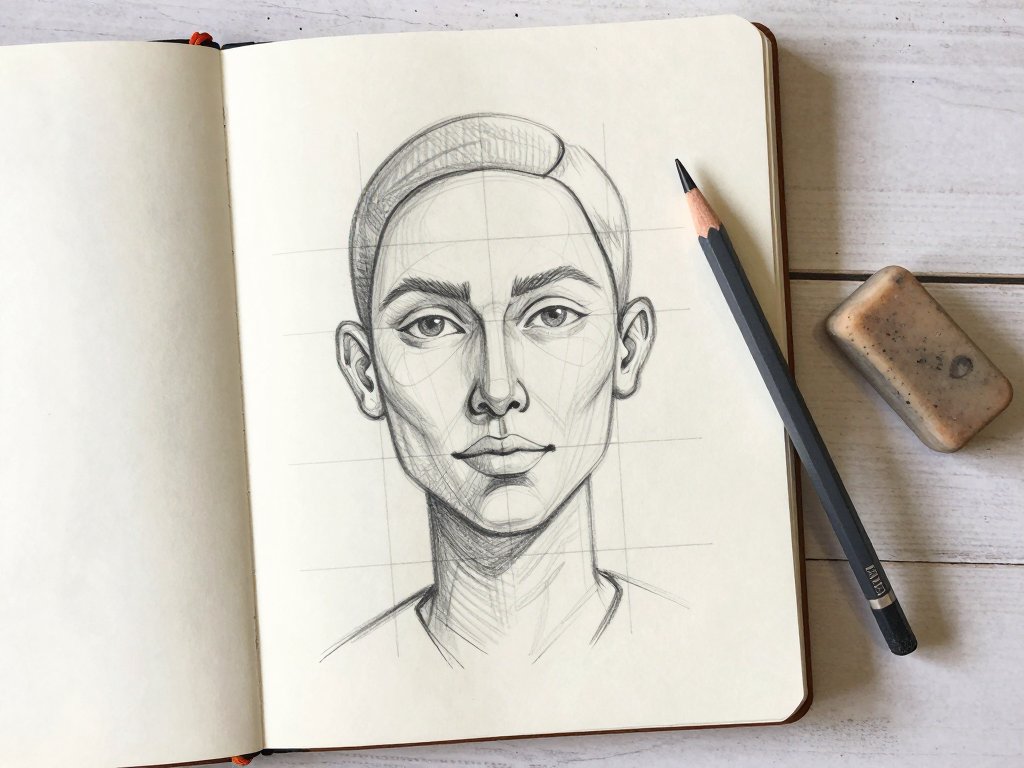
Let us walk through the standard proportions for a front-facing adult face. These are the guidelines portrait artists return to again and again.
1. The Oval
Lightly sketch an oval shape that is slightly wider at the cheekbones and narrower at the chin.
This does not need to be perfect — it is just a placeholder. Think of it as the canvas for your proportions.
The oval should be roughly one and a half times as tall as it is wide.
2. The Center Line
Draw a light vertical line down the center of the oval. This is your symmetry guide.
Every feature you place on one side should have a matching counterpart on the other.
The center line runs through the middle of the forehead, the bridge of the nose, the center of the mouth, and the middle of the chin.
3. The Eye Line
Draw a horizontal line across the center of the oval. This is where the eyes go.
Yes — the eyes sit halfway down the head, not higher up as many beginners assume.
This is the single most common proportion mistake I see, and fixing it transforms a drawing from "something is off" to "yes, that looks like a person." The halfway mark is the eye line.
4. The Nose Line
Draw another horizontal line halfway between the eye line and the bottom of the chin. This is where the bottom of the nose sits. The bridge of the nose rises from between the eyes, and the nostrils fall at this lower line.
5. The Mouth Line
Draw a horizontal line one-third of the way down from the nose line to the chin.
The mouth sits closer to the nose than to the chin. The centerline of the mouth (where the lips meet) falls at this line.
The upper lip extends upward from here, and the lower lip extends downward.
6. The Eyebrow Line
The eyebrows sit about one eye-width above the eyes. A handy trick: if you draw the eye line and then measure the height of one eye above it, that distance tells you where the eyebrow starts.
Take a moment to look at your own face in a mirror or at your reference photo.
Can you see these divisions? The eyes really are at the halfway point. The bottom of the nose really does sit about midway between the eyes and the chin.
Once you see it, you cannot unsee it — and your drawings will never be the same.
Getting the Details Right
Now that you have the basic map, let us fill in the specific features with more detail.
Eyes: The Window to Likeness
The distance between the eyes is equal to the width of one eye. If you draw an eye on the left, leave exactly one eye-width of space in the middle, and draw the right eye.
The inner corners of the eyes line up with the sides of the nose. The outer corners of the eyes usually align with the outer edges of the mouth when the person is smiling, but in a neutral expression, they fall slightly outside the mouth corners.
Eyes are often the feature beginners obsess over, but here is a secret: spend less time on the iris and pupil and more time on the overall shape and the eyelids.
The shape of the eye opening — the almond curve, the way the upper lid overlaps the lower lid at the outer corner — matters far more than the exact circle of the iris.
Draw the eyelid crease above the eye lightly; it adds structure without overwhelming the drawing.
Remember to add a tiny highlight in each eye where the light hits. This small white dot is what makes eyes look alive and reflective rather than flat and glassy.
The Nose: Simple Shapes
The nose is many beginners' least favorite feature, but it becomes much simpler when you think of it in terms of basic shapes.
The bridge is a vertical cylinder shape between the eyes. The tip is a sphere or oval at the end.
The nostrils are curved shapes on either side of the lower portion.
Instead of drawing the nose as a complete outline (which tends to look cartoonish), suggest its form with light shading on the sides and under the tip.
The bridge itself is often just a very light line or even just a suggested change in value.
Look at your reference photo and notice how much of the nose is implied by shadows rather than drawn with hard lines.
A useful trick: the bottom of the nose is almost never a straight horizontal line. It has a subtle curve, and the nostrils are teardrop or comma shapes that angle outward and upward slightly.
The Mouth: Curves and Corners
The corners of the mouth typically line up with the center of each eye when the face is relaxed. The upper lip is generally thinner than the lower lip, and the most prominent point of the upper lip is the Cupid's bow — the two curved peaks in the center.
Beginners often draw the mouth as a simple curved line, but the mouth has real structure.
The line where the lips meet is usually the darkest line in the mouth area.
The upper lip has a distinct shape with the Cupid's bow in the center and fuller sections on either side.
The lower lip is usually fuller and rounder, with a soft shadow underneath it where it meets the chin.
One of the most helpful things I learned was to draw the mouth by looking at the negative space — the area around and between the lips — rather than the lips themselves.
The shapes of the shadows under the lower lip and between the lips tell you more than trying to trace the outline.
Hair: The Framework
Hair can feel intimidating because it has so much texture and individual strands. The key is to resist the urge to draw every hair. Instead, draw the overall shape and mass of the hair as it frames the face. Think of it as a landscape of light and shadow.
Start with the general silhouette of the hairstyle — where it sits on the forehead, how it falls past the ears, where it rests on the shoulders.
Then add a few directional lines that show how the hair flows. Finally, add darker shadows in the areas where the hair is thickest or where strands overlap.
The highlights (where light hits the hair) can be created by leaving the paper white or using an eraser to lift graphite.
A common beginner mistake is to make hair too uniform. Hair has variation — some sections are darker, some are lighter, some parts lie flat while others curl away. Observe your reference carefully and capture those variations as broad areas of value rather than individual strands.
Shading: Bringing the Face to Life
Once your proportion map is in place and your features are drawn, shading is what transforms a flat outline into a dimensional face.
The principle is simple: light hits the face from a particular direction, and the parts that face the light are lighter while the parts that turn away are darker.
Start by identifying the light source in your reference photo. Is the light coming from above left? From the right side? Below? Once you know, shade accordingly. Common shadow areas include:
- The side of the nose opposite the light source
- Under the chin and jawline
- The eye sockets (the hollows above and around the eyes)
- Under the lower lip
- The temples (sides of the forehead)
- The area where the neck meets the chin
Use side-of-pencil shading for large areas and the pencil tip for small details. Build up the darkness gradually — it is much easier to add more graphite than to remove too much.
A tissue or blending stump can soften harsh lines, but do not over-blend. Some texture from the paper and pencil adds life to a portrait.
Common Beginner Mistakes (And How to Fix Them)
Every portrait artist makes mistakes, especially at the beginning. Here are the ones I see most often, along with simple fixes.
Eye placement too high. This is by far the most common issue. Remember: the eyes go at the halfway mark of the head.
If your portrait looks like the forehead is tiny and the chin is enormous, your eyes are probably too high.
Measure from the top of the head to the chin, find the middle, and place the eyes there.
Features too large or too small. A common struggle is drawing eyes that are too large or a mouth that is too small relative to the face.
Use the one-eye-width rule to check your proportions. If the space between the eyes is wider than one eye, bring them closer.
If the mouth corners do not align with the center of the eyes, adjust them.
Floating features. Sometimes beginners draw each feature beautifully but the overall face looks disconnected — the eyes, nose, and mouth feel like they are floating independently.
This happens when the proportion map is skipped. The solution is to go back to the basic divisions (eye line, nose line, mouth line) and ensure each feature connects to the grid.
Hard outlines. Faces do not have dark outlines around them. Use soft, sketchy lines for the jaw, cheekbones, and hairline. Hard outlines make a portrait look like a coloring book. Use shading and value changes to define edges instead.
Symmetry obsession. Human faces are not perfectly symmetrical, and trying to make them so results in a mask-like, artificial look.
Once you have the basic proportions in place, embrace the small asymmetries that make your subject unique — a slightly higher eyebrow, a crooked smile, a mole on one cheek.
These are what make a portrait feel like a real person.
Practicing with Purpose
The best way to improve at portrait drawing is to draw faces regularly, but how you practice matters as much as how often. Here are a few approaches that work well for busy schedules.
Five-minute sketches. Set a timer for five minutes and sketch a face from a photo or magazine. You will not finish a polished portrait, but you will train your eye to quickly identify proportions. Speed forces you to focus on what matters and ignore what does not.
Feature studies. Spend a whole session drawing just eyes from different photos. Then a session on noses. Then mouths. Isolating one feature at a time builds your visual vocabulary and reduces the overwhelm of drawing a whole face.
Proportion warm-ups. Before starting a portrait, spend two minutes drawing the proportion map — the oval, the center line, the horizontal divisions — on a scrap of paper. It takes almost no time and dramatically improves your starting accuracy.
Draw from life. If you can, draw a family member while they watch television or read.
A moving subject forces you to work quickly and capture the essential shapes before they shift.
It is harder than drawing from a photo, but it teaches you to see and capture likeness at the same time.
A Note on Frustration
I want to be honest with you: your first several portraits may not look like you hoped.
That is completely normal, and it does not mean you lack talent or that you should give up.
Every portrait artist I know — including professionals whose work hangs in galleries — has a drawer full of drawings that did not work out.
The difference between someone who improves and someone who stays stuck is simply whether they keep going.
When I started taking portrait drawing seriously in my twenties, I filled an entire sketchbook with faces that were, frankly, not good.
But somewhere around page thirty, something clicked. The eyes started landing in the right place more often.
The noses looked like noses instead of abstract blobs. The mouths curved naturally instead of looking like flat lines.
The improvement was gradual — almost invisible from one drawing to the next — but undeniable when I compared the first page to the thirtieth.
Be patient with yourself. Enjoy the process. And remember that every imperfect drawing teaches you something that a perfect one never could.
Conclusion: Your Portrait Journey Starts Now
Facial proportions are the gift that keeps giving in portrait drawing. Once you learn the basic map, you can draw any face with more confidence and accuracy.
The rules are simple: eyes at the halfway mark, nose halfway between the eyes and chin, mouth one-third of the way from nose to chin, one eye-width between the eyes.
Master these four measurements, and you have already left the worried-potato phase behind.
From here, the possibilities are endless. You might try drawing your children's portraits for a birthday gift, sketching a friend's face in a handmade card, or even working toward a larger portrait project. Every face you draw sharpens your eye and your hand a little more.
For more guidance on your drawing journey, explore our proportion grid generator — a helpful companion for checking your measurements as you practice.
And remember the advice I wish someone had given me at my grandmother's kitchen table: the face you are drawing does not need to be perfect.
It just needs to be yours.