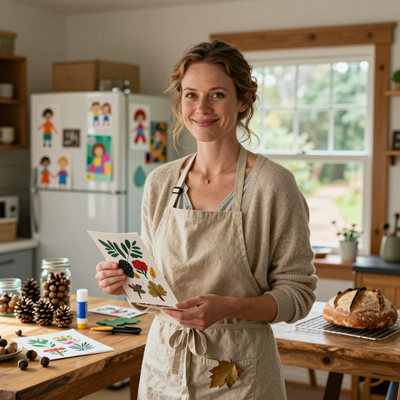
Introduction
The first time I tried to draw anything real, I was eleven years old, sitting cross-legged on my grandmother's sunroom floor with a No.
2 pencil I'd stolen from my dad's desk drawer. The subject was a single, slightly bruised Granny Smith apple.
I pressed so hard that I snapped the tip three times, leaving little craters in the page.
The apple I produced looked less like fruit and more like a lopsided potato that had been through a war.
My grandmother squinted at it and said, "Well, I'd know that apple anywhere. It's got character."
She taught me something that day that no art instructor ever could: the goal of drawing is not to produce a photographic replica.
The goal is to see — really see — and to translate that seeing onto paper with your own hand.
That apple was the beginning of everything for me. Thirty-some years later, I still believe there is no better teacher for a beginner than a humble still life.
Still life drawing doesn't get the glamour it deserves. Walk into any art supply store and you'll find shelves of books about figure drawing and landscape painting, while still life sits quietly in a corner.
But for the beginner with a pencil and a longing to make something real, that patience is everything.
Still life never moves, never gets bored, never complains. It waits for you to get it right — or wrong, as many times as you need.
This article is for anyone who has ever wanted to draw but felt intimidated. For those who have looked at a blank page and felt the weight of expectation settle on their chest.
We are going to start with the simplest tools, the simplest subjects, and build something genuinely lovely.
No talent required. Just a pencil, some paper, and the willingness to look a little more closely at the world around you.
Why Still Life? The Quietest Teacher You'll Ever Have
There is a reason nearly every formal art curriculum begins with still life. It offers something no other subject can: the gift of stillness itself.
When you draw a portrait, the person moves. When you draw a landscape, the light changes.
But a bowl of fruit on a table will sit there for as long as you need it to.
Drawing is a skill built on observation, and observation takes time. When you are learning to see shapes, values, and proportions, you need the subject to stay put.
Still life also offers small stakes. A badly drawn face can feel like a personal failure. But a badly drawn apple? It's just a funny apple. You can try again. You can eat the evidence. That lightness lets beginners take risks without the inner critic screaming quite so loudly.
Best of all, still life teaches you to find beauty in the ordinary. An onion on a cutting board.
A coffee cup with a dried ring at the bottom. Once you begin drawing everyday objects, you stop taking them for granted.
You start noticing the way light falls across your breakfast table, the subtle curve of a spoon's handle.
Drawing a still life is not just an exercise in technique — it is an exercise in gratitude for the small, beautiful moments that fill an ordinary day.
What You Actually Need (And What You Don't)
The art supply industry would love you to believe that you need sixty-seven specialized tools before you can draw anything worth looking at.
This is nonsense. When I started teaching drawing workshops, I would show up with a ziplock bag containing six pencils, two erasers, a sharpener, and a pad of paper.
That's the whole kit. And my students produced work that amazed them.
Pencils. Graphite pencils are graded from H (hard) to B (black/soft), with HB in the middle.
For still life, I recommend five: an H for light construction lines, an HB for general sketching, a 2B for first-layer shading, a 4B for darker shadows, and a 6B for the deepest darks.
If you can only buy three, get HB, 2B, and 4B. If you can only buy one, get an HB — the humble workhorse that has launched a thousand drawings.
Erasers. You need two. The first is a white plastic eraser for clean, full erasures.
The second is a kneaded eraser — a squishable gray lump that might be the most versatile tool in your kit.
You can mold it into a point to lift tiny highlights, press it against a shaded area to lighten the value, or dab it at the page to create texture.
Sharpener. Invest in one with a metal blade housing. Those tiny plastic sharpeners from the drugstore tend to break leads.
Paper. You want a paper with some tooth — surface texture — but not so much that it fights your pencil.
Smooth Bristol board (Strathmore 300 Series is my go-to) takes graphite beautifully and erases cleanly.
Avoid printer paper — it's too slick. Avoid watercolor paper unless you enjoy dragging graphite over gravel.
That's it. Pencils, erasers, sharpener, paper. Everything else is optional luxury.
How to Hold a Pencil (Yes, It Matters)
Most adults hold a pencil the way they were taught in first grade: the tripod grip, pinched between thumb and first two fingers. This is excellent for writing and fine detail. But it is terrible for shading large areas and for loose, expressive sketching.
For still life drawing, you need the overhand grip. Hold the pencil between your thumb and the side of your index finger, as though gripping a wand.
Your palm faces downward. This grip lets you draw from your shoulder rather than your wrist, producing longer, looser strokes.
It also keeps your hand off the paper, reducing smudging.
Practice switching between the two. Use the overhand grip for blocking in shapes and shading.
Switch to the tripod grip for refining edges and adding details. Also experiment with the angle of the pencil.
Holding it nearly vertical gives a sharp, precise line. Tilting it so the side of the lead touches the paper produces broad, soft strokes ideal for shading.
A pencil has a side, and that side is a shading tool of remarkable versatility.
Fundamental Shading Techniques
Before you draw anything recognizable, spend a little time making marks for their own sake. Fill a page with different kinds of strokes. This is the equivalent of a musician practicing scales.
Hatching is the most basic technique: a series of parallel lines placed close together. The closer the lines, the darker the value. Practice at different angles — horizontal, vertical, diagonal. Keep your strokes even and consistent.
Cross-hatching layers a second set of hatch marks at an angle to the first. The intersections create deeper darks, allowing you to build rich, complex values. Try cross-hatching at 90-degree angles, then at 45 degrees, then at varying angles that follow the contour of an imagined form.
Stippling uses dots instead of lines — thousands of tiny dots clustering together to create tone. It is slow, meditative work, wonderful for small details and soft transitions where you want the surface to feel alive with texture.
Blending involves smearing graphite across the page using your finger, a blending stump, or a chamois cloth.
It creates velvety transitions between values. But use it judiciously — a drawing that is entirely blended can feel airbrushed and lifeless.
Combine blending with visible hatching for a look that is both smooth and energetic.
Value gradations — the slow shift from light to dark — are the single most important skill you can develop.
Draw a long, narrow rectangle. Starting from one end, shade as lightly as you possibly can.
Gradually increase pressure as you move along, creating an unbroken gradient. This exercise is frustrating at first.
Keep practicing. A smooth value gradation is the difference between a flat collection of lines and a drawing that looks like a three-dimensional object.
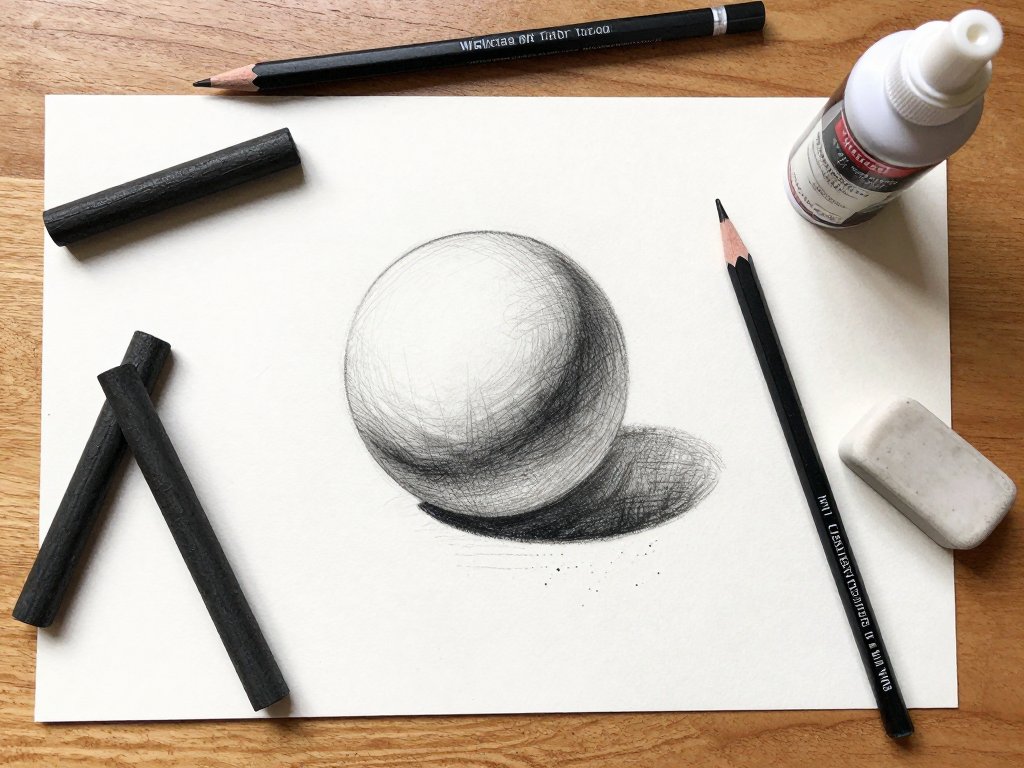
The Three-Value Approach: Your Shortcut to Believable Form
Here is the most liberating realization I can offer you as a beginning artist: you do not need to render every subtle shift of light and shadow.
In fact, trying to do so will usually produce drawings that look muddy and confused.
A convincing drawing can be built from just three values: light, mid-tone, and dark.
Look at any object on your desk. Squint until the details blur. What you see is a simplified map of light and shadow.
The areas catching direct light are bright. The areas in shadow are dark. And there is a middle zone where the light hits at an angle.
That's it. Three values. Everything else is nuance.
To practice, find a sphere — a table tennis ball, a hard-boiled egg — and place it under a single lamp from one side.
Draw it using only three values: the white of the paper for lights, one consistent shading layer for mid-tones, and your darkest pencil for darks.
Squint constantly. Map the boundaries between values as though coloring in a coloring book.
The result will look simplified, almost graphic. But it will also look unmistakably three-dimensional. Even a crude three-value rendering fools the eye into seeing depth and volume. Master simplicity before chasing complexity.
Measuring What You See: The Pencil as a Tool
One of the most common frustrations beginners express is that their drawings "don't look right" — the proportions are off. This is not a failure of talent. It is a failure of measurement, and measurement is a learnable skill.
The simplest technique requires nothing but your pencil and an outstretched arm. Hold your pencil vertically at arm's length, elbow locked.
Close one eye. Align the top of the pencil with the top of your object.
Slide your thumb down until it aligns with the bottom. This gives you a unit of measurement.
Now move the pencil to the width. How many times does your measured height fit into the width?
This is called sight measuring, and it is the foundation of accurate drawing. Measure constantly.
Your eye wants to lie to you. The pencil does not.
Negative space is another powerful tool. Instead of drawing the object itself, draw the shapes around it — the gap between the apple and the mug, the triangle of tabletop visible between them.
Drawing negative space bypasses your brain's tendency to draw what it "knows" and instead draws what is actually there.
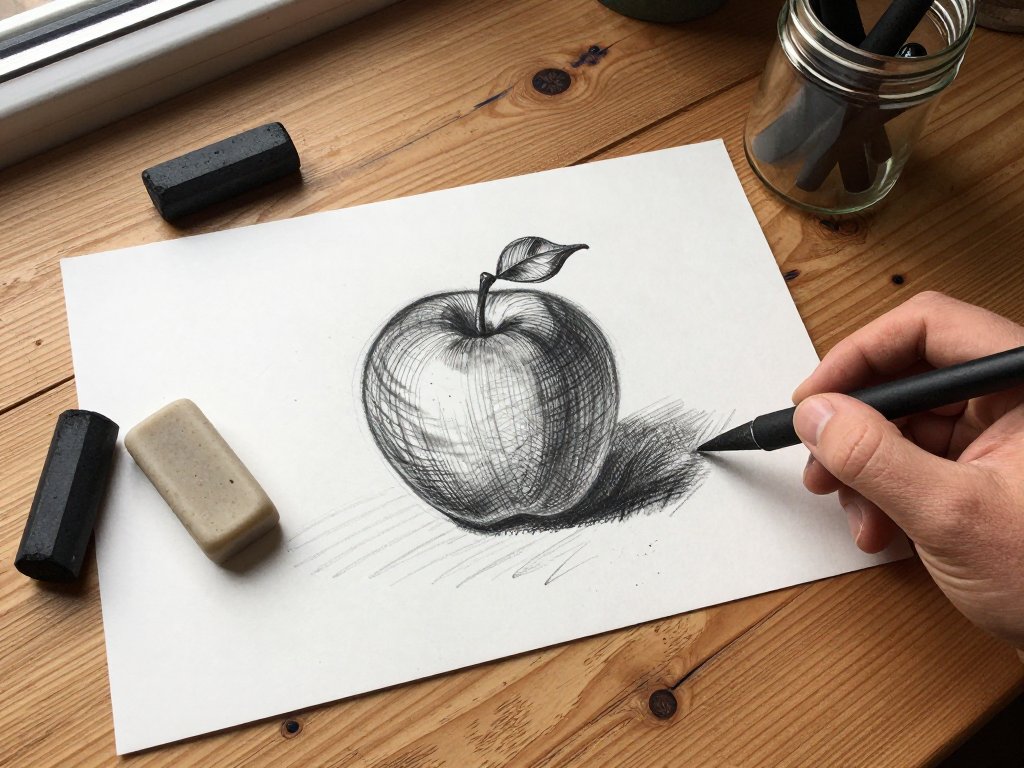
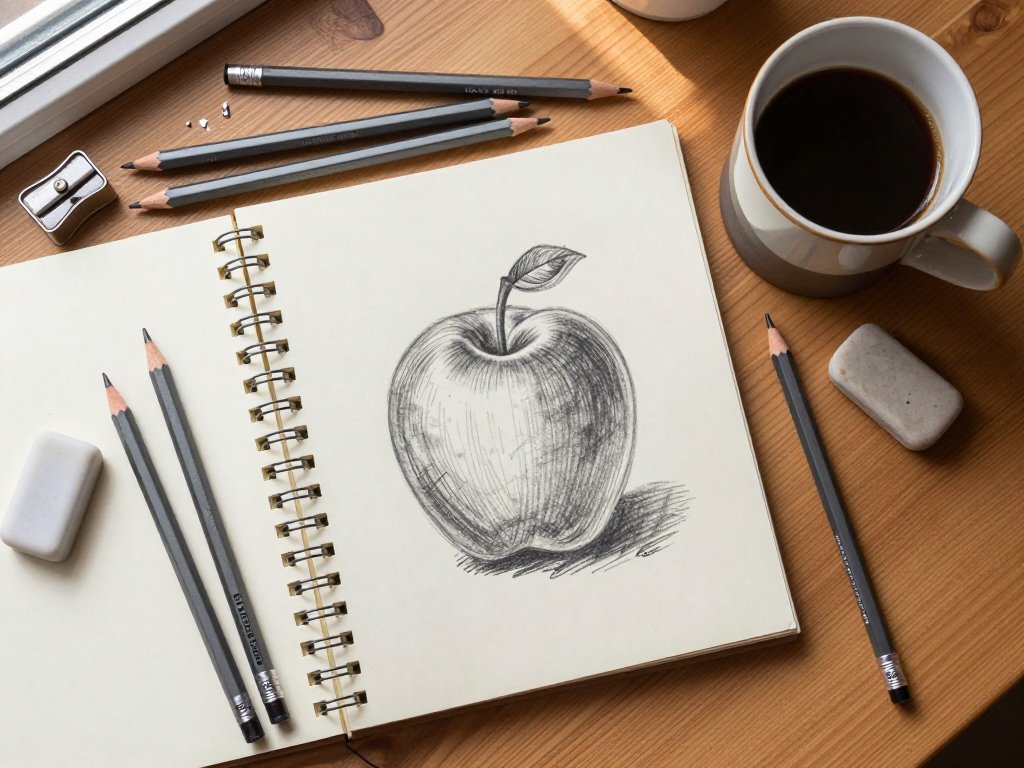
Step by Step: Drawing an Apple and a Mug
Let us put everything together. Find an apple and a ceramic coffee mug. Place them on a table about twelve inches apart, with the mug slightly behind the apple. Set up a single desk lamp to one side and turn off the overhead light.
Step 1 — Block in shapes. Using your H pencil and the overhand grip, lightly sketch the basic shapes. The apple as a rough circle, the mug as a cylinder, the table as a horizontal line. Keep your lines so light you can barely see them.
Step 2 — Refine proportions. Use your pencil measuring technique. How tall is the apple compared to the mug? Where does the apple's widest point fall? Adjust your ghost shapes until the proportions feel right.
Step 3 — Find the light. Squint and identify the three value zones: light areas (highlight on the apple, bright side of the mug), mid-tones (surfaces facing the light at an angle), and dark areas (shadow sides, cast shadows). Lightly outline these zones.
Step 4 — Lay in the darks. Take your 6B pencil and fill in the darkest areas: the deep shadow on the far side of the mug, the cast shadow of the apple, the interior of the mug. Go darker than you think you need to.
Step 5 — Build mid-tones. Use your 2B pencil to add the mid-tone areas. Use hatching that follows the contours — curved strokes on the apple, vertical strokes on the mug. Let your strokes remain visible. Let the drawing show how it was made.
Step 6 — Blend and refine. Use a blending stump or your finger to soften transitions. After blending, go back with a sharp 2B pencil to reinforce edges and add detail — the apple's stem, the mug's rim, the handle's curve.
Step 7 — Lift highlights. Use your kneaded eraser, shaped into a soft point, to lift graphite from the brightest highlights: the reflection on the apple's skin, the glossy rim of the mug. These tiny bright spots give a drawing its sense of surface and materiality.
Step 8 — Step back and soften. Look at your drawing from across the room. Use your kneaded eraser to soften edges where objects meet the background. Lose some outlines. Let the apple bleed into the table. The most common beginner mistake is rigid contour lines. Let some lines disappear.
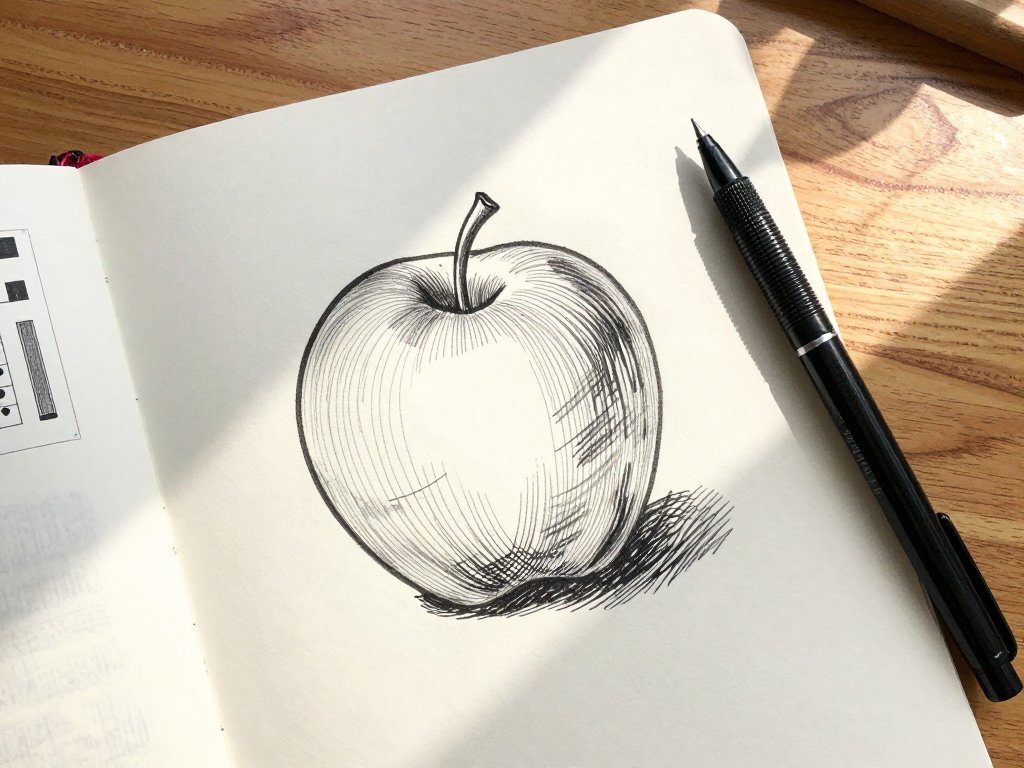
Building Texture: Apple Skin, Ceramic, and Table Surface
Apple skin is smooth with a soft sheen. Use curved strokes that follow the apple's contour.
Build values gradually, blending lightly to create soft transitions. The highlight should be soft-edged — lift it with your kneaded eraser, then soften the edges with your finger.
Add a tiny, sharp catchlight within the larger highlight. That point of brightness is what makes skin look like skin rather than felt.
Ceramic mug is matte with a subtle texture. Use cross-hatching or stippling to build the surface, keeping strokes visible to suggest the material's grain.
The highlights are softer and broader than on apple skin. If your mug has a glossy glaze, add a sharper highlight along the rim — but keep it subtle.
Table surface depends on what you are using. A wooden table has grain you can suggest with long, horizontal strokes and occasional darker lines.
A tablecloth has folds rendered by observing where light catches the raised ridges and where shadows gather in the creases.
Pick three prominent folds and suggest the rest with loose strokes.
Composition: Setting the Stage
Where you place objects on the page matters as much as how you draw them.
The rule of thirds is the simplest starting point. Divide your page into three equal rows and three equal columns.
Place your main subject at one of the four intersection points rather than dead center.
An off-center subject creates a more dynamic arrangement.
Overlap your objects. Placing the mug slightly behind the apple so the apple overlaps the mug's base creates depth and suggests three-dimensional space. The apple's edge should be fully finished where it crosses the mug, while the mug's edge behind the apple should be implied rather than fully drawn.
Vary heights to avoid a boring horizontal line. Place the mug on a small book or folded cloth to create a diagonal line of sight. Include cast shadows as compositional elements — a long shadow can anchor the composition. Leave breathing room with generous margins around your still life.
Empty space frames the subject like a mat frames a photograph.
Common Beginner Struggles (And How to Fix Them)
I have taught drawing to hundreds of beginners, and these same problems appear every time.
Pressing too hard. This stems from believing darker equals better. The fix: use an H or HB pencil and draw as lightly as possible, as though tickling the paper.
Build darkness gradually with multiple light layers. The difference is like whispering versus shouting — both can be heard, but one is far more pleasant.
Smudging. Place a clean sheet of paper under your drawing hand so your skin never touches the drawing surface. Work from top to bottom so your hand rests on finished areas. A thin cotton glove also works wonders.
Rigid outlines. Objects do not have outlines; they have edges that vary in clarity. After finishing your drawing, take your kneaded eraser and selectively soften parts of your outlines.
Let the apple's shadow side dissolve into the table. Losing some edges makes a drawing look like a window into a real space rather than a page in a coloring book.
Flat shading. If your shading looks like uniform gray, you are using only one pencil at one pressure level. Build in layers with harder pencils for initial passes and softer pencils for darks. Vary your stroke direction. Let some strokes be visible and some blend together.
Impatience. This is the hardest problem because it is emotional, not technical. A good still life might take two to four hours.
Beginners want results in fifteen minutes, and when they do not get them, they assume they lack talent.
But even experienced artists work slowly. Speed comes later, after years of practice. For now, embrace slowness.
Sit with your subject. Enjoy watching a blank page fill up with marks that you made, marks that add up to something that did not exist before you sat down.
That is the whole point.
From Still Life to Real Life
Here is the beautiful truth every beginner deserves to hear: the skills you build drawing a bowl of fruit are the exact same skills you need to draw anything else in the world. Still life is not a separate genre — it is a training ground for everything.
When you learn to measure proportions with your pencil, you are learning to measure the proportions of a face.
When you learn to identify three value zones on an apple, you are learning to see light and shadow on a landscape.
When you learn to soften edges where a mug meets the table, you are learning to soften edges where a portrait subject's hair meets the background.
The transfer is direct and immediate.
I have watched students spend three months drawing nothing but fruit and pottery, convinced they were getting nowhere, and then pick up a pencil to draw their sleeping child — and produce something beautiful on the very first try. The still life had taught them everything they needed.
So start with something simple. An apple. A mug. Do not worry about whether it is "art" or whether anyone would hang it on a wall.
Draw it because the act of drawing changes how you see the world. Draw it because there is something deeply satisfying about the scratch of graphite on paper, about the slow emergence of form from a cloud of marks, about the way a surface you have shaded for an hour suddenly catches the light just right and looks, for a moment, startlingly real.
Draw it because my grandmother was right: even a lopsided apple that looks like a potato has character.
And so do you. That character is what makes your drawings yours. No one else in the world would draw that apple the same way.
No one else holds a pencil the way you do or makes mistakes in the exact sequence that you make them.
Your hand, your eye, your willingness to sit quietly with an ordinary object and really look at it — that is the whole art.
Everything else is just technique.
And technique, as you have just learned, is just a matter of practice, patience, and a few good pencils.
Your Next Steps
If this article has sparked something in you, set up a simple still life today.
Grab any object within reach — a coffee mug, a piece of fruit, a shoe, a book.
Place it under a lamp. Sit down with your sketchbook. Spend fifteen minutes just looking at it.
Then draw it. Not well, not finished, but started. That first mark is the hardest one you will ever make.
Draw the same object again tomorrow. And the next day. Watch how your hand learns.
Watch how your eye sharpens. Watch how the object reveals itself over time — details you did not notice on day one, the way the light shifts across its surface at different hours.
By the end of a week, you will see progress that astonishes you.
Then set up a new still life. Two objects. Add a cloth. Change the lighting. Push yourself further with each drawing. The growth will not feel dramatic day to day, but when you look back at that first tentative sketch, you will see how far you have come.
The world is full of still life subjects waiting for you. A coffee cup on a rainy morning. Wildflowers in a mason jar. A stack of books beside a reading lamp. Your grandmother's fruit bowl. They are invitations. They are asking you to stop, to look, to draw.
Pick up your pencil. Accept the invitation.