Introduction
Have you ever walked through a home decor store and stopped in front of a macrame wall hanging, wondering how those intricate knots came together? They look complicated, like something only an experienced fiber artist could create. But here is the truth that might surprise you: macrame is one of the most forgiving and beginner-friendly crafts you can try. With just three knots and a few basic supplies, you can create a stunning boho wall hanging that looks like it came from a boutique.
I remember the first time I tried macrame. I was sitting on my living room floor with a tangled mess of cotton cord, convinced I had made a mistake. But within an evening, I had a textured, beautiful wall hanging that my daughter immediately claimed for her bedroom. That is the magic of macrame — it looks far more impressive than it is difficult.
In this tutorial, I will walk you through everything you need to know to create your first macrame wall hanging. We will start with the supplies, learn the three essential knots, and then put them together into a finished piece. By the end of this weekend, you will have a handmade decor piece and the confidence to try more advanced patterns. Let us untangle this together.
Why Macrame Belongs in Your Craft Rotations
Macrame has been around for centuries — sailors tied decorative knots on ships, and the craft experienced a major revival in the 1970s. Today, it is back and more popular than ever, and for good reason. It requires no special tools, no electricity, and no glue. You just need your hands, some cord, and a little patience.
For busy moms, macrame offers something rare: a craft you can pick up and put down without losing your place. Knot a few rows while the kids watch a movie, then come back to it after dinner. There is no drying time, no glue to clean up, and no project-ruining mistake that cannot be undone with a gentle tug.
The materials are also wonderfully budget-friendly. A spool of cotton cord costs about what you would pay for a specialty coffee, and it will last you through several projects. Scissors, a dowel or stick to hang from, and something to hold your work in place — that is your entire shopping list.
What You Will Need
Before we start, let us gather the supplies. One of the best things about macrame is that the materials list is short and affordable.
Materials
- Cotton macrame cord — For beginners, I recommend a 4mm or 5mm three-ply cotton rope. It is thick enough to work with easily and holds knots well. You will need about 100 yards for a wall hanging roughly 12 inches wide and 24 inches long. That is roughly four 25-yard spools, or a single 100-yard skein. Look for预 twisted or braided cord rather than single-strand, as it creates more defined knots.
- A dowel, stick, or wooden ring — This will serve as the top support for your hanging. A 12-inch wooden dowel from the craft store works perfectly. You can also use a driftwood stick for a more natural look, or a brass ring for a modern vibe.
- Scissors — A sharp pair for cutting cord cleanly.
- Masking tape or a clipboard — To hold your work in place as you knot. A clipboard is especially helpful because it keeps your cords organized and prevents tangling.
- A comb or brush — For brushing out the fringe at the bottom of your hanging. A simple plastic comb with wide teeth works fine.
Optional but Helpful
- A measuring tape — Cords need to be cut to specific lengths. A tape measure saves you from guessing.
- A wooden bead or two — These can be threaded onto cords for added visual interest. Look for beads with a 6mm or larger hole so the cord passes through easily.
- Fabric glue or clear nail polish — A tiny drop on the ends of your cut cords prevents fraying. This is optional, but it does give your finished piece a polished look.
The Three Essential Knots
Here is the best news: you only need to learn three knots to make a beautiful macrame wall hanging. Every intricate pattern you see online is a variation or combination of these three simple techniques. Master these, and you can create just about any macrame project you can imagine.
1. The Lark's Head Knot
This is the knot you will use to attach each cord to your dowel or ring. It is the foundation of almost every macrame project.
Step by step: Fold a cord in half so you have a loop at one end and two tails at the other. Place the loop behind your dowel, then bring the loop forward and down over the front of the dowel. Take the two cord tails, pull them through the loop, and tighten. That is it — you have tied a Lark's Head knot. Repeat this for every cord you are using.
Take a moment to practice this knot three or four times. It should feel natural before you move on, because you will be using it a lot. A well-tied Lark's Head sits snugly against the dowel with both tails hanging evenly. If one tail is longer than the other, gently tug the shorter side to balance them.
2. The Square Knot
The Square Knot is the workhorse of macrame. It creates the flat, woven sections that give macrame its distinctive look. You will use four cords at a time — two working cords on the outside and two filler cords in the middle.
Step by step: Take four cords that are hanging next to each other. Mentally label them from left to right: cords 1, 2, 3, and 4. Cords 2 and 3 are your filler cords — they will stay straight in the middle. Cord 1 (left) and cord 4 (right) are your working cords.
Take cord 1 and bend it over the top of cords 2 and 3, forming a loose "L" shape. Bring cord 4 over cord 1, then behind cords 2 and 3, and up through the loop created by cord 1. Pull both working cords gently to tighten. This is half of a Square Knot.
Now repeat in the opposite direction. Take cord 4 (now on the right side of the knot) and bend it over cords 2 and 3 to the left. Bring cord 1 over cord 4, behind cords 2 and 3, and up through the loop. Pull tight. You have just completed a full Square Knot.
Practice this sequence until you can do it without thinking. You will be tying hundreds of these in your macrame journey. Keep your tension consistent — not too tight that the knot buckles, and not too loose that it looks sloppy. Aim for a firm, even pull each time.
3. The Half Hitch Knot
The Half Hitch is what creates diagonal lines and angles in your macrame. It allows you to make chevron patterns, diamond shapes, and curved lines. This knot uses one holding cord (the one you are tying around) and one working cord.
Step by step: Take a cord and hold it diagonally across your work area — this is your holding cord. Take a second cord (your working cord), loop it over the holding cord from behind, bring it forward, and pull it through the loop. Tighten gently. This is a single Half Hitch.
To create a solid diagonal line, you will tie two Half Hitches in a row with the same working cord. This is called a Double Half Hitch. The double version is what you will use most often because it creates a cleaner, more stable line.
Try tying a few Double Half Hitches in a row along the same holding cord. You will see a diagonal line forming. The angle of your holding cord determines the angle of your design. A steep angle creates a sharp chevron; a shallow angle creates a gentle wave.
Designing Your First Wall Hanging
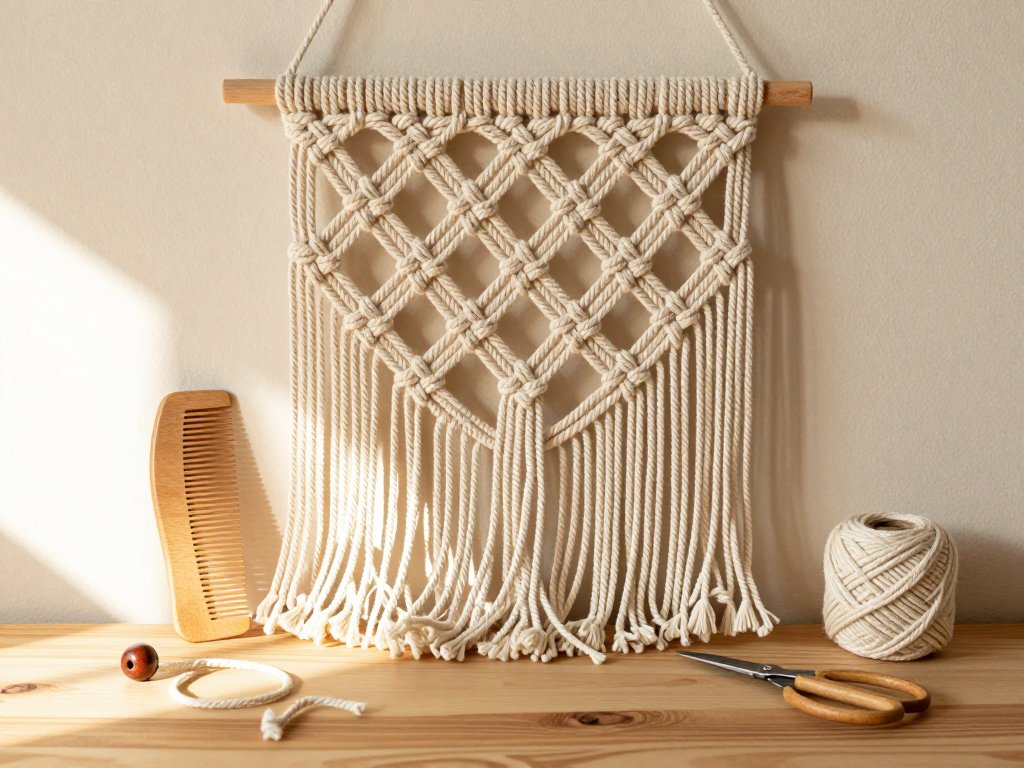
Now that you know the three knots, it is time to put them together into a wall hanging. I will walk you through a simple, elegant design that uses all three knots. The finished piece will be about 12 inches wide and roughly 24 inches long from the dowel to the bottom of the fringe.
Step 1: Prepare Your Cords
You will need 24 cords, each cut to 120 inches (10 feet) long. That is 2,880 inches or roughly 80 yards of cord total. If you bought 100 yards, you will have plenty left over for practice.
Before you start cutting, here is a tip: wrap a small piece of masking tape around the cord where you plan to cut. Cut through the middle of the tape. The tape prevents the cord from unraveling as you work. You can remove it once the knot is tied.
Step 2: Attach Cords to the Dowel
Take your 12-inch dowel and attach each of your 24 cords using a Lark's Head knot. Space them evenly across the dowel — each knot should sit about half an inch apart. When you are done, you will have 48 cord tails hanging down (two per cord).
Secure the dowel to your clipboard or tape the ends of the dowel to a table so your work stays in place. You want the cords hanging straight down, not twisted or tangled.
Step 3: Create the Top Section
Take the first four cords on the left side of your dowel. Tie two Square Knots in a row using these four cords. Move to the next group of four cords and repeat. Continue across the entire row. You should have 12 Square Knots in a neat row across the top.
Now skip the first two cords on the left. Take cords 3 through 6 (remember, each group of four overlaps — cords 3 and 4 are the right side of the first knot and the left side of the second). Tie a Square Knot with cords 3 through 6. Move across the row, spacing your knots in between the knots from the first row. This staggered pattern is called an alternating Square Knot, and it creates a beautiful net-like texture.
Step 4: Add Diagonal Patterns
Now you will use Double Half Hitches to create diagonal lines. Find the center of your work — cords 23 through 26. Take cord 23 and pull it diagonally to the right across the other cords. This is your holding cord. Tie Double Half Hitches with cords 24, 25, and 26 around this holding cord. You should see a diagonal line forming from the center toward the right edge.
Repeat on the left side. Take cord 26 and pull it diagonally to the left. Tie Double Half Hitches with cords 25, 24, and 23 around it. Now you have two diagonal lines meeting in a V shape at the center.
Continue this pattern, using each outer cord as a holding cord and working inward. This creates a beautiful diamond or chevron pattern in the middle of your hanging. Do not worry if your lines are not perfectly straight at first — the slight wobble gives handmade pieces their charm.
Step 5: Fill the Middle Section
Below the diagonal lines, fill the space with alternating Square Knots for about 4 to 5 inches. This creates a dense, woven section that provides visual weight to your hanging. The alternating pattern will make it look like a continuous mesh rather than individual knots.
As you work, occasionally step back and look at your piece from a distance. This helps you spot spots where the tension is uneven. If a section looks loose, gently tug the outer cords to tighten the rows.
Step 6: Create the Bottom Fringe
Once your knotted section reaches about 12 to 14 inches from the dowel, it is time to finish with fringe. Simply let the remaining cord hang naturally. You can leave the ends straight for a clean, modern look, or you can fray them for a softer, bohemian feel.
To fray the ends, use a wide-tooth comb or a pet brush. Hold each cord firmly near the base and brush downward gently. The cotton fibers will separate and fluff up, creating a soft, wispy fringe. Brush slowly — too much force can break the cord.
Trim the fringe to your desired length. For a beginner piece, I recommend trimming the bottom into a gentle curve or V shape. Lay your hanging flat, mark the shape with chalk or pins, and trim carefully with sharp scissors. A curved bottom adds a professional touch that elevates the entire piece.
Step 7: Finish and Hang
Turn your wall hanging over. If any cords have frayed ends that bother you, apply a tiny dot of fabric glue or clear nail polish to the tip. Let it dry completely.
Cut a 24-inch piece of cord for the hanging loop. Tie the ends together in a sturdy knot, then loop it over both ends of the dowel. Adjust it so the dowel hangs evenly.
Hang your creation on a wall hook, command strip, or nail. Step back and admire what you made with your own two hands and three simple knots.
Troubleshooting Common Beginner Issues
Even with clear instructions, things do not always go perfectly the first time. Here are the most common issues beginners face and how to fix them.
Uneven Tension
If some of your knots look tighter than others, do not worry — this is the most common beginner issue by far. The solution is practice and patience. As you tie more knots, your hands will develop muscle memory and your tension will become more consistent. For this project, a slight variation in tension gives the piece a handcrafted feel rather than a machine-made look. Embrace the imperfection.
Cord Tangling
Long cords love to tangle. To prevent this, stop every few rows and gently comb through your cords with your fingers from top to bottom. If a cord does get knotted, work the tangle out slowly with a pin or the tip of a crochet hook. Never yank on a tangle — you can stretch or break the cord.
Knots Sliding Down
If your knots are sliding down the cords rather than staying in place, your tension is too loose. Pull the working cords a bit tighter as you finish each knot. You can also try using a slightly thicker cord — 5mm cord holds knots better than 3mm.
Uneven Bottom Edge
If one side of your hanging is longer than the other, trim the fringe to even it out. Next time, check the cord lengths after every five rows by measuring from the dowel to the knot. Adjust your grip on the working cords to keep them level.
Taking It Further: Next Project Ideas
Once you have completed your first wall hanging, you will probably be eager to try more. Here are some natural next steps:
- Plant hangers — Use the same Square Knot and Half Hitch techniques to create a hanging planter. You will need a pot, four cords about 12 feet each, and a ring to hold the top together. The knots are the same — you just arrange them around the pot.
- Keychains and small decor — Scale down your materials and make small macrame keychains or ornament covers. These make wonderful handmade gifts and are quick enough to finish in an evening.
- Curtains and room dividers — Once you are comfortable with the knots, try making a larger piece using a longer dowel and more cords. A macrame curtain across a doorway adds texture and privacy to any room.
- Add color — Experiment with dyed cords. You can find cotton macrame cord in almost any color, or you can dye white cord yourself using fiber-reactive dye.
Each of these projects uses the same three knots you have already learned. You are not starting from scratch — you are building on a foundation you already have.
Why Handmade Matters
In a world where we can buy almost anything pre-made and delivered to our doorstep, there is something quietly revolutionary about making something with our own hands. A macrame wall hanging is not just decor. It is a record of your time and attention. Every knot represents a moment you chose to create rather than consume.
When guests admire your wall hanging and ask where you bought it, you get to say, "I made it." That feeling never gets old. And when your child points to it and says, "Mommy made that," you realize the example you are setting — that creativity is not something reserved for other people. It is something you practice, right in your living room, one knot at a time.
Final Thoughts
Macrame is one of those rare crafts that rewards you immediately. Within your first hour, you will see real progress. Your hands will learn the rhythm of the knots, the cord will begin to form a pattern, and a beautiful piece will emerge from what was once just a pile of rope.
I hope this tutorial has shown you that macrame is not as intimidating as it looks. You do not need special skills or years of practice. You just need a Saturday afternoon, some cotton cord, and the willingness to try. The three knots you learned today — the Lark's Head, the Square Knot, and the Half Hitch — are the same knots used in the most elaborate macrame art. You now know everything you need to begin.
So go ahead and cut your cords. Tie that first Lark's Head knot. And when you step back to admire your finished wall hanging, remember: you did that. With your own hands. And you can absolutely do it again.