Introduction
Have you ever held a piece of old handwritten correspondence and felt a quiet connection to the person who wrote it decades ago?
That is the heart of junk journaling — a gentle, intuitive craft that turns vintage papers, fabric scraps, ticket stubs, and found treasures into a one-of-a-kind book filled with texture, memory, and meaning.
Unlike traditional scrapbooking, which often follows strict layouts and design rules, junk journaling invites you to embrace imperfection.
Torn edges, ink smudges, uneven stitching — these are not mistakes. They are the details that give your journal character.
And the best part? You probably already own most of the supplies you need to start.
In this guide, I will walk you through everything you need to begin your first junk journal: the essential tools, where to find ephemera, how to bind your pages, and techniques for building beautiful collage spreads.
Whether you are looking for a mindful creative outlet or a meaningful way to preserve family treasures, junk journaling welcomes you exactly as you are.
What Is Junk Journaling?
Junk journaling is the art of creating handmade journals from recycled and upcycled materials. The term "junk" refers not to the quality of the finished product but to the source materials — old books, discarded papers, fabric remnants, and other odds and ends that might otherwise end up in the recycling bin.
Every page tells a story, and every tucked-in pocket holds a surprise.
The practice gained popularity as a DIY offshoot of traditional scrapbooking, but it has a distinct personality of its own.
Where scrapbooking often aims for polished, archival-quality layouts, junk journaling celebrates the worn, the weathered, and the wonderfully imperfect.
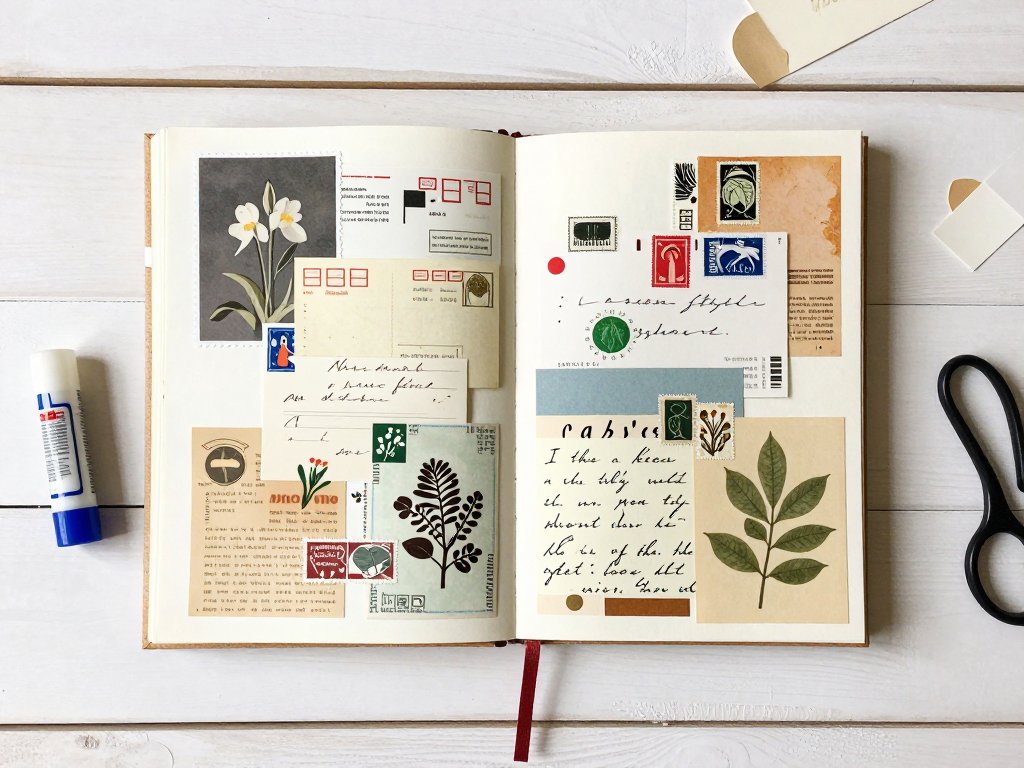
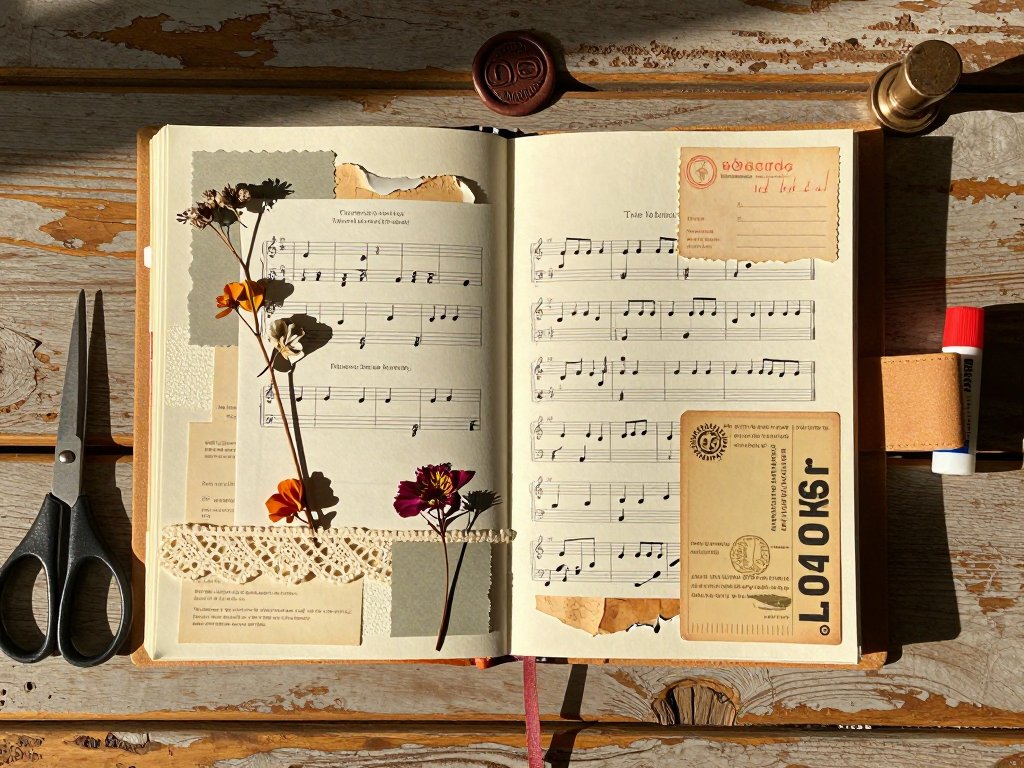
A journal might include vintage sheet music tucked into a paper pocket, a handmade envelope holding a pressed flower, a patch of lace sewn along the spine, and a pocket formed from a tea-stained envelope — all coexisting on facing pages.
The result is a tactile, layered keepsake that feels more like an art object than a notebook.
Many crafters find the process deeply therapeutic. There is no right or wrong way to arrange a page.
You simply gather your materials, let them speak to one another, and assemble them in a way that feels pleasing.
If a piece of paper tears while you are working with it, you incorporate the tear into the design.
That freedom is what makes junk journaling so accessible — even if you have never made a book before, you can create something beautiful on your very first try.
Essential Supplies for Your First Journal
One of the most appealing aspects of junk journaling is how little you need to spend to get started. Here is exactly what you will need, divided into categories so you can gather what you already have before buying anything new.
Paper for Signatures (Page Bundles). The core of your journal is made up of folded paper bundles called signatures.
Look for: old book pages from damaged or discarded hardcovers, vintage maps and atlases, sheet music from thrift stores, and decorative scrapbook paper in coordinating colors.
Aim for a mix of textures — smooth book pages next to rough handmade paper creates visual interest.
Ephemera for Decoration. Ephemera is the heart of junk journaling. These are the small paper treasures that give your journal its personality: vintage postcards and greeting cards, old letters and envelopes, ticket stubs and theater programs, sheet music, stamps both postage and decorative, botanical prints from old gardening books, and calendar pages with interesting illustrations.
Begin collecting now — a shoebox kept in your craft area fills up surprisingly fast once you start looking.
Binding Supplies. You have several options for holding your journal together: waxed linen thread for stitching signatures, a bone folder for crisp creases, an awl or thick needle for punching holes, and decorative washi or bookbinding tape for the spine.
If you prefer a no-sew approach, heavy-duty craft glue and a few sturdy binder rings work beautifully for a first project.
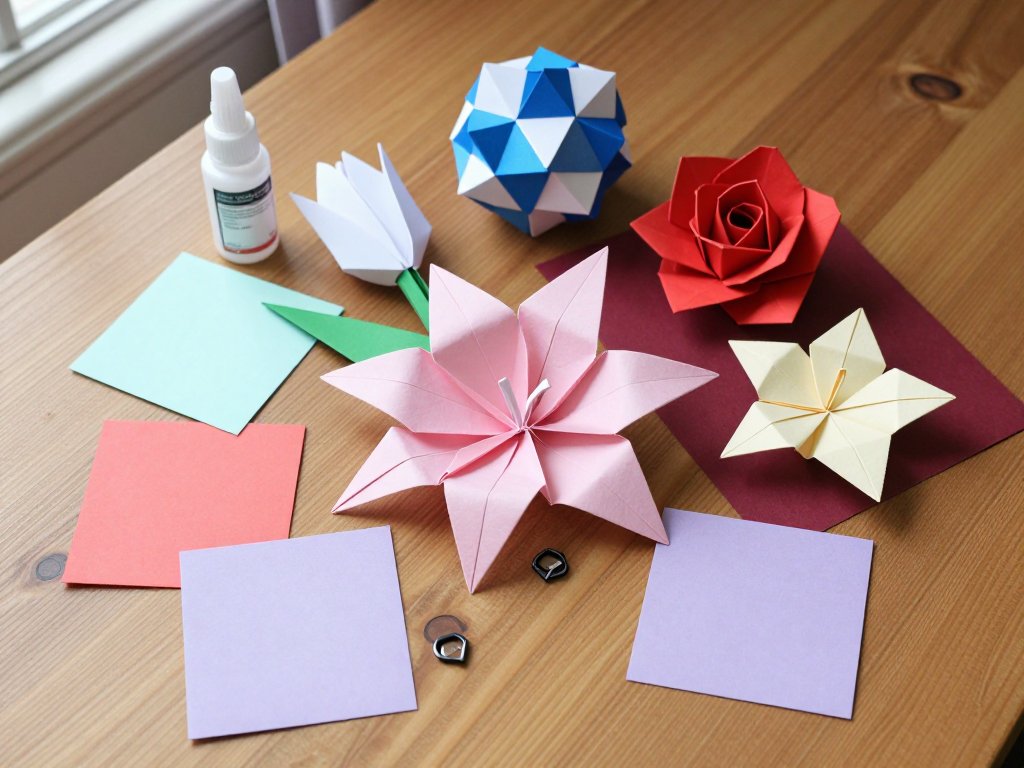
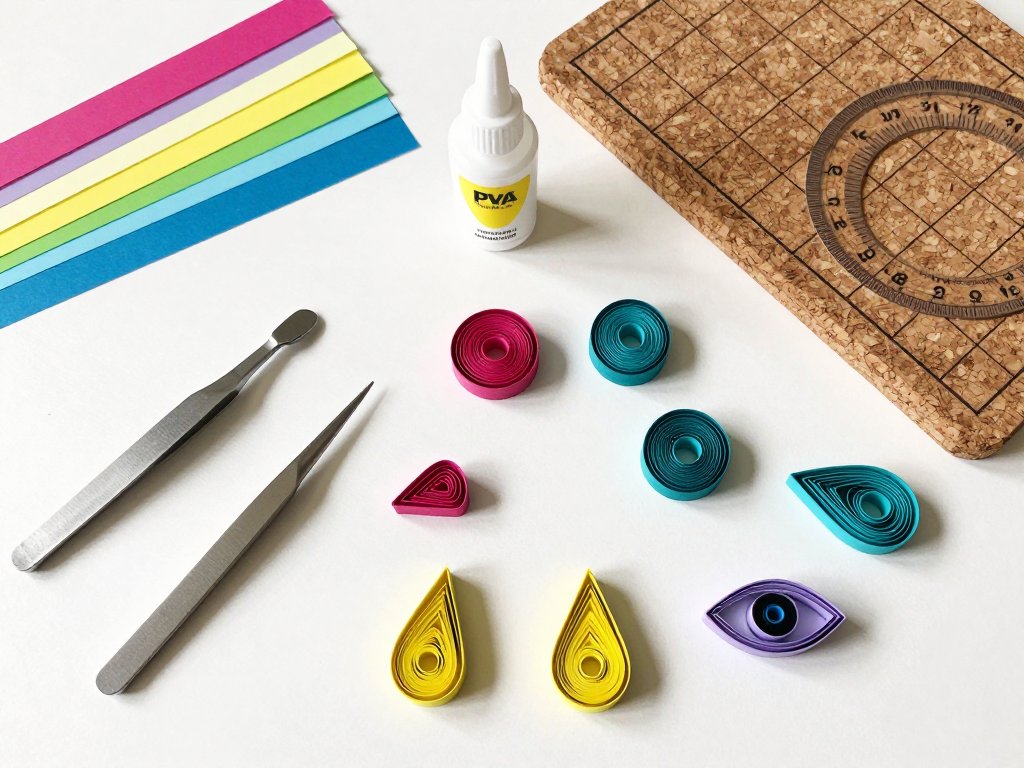
Embellishments. This is where your journal gets its signature look: lace trims and ribbon scraps, buttons and beads, dried flowers and pressed leaves, fabric scraps and doilies, tea bags for staining paper, and washi tape in coordinating colors.
You can also add metal charms, sea glass, or small keys for a truly unique touch.
Basic Tools. A pair of sharp scissors, a craft knife with a fresh blade, a self-healing cutting mat, a glue stick that dries clear, and a ruler with a metal edge for straight cuts. A sewing needle if you plan to stitch your binding.
Sourcing Ephemera on a Budget
Building a collection of ephemera does not require spending much money. Some of the best materials come from sources that cost nothing at all.
Start at Home. Before you shop, look through your own drawers and boxes. Old greeting cards, letters from family members, travel souvenirs, and children's artwork all make wonderful journal additions. Your own life is your richest source of meaningful ephemera.
Thrift Stores and Charity Shops. These are goldmines for junk journalers. Look for damaged hardcover books with interesting covers and endpapers, vintage sheet music priced at pennies each, old decks of playing cards, aged atlases and encyclopedias, and frames containing old prints or maps.
Thrift stores typically price books at one or two dollars, making this the most affordable way to build your stash.
Free Digital Resources. Many creators offer free printable ephemera online. Search for "junk journal printable ephemera" and you will find vintage labels, postage stamps, botanical illustrations, and advertising ephemera that you can print at home.
Print them on a variety of papers — matte photo paper, cream-colored copy paper, and even brown kraft paper each give a different look.
Nature Itself. Pressed flowers, dried leaves, seed pods, and feathers add an organic, seasonal element to your pages. Press them between the pages of a heavy book for a week before using them in your journal to ensure they lie flat.
Everyday Finds. Start seeing the potential in everyday paper items. Coffee shop sleeves with interesting patterns, paper bags from bakeries, ticket stubs from museums, tissue paper from gift bags, and the decorative inserts that come in packages all become treasures in a junk journal.
Preparing Your Materials
Before you begin assembling your journal, take time to prepare your materials. This step makes the actual construction process smoother and more enjoyable.
Tea or Coffee Staining. Many junk journalers prefer aged-looking paper. To achieve this naturally, brew a strong cup of black tea or coffee, let it cool completely, then submerge your paper sheets for one to five minutes depending on how dark you want them.
Lay the wet sheets flat on a towel to dry, or hang them on a clothesline for a more textured look.
For a variation, crinkle the paper before staining — the creases will hold more pigment and create a beautifully aged appearance.
Distressing Edges. New paper looks crisp and clean, which is the opposite of the vintage aesthetic.
To distress your pages, gently tear edges instead of cutting them, use a bone folder to create creases and worn folds, sand the edges lightly with fine-grit sandpaper, and crinkle the paper in your hands and then smooth it out again.
Cutting Signatures. Cut your paper into sheets that are half the width of your desired journal size.
For a standard 6-by-8-inch journal, cut your paper to 8 by 6 inches. Fold each sheet in half widthwise, creating a 4-by-6-inch page.
Stack four to six folded sheets together to form one signature. Prepare four to six signatures for a journal with substance.
Simple Binding Method: The Pamphlet Stitch
The pamphlet stitch is the simplest binding technique and perfect for beginners. It works beautifully for a single-signature journal and takes about fifteen minutes from start to finish.
Step 1: Prepare Your Cover. Cut two pieces of sturdy cardstock or kraft board to the same size as your folded pages, plus one-eighth inch on each side. This slight overhang protects your pages. If you want a softcover journal, use decorative scrapbook paper instead of cardstock.
Step 2: Stack and Clamp. Stack your cover pieces with one signature of folded pages between them. Use binder clips to hold everything in place along the spine edge. Make sure all the folds are aligned neatly.
Step 3: Mark Your Holes. Along the folded spine edge, make three small pencil marks: one at the center and one each one inch from the top and bottom. These are your sewing stations.
Step 4: Punch the Holes. Using your awl, punch through all layers at each pencil mark. Work on a self-healing mat and punch straight through from the outside of the cover to the inside.
Step 5: Thread Your Needle. Cut a piece of waxed linen thread about three times the height of your journal. Thread your needle but do not knot the end — you will tie it off at the end.
Step 6: Sew the Spine. Starting from the outside of the back cover, push your needle through the center hole, leaving a three-inch tail on the outside.
Come up through the top hole, go back down through the center hole, come up through the bottom hole, and go back down through the center hole.
You should now have both the thread tail and the working thread emerging from the center hole on the outside of the back cover.
Step 7: Tie Off. Gently pull the thread taut — not so tight that it cuts into the paper — and tie a square knot with the tail and working thread. Trim the ends to about one-half inch. Your journal is bound.
Building Your First Collage Spread
Once your journal is bound, the real fun begins. A collage spread is simply two facing pages that you decorate as a unified composition. Here is a practical approach for your first spread.
Choose a Theme. Working with a theme makes decisions easier. Your theme might be as simple as "things I loved this summer" or as specific as "tea time" with vintage tea labels, warm colors, and fabric doilies. A theme gives you direction without constraining your creativity.
Layer Your Background. Start with a base layer on each page. This could be a piece of book page, a sheet of music, a map section, or a piece of scrapbook paper.
Glue it down with a glue stick, covering the entire page. Do not worry if the edges extend beyond your page — you can trim them after the glue dries.
Add a Focal Point. Choose one or two larger pieces of ephemera to serve as the visual anchor of your spread. A vintage postcard, a botanical print, or a handwritten letter all work well. Position them slightly off-center for a more natural, less rigid composition.
Build Layers. Layer smaller pieces around your focal point. Tuck a corner of lace behind a postcard.
Place a ticket stub at a slight angle. Add a small envelope with a note tucked inside.
Each layer adds depth and invites the reader to explore the page with their hands as well as their eyes.
Add Pockets and Tuck Spots. One of the most beloved features of junk journals is the hidden pocket.
Create them by gluing a piece of paper along two edges, leaving the top open, or by repurposing an envelope with its flap intact.
These pockets hold tags, notes, photos, and small treasures that the journal's owner can discover over time.
Finish with Details. Add small embellishments to complete the spread. A cluster of stitches along one edge, a button glued near a corner, a washi tape border, a pressed flower tucked behind a piece of lace. These finishing touches make the spread feel intentional and complete.
Techniques for Beautiful Pages
Once you have completed your first spread, you may want to experiment with techniques that add depth and interest to your pages.
Sophie Bennett is a papercraft teacher who has been making junk journals for six years, and these are her favorite techniques for creating pages that feel layered and rich without looking cluttered.
Gesso Backgrounds. A thin layer of white or clear gesso brushed onto your page before you begin collage gives the paper more tooth and prevents thin ephemera from becoming translucent.
It also helps subsequent layers of glue adhere more evenly. Let the gesso dry completely before adding your first paper layer.
Fussy Cutting. This is the technique of cutting around the outline of an image with precision, removing its background so it integrates seamlessly into your collage.
Use small, sharp scissors and cut slowly, rotating the paper as you go. Fussy-cut flowers from wrapping paper or botanical prints look especially lovely layered over book pages.
Bellying Bands. A bellying band is a strip of paper or fabric that wraps around the outside of your journal and tucks into the spine, creating an exterior pocket.
Use it to hold a pen, a bookmark, or a small tag. Bellying bands add function and visual interest to the outside of your journal.
Thread and Stitching. Even if you do not sew, you can add thread to your pages.
A few straight stitches across a corner, a running stitch along the edge of a pocket, or a small embroidered detail in the center of a flower all add tactile appeal.
Use embroidery floss in a contrasting color for maximum impact.
Wax Seals. A wax seal on an envelope or tag adds an instant vintage touch.
You can buy sealing wax and a stamp at most craft stores for under ten dollars.
Practice on scrap paper first — the technique takes a few tries to master, but the results are worth the effort.
Organizing Your Ephemera Collection
As your junk journaling practice grows, so will your collection of ephemera. Keeping it organized saves time and inspires creativity when you sit down to work.
By Theme. Group your ephemera into broad theme categories: nature and botanicals, vintage correspondence and postmarks, travel and maps, holidays and seasons, food and kitchen, children and family, and architecture and cityscapes. Store each category in a labeled envelope or box.
By Color. For color-focused journalers, sorting by color is incredibly useful. Keep a box of warm-toned ephemera (reds, oranges, golds, browns) and a box of cool-toned pieces (blues, greens, purples, grays). This makes pulling a cohesive palette for a spread quick and intuitive.
By Size. Larger pieces like full pages from old books, maps, and sheet music work best when stored flat in a portfolio or large envelope. Keep these separate from your small bits so you can easily see what you have.
A Portable Starter Kit. For journaling on the go, assemble a small kit containing a glue stick, a small pair of scissors, a selection of your favorite ephemera in a zip pouch, a few sheets of washi tape, and a needle and thread.
This travel kit lets you work on your journal during quiet moments anywhere.
Troubleshooting Common Beginner Challenges
Every new junk journaler encounters a few hurdles. Here is how to handle the most common ones.
My journal is too bulky. If your journal refuses to close, you have likely added too many thick embellishments. Remove some of the bulkiest items and redistribute them across more pages. Alternatively, switch to a larger journal format that accommodates dimensional elements more comfortably.
My pages stick together. Wet glue takes time to dry completely, especially under layers of paper and fabric.
Use glue sparingly and press your pages under a heavy book for several hours after completing a spread.
If pages still stick, place a sheet of wax paper between them while the glue cures.
I do not like how a page turned out. This is a common feeling, especially for beginners.
Remember that every journal has pages that feel less successful than others. Instead of removing a page, try pasting a new layer over it — this is called a "tip-in" and is a legitimate technique in junk journaling.
You can also cover the page with gesso and start fresh.
My stitching is uneven. Uneven stitching adds character to a handmade journal. Unless the binding is about to come apart, leave it as it is.
The visible imperfections are what make your journal unique. If the binding is genuinely loose, add a second pamphlet stitch next to the first one for reinforcement.
I have run out of ideas. Keep a "swipe file" of junk journal inspiration. Follow junk journal creators on social media, bookmark images you love, and save screenshots of color palettes that catch your eye.
When you feel stuck, flip through your swipe file and let the images spark new ideas.
Expanding Beyond the Basics
Once you feel comfortable with the fundamentals, there are many directions your junk journaling practice can take.
You might try making journals with multiple signatures and a fabric-covered spine, a more advanced binding that creates a flexible, lay-flat journal.
You might explore art journaling, using your journal as a container for mixed media art with paint, ink, and found objects.
You could create themed journals for specific purposes — a garden journal with pressed flowers and seed packets, a travel journal with maps and ticket stubs, or a gratitude journal filled with uplifting quotes and images.
Some journalers make gift journals for friends and family, filling them with personalized ephemera that reflects shared memories.
The techniques you have learned in this guide apply to all of these formats. Your skills will grow with every journal you make, and each one will be a reflection of who you are at that moment in time.
Final Thoughts
Junk journaling is a craft that rewards patience, curiosity, and a willingness to see beauty in the discarded.
A chipped button becomes a closure. A torn envelope becomes a pocket. A faded letter becomes a story waiting to be read again.
The journals you create will hold not only paper and ephemera but the quiet joy of making something meaningful with your own hands.
Start with what you have, embrace the imperfections, and let your journal grow organically. Before you know it, you will have created something that no store could ever sell — a true original, made by you.