Introduction
Quilling is an art form where thin strips of paper are rolled, shaped, and glued together to create decorative designs.
The craft dates back to the Renaissance, when nuns and monks would roll gold-gilded paper trimmings from book edges to create religious artworks.
Today, it remains one of the most accessible and satisfying paper crafts you can try.
The beauty of quilling is that the learning curve is gentle. You can produce something lovely within your first hour. The materials are inexpensive and the projects travel well. You can quill at the kitchen table while the kids do homework or on the couch after everyone is in bed.
This guide covers everything you need to start. By the end, you will know the tools to buy, the eight essential shapes to master, and three complete projects to create your first pieces of quilled art.
Tools and Materials
One of the best things about paper quilling is how little you need to begin. Here is exactly what to buy.
Quilling Paper Strips
You cannot quill without paper strips. Pre-cut strips save hours of cutting and give consistent results. Most quilling strips come in three standard widths.
- 3mm strips — Used for delicate, fine detail work. Best for jewelry and small card accents.
- 5mm strips — The standard width for most beginners. Versatile for cards, wall art, and ornaments.
- 10mm strips — Wide strips used for fringed flowers and bold, chunky designs.
Start with a mixed-width pack of 5mm and 3mm strips in assorted colors. You can find these at any craft store, on Amazon, or at specialty quilling shops like Quilled Creations or Lake City Crafts.
Expect to pay about $8 to $15 for a starter pack with 100 to 200 strips.
Quilling Tools
Three tools form the core of your quilling kit.
- Slotted tool — This has a small slit at the tip that catches the end of the paper strip. You slide the strip into the slot and rotate the tool to roll the paper around itself. It is the easiest tool for beginners because it holds the paper securely. Look for a tool with a fine slot that does not leave a crease in the center of your coil.
- Needle tool — A long, sharp metal point used to apply glue precisely and to manipulate tight coils without crushing them. Some quillers use a corsage pin or a long sewing needle mounted in a handle. The needle tool is your best friend for fine adjustments.
- Tweezers — Curved or straight tweezers with fine points let you place tiny coils exactly where you want them. You will use these constantly. Invest in a good pair with a comfortable grip.
Glue
Use PVA glue — white craft glue that dries clear. Elmer's School Glue works well and costs about $2.
A smaller bottle with a fine-tip applicator gives you better control. Put a small drop on a disposable surface, dip your needle tool into it, and apply the tiniest amount to your paper.
Less is always more with quilling glue.
Work Board
A cork work board or a foam board gives you a surface to pin shapes onto while they dry.
A 12-inch by 12-inch board is plenty for most beginner projects. You can buy a dedicated quilling board with a printed ruler and circle guides for under $15, or simply use a cork trivet from the dollar store.
Other Essentials
- Crimper tool — A small hand-crank tool that embeds a zigzag texture into paper strips. Optional but fun for adding visual interest.
- Quilling comb — A long-toothed comb used to create woven, looped patterns. Many beginner kits include one.
- Circle sizing ruler — A flat template with circles of varying diameters. You place loose coils inside to ensure they are all the same size. Invaluable for consistent results.
- Straight pins — Pearl-headed or T-pins hold shapes in place on your work board as the glue dries.
- Ruler — A standard 12-inch ruler for measuring strips and spacing.
You can buy a complete beginner quilling kit for $20 to $30 that includes a slotted tool, needle tool, tweezers, glue, a work board, circle sizer, and paper strips. This is the most cost-effective way to start.
Basic Shapes and Techniques
Every quilling design, no matter how complex, is built from a small set of fundamental shapes. Master these eight, and you can make almost anything.
1. Tight Coil
The tight coil is the simplest shape and the foundation for many others.
- Insert one end of a paper strip into the slot of your slotted tool.
- Rotate the tool with your dominant hand while keeping gentle tension on the paper strip with your other hand.
- Continue rolling until the entire strip is wound tightly around the tool.
- Remove the coil from the tool. Immediately apply a tiny dot of PVA glue to the loose tail end and press it against the outer edge of the coil with your needle tool.
- Hold for ten seconds until the glue sets.
Use tight coils as centers for flowers, dots in patterns, or decorative borders on cards.
2. Loose Coil
The loose coil is the same as a tight coil, but you let it relax before gluing.
- Roll a strip into a tight coil following the steps above.
- Remove it from the slotted tool and place it on your work board.
- Let the coil naturally unwind. Wait three to five seconds for a standard loose coil.
- Use the circle sizing ruler to check that your coil is the correct diameter.
- Glue the tail once the coil has relaxed to the desired size.
Loose coils are the blank canvas for almost every other shape. Practice making them consistently the same size before moving on.
3. Teardrop
The teardrop is the first shaped coil you will learn and one of the most useful.
- Make a loose coil and do not glue the tail yet.
- Pinch one point of the coil between your thumb and forefinger to create a sharp point.
- The opposite end remains rounded.
- Apply glue to the tail and hold the shape until dry.
Teardrops form the petals of flowers, leaves, and the outer rings of snowflake designs. Vary the position of the pinch to create long, thin teardrops or short, plump ones.
4. Eye Shape (Marquise)
The eye shape, also called the marquise, is a teardrop with two pinched points.
- Make a loose coil.
- Pinch one side between your thumb and forefinger.
- Pinch the opposite side directly across from the first pinch.
- You now have a shape that resembles an eye or a football.
- Glue the tail and allow the shape to dry.
Eye shapes work beautifully as leaves, flower petals on pointed blooms, and decorative border elements. For a more open look, use a larger loose coil before pinching.
5. Marquise Curved
A curved marquise adds gentle movement to the basic eye shape.
- Make an eye shape following the instructions above.
- Place the eye shape flat on your work board.
- Use your needle tool to nudge the center of one long side inward, creating a gentle curve.
- Hold the shape briefly until it holds the curve, then glue.
Curved marquises make excellent flower petals because they mimic the natural curve of a blooming flower. Try using five curved marquises arranged in a circle for a simple daisy.
6. Square
The square gives you a geometric shape for structured designs.
- Make a loose coil.
- Pinch the first point to create a corner.
- Rotate the coil 90 degrees and pinch a second point.
- Rotate again and pinch a third corner.
- Rotate one final time and pinch the fourth corner.
- Adjust all four corners so the shape sits evenly. Use your tweezers to refine the points.
- Glue the tail.
Squares are perfect for mosaic-style designs, geometric patterns, and filling in backgrounds. You can make them more pronounced by using a larger loose coil.
7. Triangle
The triangle is simpler than the square and equally useful.
- Make a loose coil.
- Pinch one point to form the first corner.
- Rotate the coil and pinch a second corner about one-third of the way around.
- Rotate again and pinch the third corner, forming a triangle.
- Adjust the sides so they are even. The center should be slightly domed.
- Glue the tail.
Triangles work well in geometric designs, as leaves, and as elements in Christmas tree or holiday-themed projects.
8. Scroll Shapes
Scrolls are coils that are not fully closed. They have loose, open ends that add elegance to any design.
Open Heart Scroll:
- Fold a paper strip in half to find the center crease.
- Roll one end of the strip outward from the center using your slotted tool. Roll until you reach the fold.
- Roll the other end outward in the opposite direction, mirroring the first roll.
- Both rolls should face outward, creating a heart shape.
- Apply glue to the center fold to hold the two halves together.
V Scroll:
- Fold a strip in half.
- Roll each end inward toward the fold.
- The rolls sit side by side and the open ends form a V shape.
- Glue the inside of the V where the rolls meet.
S Scroll:
- Roll one end of a strip inward toward the center.
- Roll the opposite end outward away from the center.
- The two rolls curve in opposite directions, forming an S shape.
- Apply a tiny dot of glue to the center curve to hold the S in place.
Scrolls are wonderful for decorative borders, filigree accents, and Victorian-style designs. Practice each of the three scroll types until you can make them symmetrical.
Essential Techniques
Gluing Tips
Too much glue is the most common beginner mistake. Here is the right method.
- Put a dime-sized drop of PVA glue on a scrap piece of paper or a plastic lid.
- Dip the tip of your needle tool into the glue. It should pick up only a tiny bead.
- Touch the bead to the paper where you need it. The glue will wick into the fibers.
- Use tweezers to hold the glued piece in place for ten to fifteen seconds.
- Let glued projects dry flat overnight before moving or framing them.
If glue seeps out from under a piece, wipe it away immediately with a dry toothpick. Dried glue is nearly invisible on white paper but shows as shiny spots on darker paper.
Using a Crimper
A paper crimper adds a textured zigzag pattern to your strips.
- Insert a paper strip between the two rollers and turn the handle slowly. The strip emerges with a crisp zigzag texture.
- Use crimped strips in loose coils, scrolls, or as background borders on cards.
- Crimped paper is thicker and slightly shorter than uncrimped paper, so adjust your project dimensions accordingly.
Crimped coils catch light differently than smooth coils, adding visual depth to your finished pieces.
Fringed Flowers
Fringed flowers are a classic quilling technique that produces realistic, fluffy blooms.
- Take a 10mm wide paper strip. Cut perpendicular slits along one long edge, about 2mm apart and 7mm deep. You can use scissors or a fringe cutter tool.
- Roll the uncut edge into a tight coil using your slotted tool. The fringed edge will fan outward as you roll.
- Glue the tail end of the strip.
- Gently fluff the fringed edges outward with your fingers or a needle tool until the flower looks full and rounded.
A single fringed flower looks lovely on a greeting card. Group three together in different colors for a striking bouquet.
Quilling Comb Patterns
A quilling comb lets you create woven, looped shapes that resemble Celtic knots or woven baskets.
- Weave the end of a paper strip between the first two teeth of the comb.
- Loop the strip around the outside tooth and weave back through the next gap.
- Continue wrapping back and forth around the comb teeth, building up layers.
- When you reach the desired width, glue the tail to the back of the shape.
- Slide the shape off the comb and pinch the ends if desired.
Comb patterns make beautiful leaves, butterfly wings, and decorative borders. They look intricate but are easy once you get the rhythm.
Simple Patterns
Project 1: Floral Greeting Card
This project produces a simple but elegant card that looks like it came from a boutique. It takes about thirty minutes.
Materials:
- Blank greeting card and envelope (4.25 inches by 5.5 inches, A2 size)
- Eight 5mm paper strips in pink or red for petals
- One 5mm paper strip in yellow for the flower center
- Three 3mm paper strips in green for leaves and stem
- PVA glue and needle tool
- Circle sizing ruler
Instructions:
- Make eight teardrop shapes from the pink strips. Use the circle ruler to keep them uniform — a 12mm diameter works well.
- Make one tight coil from the yellow strip for the flower center.
- From the three green strips, make two curved marquises for leaves and one straight strip cut in half for the stem.
- Arrange the eight teardrops in a circle on the card front with the points facing inward. The points should meet at the center.
- Glue the yellow tight coil in the center on top of the teardrop points.
- Glue the stem below the flower and add the curved marquise leaves on either side.
- Let the card dry flat for one hour before closing.
Project 2: Framed Wall Art — Butterfly and Flowers
A 5-inch by 7-inch shadow box frame creates a lovely gift or home decor piece. This project takes about two hours spread over two drying sessions.
- 5-inch by 7-inch shadow box frame with a white or cream background
- Twelve 5mm strips in assorted flower colors (pink, purple, blue)
- Four 5mm strips in a contrasting color for the butterfly
- Ten 3mm strips in green for leaves
- Two 3mm strips in a light blue or grey for accent scrolls
- PVA glue, needle tool, tweezers, circle sizing ruler
Instructions:
- Make eight loose coils from the flower-colored strips. Use a 14mm circle on the ruler for consistency.
- Shape four of the loose coils into teardrops and four into curved marquises.
- Make four tight coils from the remaining flower-colored strips. These will be the flower centers.
- Group the shapes into three flower units: two flowers use two teardrops and two curved marquises each, and one flower uses four teardrops. Place a tight coil in the center of each.
- Make the butterfly body from one 3mm strip rolled into a tight coil.
- For the butterfly wings, take the four 5mm contrasting strips. Roll each into an eye shape. Two should be slightly larger for the upper wings and two slightly smaller for the lower wings.
- Make five leaf shapes from the green strips: three teardrops and two curved marquises.
- Roll the two light blue strips into open heart scrolls. Place these as accent flourishes near the butterfly.
- Arrange the three flower units at the bottom left quadrant of the frame. Place the butterfly in the upper right quadrant flying toward the flowers.
- Add the leaves near the flower bases and position the scroll flourishes.
- Glue everything in place. Let dry flat for at least four hours before closing the frame.
Project 3: Quilled Pendant Necklace
Quilled jewelry looks delicate and impressive but takes only about forty-five minutes.
Materials:
- One 3mm strip in your main color (about 18 inches long — glue two strips together if needed)
- One 3mm strip in a contrasting accent color
- PVA glue and needle tool
- Pendant finding with a glass cabochon (20mm to 25mm diameter)
- Needle-nose pliers
- Chain or cord, 18 to 24 inches
Instructions:
- Roll the main color strip into a tight coil. Apply glue to the tail and let it dry completely.
- Roll the accent strip into a loose coil. Use a circle sizing ruler to match the diameter of the tight coil.
- Shape the loose coil into a teardrop.
- Apply a thin layer of PVA glue to the back of the tight coil and press it onto the pendant finding base.
- Glue the teardrop accent alongside the tight coil.
- Let the glue cure for thirty minutes.
- Use needle-nose pliers to attach the pendant finding bail if it is not already attached.
- Thread the chain or cord through the bail.
Try making several pendants in different color combinations. They look beautiful grouped together as a gift set.
Tips for Beginners
Every new quiller makes the same mistakes. Here is how to avoid the most common ones.
Mistake: Using Too Much Glue
Excess glue seeps out from under your pieces and leaves shiny spots. It also warps the paper and can cause coils to lose their shape.
Solution: Use a needle tool to apply glue one tiny bead at a time. If you see glue pooling around a shape, you are using too much. Wipe it away immediately with a dry toothpick.
Mistake: Uneven Tension While Rolling
If you pull the paper strip too tightly, the coil will be tight on one side and loose on the other.
Solution: Relax your grip on the paper strip. The slotted tool does the work of rolling. Guide the strip gently instead of pulling it taut. Practice with scrap paper until you find a rhythm that produces even coils.
Mistake: Coils Popping Open
Your coil unwinds after you remove it from the tool and the glue does not hold. This is usually because the tail was not pressed firmly enough or the glue was too dry.
Solution: After applying glue to the tail, hold the coil in place with your tweezers for a full ten seconds. Count slowly. Do not let go early. If the tail still pops up, use a tiny bit more glue or try a fresh bottle of PVA.
Mistake: Inconsistent Coil Sizes
Your loose coils come out different sizes, so your flower petals do not match each other.
Solution: Always use a circle sizing ruler. Develop the habit of placing every loose coil into the ruler immediately after rolling. Let it relax to the same circle size every time before gluing. Consistency is the fastest path to professional-looking quilling.
Mistake: Not Letting Shapes Dry Properly
You glued a shape in place but it shifted when you tried to add the next piece.
Solution: Give each glued piece enough time to set before handling it. PVA glue needs about thirty seconds to grab and about an hour to fully cure.
Work on one section at a time. A hair dryer on a low, cool setting for thirty seconds speeds up drying in a pinch.
Mistake: Buying the Wrong Paper
Standard craft store paper is too thick or too thin for quilling. Printer paper will not hold a coil shape.
Solution: Buy paper made specifically for quilling. It is available in 80 to 120 gsm weight and comes in acid-free options. Quilling paper has the right amount of spring and holds its shape without unrolling.
Mistake: Starting with a Complex Project
You tried a detailed portrait as your first project and felt frustrated.
Solution: Start with the greeting card project in this guide. It uses only three shape types and gives you a finished piece in under an hour. Build your skills gradually before moving to the framed wall art.
Conclusion
Paper quilling rewards patience and practice with beautiful, handmade results. The materials are inexpensive. The tools are simple. And the skills build on each other in a natural, satisfying way.
Start with the greeting card project this weekend. Practice your tight coils and teardrops until they feel automatic. Then try the butterfly wall art or the pendant necklace. Every shape you master opens the door to more complex designs.
There is a large quilling community online. Search for patterns on Pinterest, join quilling groups on Facebook, and follow quilling artists on Instagram. Many share free patterns and video tutorials to help you keep growing.
The most important thing is to enjoy the process. Paper quilling is meant to be calming, not stressful.
If a coil pops open, glue it back. If a shape looks uneven, make another one.
Your hands will learn the motions with practice, and soon you will be creating pieces that surprise even you.
Happy quilling.
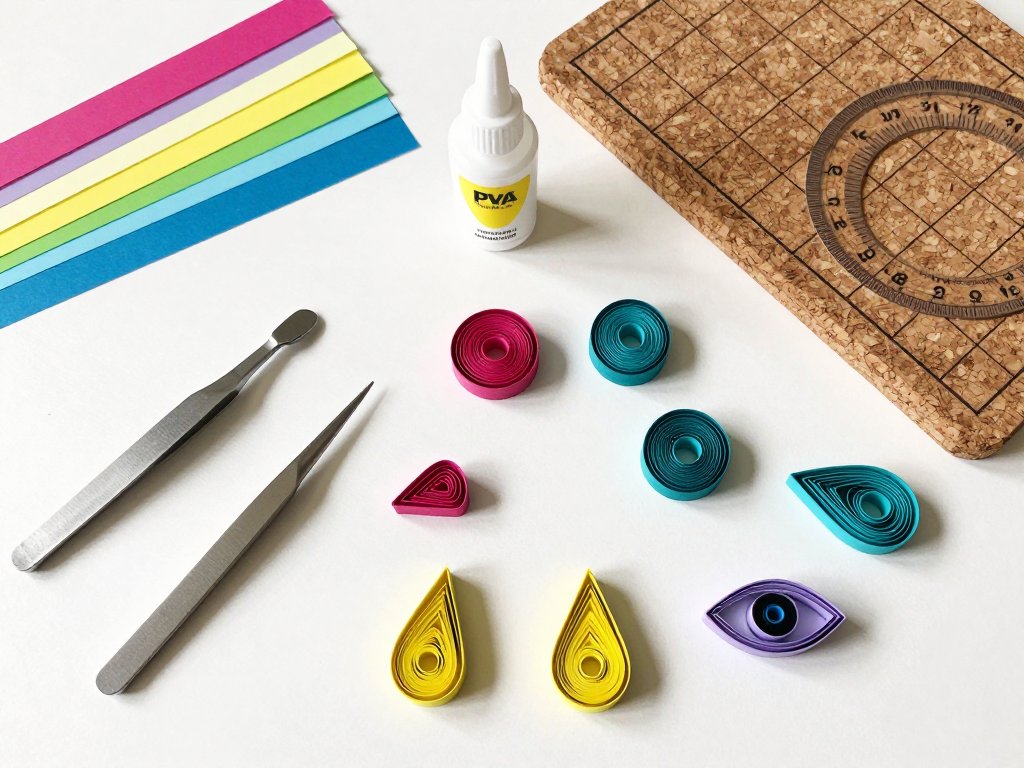
Image
Flat-lay photography of paper quilling supplies on a clean white wooden table, top-down view, bright natural daylight.
Visible items include an assortment of colorful pre-cut 3mm, 5mm, and 10mm quilling paper strips spread across the surface, a silver slotted tool, a metal needle tool, fine-point tweezers, a small bottle of white PVA glue, a cork work board with pearl-headed pins, a circle sizing ruler, and three finished quilled shapes — a tight coil, a teardrop, and an eye shape — resting beside the tools.
Soft shadows cast to the lower right. Clean, minimal aesthetic with pastel-colored paper strips in pink, blue, yellow, lavender, and green.
The composition is balanced and intentional, evoking a calm, creative workspace. Shallow depth of field with the tools in sharp focus and the background slightly blurred.
Warm, inviting, aspirational craft photography style suitable for a magazine feature.