Introduction
There is something special about a paper flower. It never wilts, never needs water, and it carries the quiet satisfaction of having been made by your own hands.
Origami flowers are one of the most rewarding paper crafts you can learn — they use only paper and your hands, they cost almost nothing, and the results are stunning enough to give as gifts.
I started making origami flowers when my daughter wanted a bouquet for her playroom. We sat at the kitchen table with a stack of scrapbook paper, and within an hour, we had a handful of blooms that made her absolutely beam.
That is the beauty of origami flowers: they look delicate and intricate, but the folds are simple enough for a child to learn with a little patience.
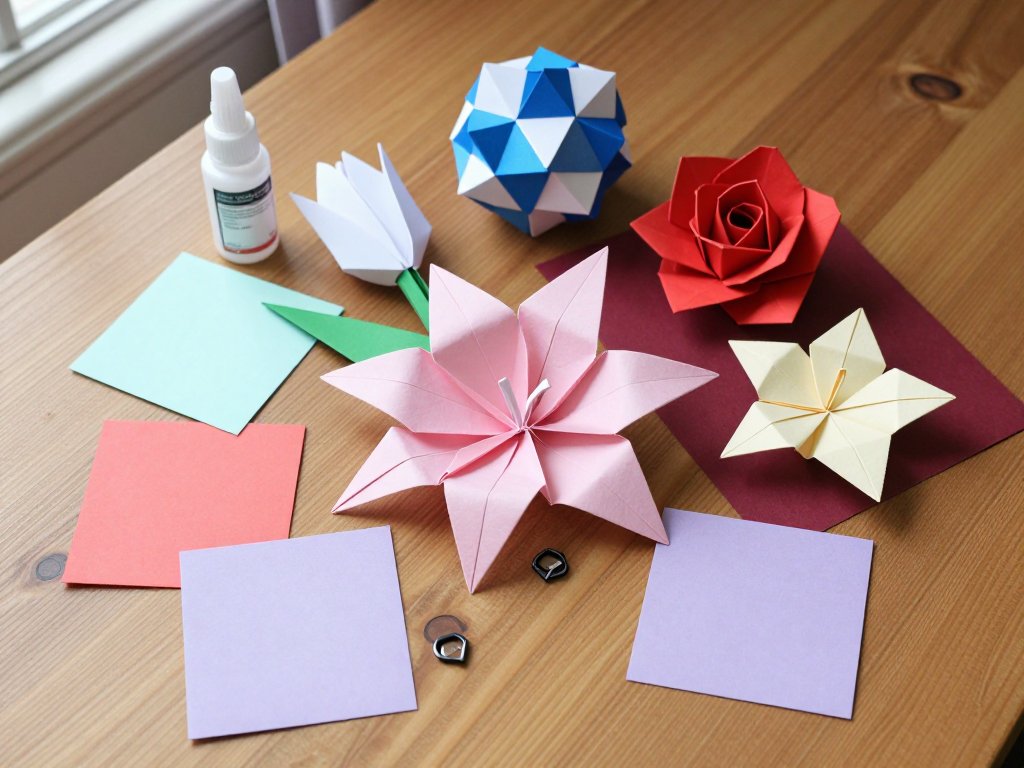
This tutorial covers five flower styles, from the classic lily to the modern kusudama ball.
Each project lists the exact steps, the paper size you need, and the difficulty level.
Start with the first flower and work your way through, or skip ahead to the one that catches your eye.
By the end, you will have enough knowledge to create bouquets, wreaths, gift toppers, and home decor that looks beautiful year-round.
What You Will Need
Here is the complete supply list. You likely have most of these at home already.
- Origami paper — Standard 6-inch by 6-inch origami paper is ideal. It is thin enough to fold cleanly but holds creases well. A pack of 100 sheets in assorted colors costs about eight dollars. For larger flowers, use 8-inch or 10-inch paper.
- A flat, clean surface — A table or desk works perfectly. Avoid soft surfaces like carpet or bedding, which absorb the pressure of your creases.
- A bone folder or credit card — For sharp creases. A bone folder is ideal, but the edge of a credit card works almost as well in a pinch.
- Craft glue — A small bottle of white craft glue or a glue stick for attaching petals and finishing touches.
- Scissors — For trimming paper if needed (some designs require cutting before folding).
- Optional: Floral wire and tape — If you want to turn your paper flowers into a bouquet with stems, pick up a pack of floral wire (about five dollars) and green floral tape (about three dollars).
Origami Basics: Three Folds You Need to Know
Before you start on the flowers, practice these three foundational folds. They appear in every origami flower design.
The Valley Fold
Fold the paper toward you, creating a crease that dips inward like a valley. This is the most common fold in origami. Run your fingernail or bone folder along the crease to make it sharp.
The Mountain Fold
Fold the paper away from you, creating a crease that rises like a mountain peak. Think of it as the opposite of a valley fold. The paper bends in the other direction.
The Reverse Fold
A reverse fold changes the direction of an existing fold. You open the paper slightly, push a section inside along the crease, then flatten it. It sounds tricky, but once you see it done, it clicks. This fold is used to shape petals and create dimension.
Flower 1: The Classic Origami Lily
The origami lily is a perfect starting point. It uses one sheet of paper, requires only valley and mountain folds, and produces a recognizable flower shape that looks lovely on its own or in a group.
Paper Size and Prep
You will need one square sheet of paper, 6 inches by 6 inches. Lighter colors like white, pink, or pale yellow work beautifully. Place the paper with the colored side facing up.
Step 1: Create the Base
Fold the paper in half diagonally, bringing the top-left corner to the bottom-right corner. Crease firmly and unfold. Fold diagonally in the other direction, bringing the top-right corner to the bottom-left corner. Crease and unfold. You should have an X-shaped crease across your paper.
Flip the paper over. Fold it in half horizontally, bringing the top edge to the bottom edge. Crease and unfold. Fold in half vertically, bringing the left edge to the right edge. Crease and unfold. You should now have a star-shaped crease pattern.
Step 2: Collapse into a Square Base
This step creates what origami artists call a square base. Push the left and right sides of the paper inward along the diagonal creases.
The paper will naturally collapse into a smaller square shape. Flatten it so you have a diamond shape with the open end pointing toward you — the point where all flaps meet at the top is the closed tip.
Step 3: Fold the Flaps
With the open end of the diamond pointing toward you, fold the right corner of the top layer to the center crease.
Repeat on the left. Flip the paper over and do the same on the back.
You should now have a shape that looks like a kite or an elongated diamond.
Step 4: Form the Petals
Fold the top point of the diamond down toward the bottom point, creasing firmly. Unfold all the folds from step 3.
Open the top layer of the paper slightly and lift the bottom point up through the middle.
This is called a petal fold. Flatten carefully — you should see the paper forming petals on both sides.
Step 5: Shape the Flower
Repeat the petal fold on the other three sides. Once all four are done, you will have a bud shape. Gently curl the tips of each petal outward using your fingers or a pencil. Curl the petals back slightly to give the lily its characteristic open bloom shape.
Flower 2: The Simple Tulip
The origami tulip is even simpler than the lily and creates a charming, rounded flower. It is an excellent choice for children's crafts or when you need a quick batch of flowers for a party decoration.
Paper Size and Prep
One square sheet, 6 inches by 6 inches. Bright, solid colors like red, yellow, or orange work best. Place the colored side down.
Step 1: Start with a Triangle
Fold the paper in half diagonally to form a triangle. The colored side should now be visible on the outside. The long edge of the triangle should be at the bottom.
Step 2: Fold the Corners Up
Take the right corner of the triangle and fold it upward at an angle, bringing it past the top center point.
The tip should extend slightly beyond the top edge of the triangle. Repeat with the left corner, overlapping it over the right corner.
The two folded corners form the tulip's petals.
Step 3: Fold the Bottom Points
Fold the bottom corners of the triangle upward, tucking them behind the petals. This creates the rounded base of the tulip.
Step 4: Finish
Flip the flower over. You should see a neat tulip shape with two overlapping petals at the top.
Gently curl the petals outward with your fingers for a more natural look. If you want to add a stem, glue a piece of floral wire or a green paper strip to the back.
Flower 3: The Modular Kusudama Ball
A kusudama ball is a collection of identical folded units that fit together without glue to form a spherical shape.
It sounds complex, but each unit is simple to fold. The magic happens when you assemble them.
A finished kusudama ball makes a stunning decoration for a shelf, a mobile, or a party centerpiece.
Paper Size and Prep
You will need 12 square sheets of paper, 3 inches by 3 inches. Using two or three coordinating colors creates a beautiful pattern. Each sheet makes one unit of the ball.
Folding One Unit
Fold the paper in half horizontally to create a rectangle. Unfold. Fold the top and bottom edges to the center crease. Fold the paper in half vertically. Unfold. Fold the right edge to the center crease. Unfold. You should have a grid of small rectangles.
Fold the four corners inward at a 45-degree angle, creating small triangles on each corner. Fold the paper in half vertically, bringing the left edge to the right edge. The folded corners should now be visible on the outside.
Fold the top right corner down to the bottom edge, creating a 45-degree angle. Repeat on the bottom left corner, folding it up to the top edge. You have completed one unit. Repeat this process for all 12 sheets.
Assembling the Ball
Each unit has a pocket and a tab. Insert the tab of one unit into the pocket of another.
They fit snugly — if they are loose, your creases may not be sharp enough.
Continue connecting units until all 12 are joined into a sphere. The final connection can be tricky; work slowly and adjust the units as you go.
Flower 4: The Easy Rose
This origami rose is slightly more advanced but produces stunning results. It uses a technique called wet folding — lightly dampening the paper before folding — which allows the paper to hold curved shapes.
Do not worry if your first rose is not perfect. Even a slightly crumpled paper rose has a lovely, romantic charm.
Paper Size and Prep
One square sheet, 8 inches by 8 inches. Red, pink, or burgundy paper creates a classic rose look. If you plan to wet fold, use thicker origami paper or lightweight cardstock, which can handle moisture without tearing.
Step 1: Create a Blintz Base
Fold the paper in half diagonally both ways to create an X crease. Unfold. Fold all four corners to the center point. This is called a blintz base. The paper should now be a smaller square.
Step 2: Fold the Corners to Center Again
Fold the four new corners to the center point again. The square gets smaller. Repeat this step once more. You will now have a small, thick square with many layers.
Step 3: Flip and Shape
Flip the paper over. You will see four flaps, one in each corner. Gently pull each flap outward and upward. They will naturally form the rose petals. Curl the edges of each petal outward using your fingers or a pencil.
Step 4: Shape the Center
The center of the rose will be a small square on top. Push it down gently with your finger to create the rose's inner spiral. If the paper resists, use the tip of a pencil to coax it into shape.
Flower 5: The Five-Petal Blossom
This blossom is made from five separate petals that are folded individually and then glued together. It is an excellent choice when you want a larger, more dimensional flower that looks like a cherry blossom or star jasmine.
Paper Size and Prep
Five square sheets, 4 inches by 4 inches, plus one small circle of cardstock for the center. Pastel or white paper works beautifully.
Folding a Single Petal
Fold one square in half diagonally to form a triangle. Fold the two bottom corners upward to meet the top point, creating a diamond shape. Unfold these two folds completely. You should see crease lines forming an X on the triangle.
Open the top layer of one corner and flatten it into a smaller square (this is called a squash fold).
Repeat on the other corner. Fold the outer edges of both squash folds inward to the center line.
Fold the two points down. Fold the entire petal in half along the center line.
You have completed one petal. Repeat for all five sheets.
Assembly
Apply a thin line of glue along the straight edge of one petal. Press it against the straight edge of another petal. Hold for 30 seconds. Continue adding petals until all five are joined in a ring. Glue the small cardstock circle to the center to hide the seams.
Finishing Touches and Display Ideas
Once you have folded a few flowers, here are some ways to display and use them.
- Bouquet — Attach each flower to a length of floral wire wrapped in green floral tape. Arrange them in a vase. Mix different flower types and colors for a realistic look.
- Gift toppers — Glue a single origami flower to the top of a wrapped gift. It adds a personal touch that store-bought bows cannot match.
- Garland — String several flowers on a length of twine or thread. Hang the garland across a window, mantel, or bookshelf.
- Wreath — Glue flowers onto a foam or wire wreath base. Add leaves cut from green paper for a full, lush look.
- Mobile — Hang individual flowers from a hoop or branch at different heights using clear fishing line. A paper flower mobile makes a lovely nursery decoration.
- Framed art — Arrange a few flowers in a shadow box frame. The three-dimensional effect is striking, and the flowers will never fade.
Troubleshooting Common Origami Issues
Creases Are Not Sharp Enough
If your paper does not hold its fold, your creases may not be firm enough. Run a bone folder or the back of a spoon along every crease. For origami, sharp creases are everything — a sloppy crease leads to a sloppy flower.
Paper Tears at the Crease
Thin origami paper can tear if you fold and unfold too many times in the same spot.
To prevent this, use a bone folder instead of your fingernail, which can dig into the paper.
If your paper is already torn, reinforce the area with a small piece of tape on the back.
Petals Do Not Open Evenly
Uneven petals are usually caused by uneven folding in the early steps. Check that your corner-to-corner folds are precisely aligned before creasing. If the petals are already folded and uneven, gently manipulate them with your fingers — a small adjustment can make a big difference.
Kusudama Units Do Not Fit Together
If your kusudama units are loose, your creases may not be deep enough. Go back and reinforce every fold with a firm crease. If the units still do not fit, check that all 12 units are folded identically. A single unit folded slightly differently can throw off the entire assembly.
Conclusion
Origami flowers are one of those crafts that rewards practice. Your first lily might look more like a crumpled napkin than a flower, but your tenth will be noticeably better.
The key is patience — with the paper, with the folds, and with yourself. Each crease you make teaches your hands something new.
I still remember the first time I made a kusudama ball that actually held together.
I sat back in my chair, turned it slowly in my hands, and felt an almost silly amount of pride.
Twelve pieces of paper, no glue, and I had made a sphere. That is the quiet magic of origami.
It is just paper and folding, and yet it produces something that feels like much more than the sum of its parts.
Start with the lily. It is the gateway flower — learn it well, and the others will come more easily.
Then try the tulip for a quick win. Graduate to the kusudama ball when you want a project that impresses.
And when you are ready for a challenge, tackle the rose. Each flower you learn adds to your repertoire, and before long, you will be able to fold a bouquet from memory.
So pick a piece of paper, make that first valley fold, and see where it takes you. A beautiful paper garden is waiting at the other end of your creases.