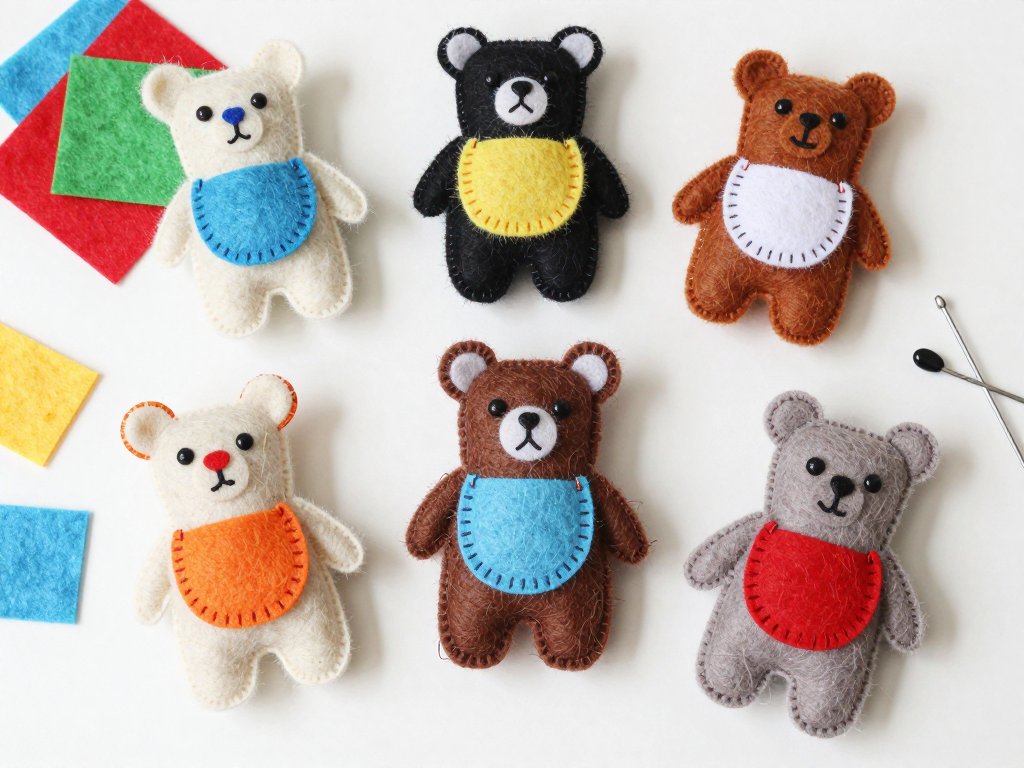
There is something magical about a tiny bear that fits right in the palm of your hand. I discovered this firsthand one rainy afternoon when my three-year-old was bouncing off the walls and my six-year-old was claiming boredom was a life-threatening condition. I needed something quick, something quiet, and something that would not involve setting up the sewing machine only to have it abandoned after five minutes. That is when I remembered a scrap of wool-blend felt in my craft basket and a bottle of fabric glue that had been gathering dust. Within an hour, we had a tiny felt bear with a slightly lopsided smile and button eyes that my daughter named "Pocket Peanut." She carried that little bear everywhere for three months — to the grocery store, to preschool pickup, and tucked under her pillow every night. That is the power of a pocket pal.
Felt mini bear pocket pals are the perfect no-sew craft for crafters of all ages, and I mean that genuinely. If you have ever wanted to make something cute with your kids but felt intimidated by patterns, sewing machines, or the general chaos that comes with craft time, this project is for you. There is no sewing required. There is no fancy equipment. There are just a few simple materials, a bit of patience, and the joy of watching a little bear come to life under your fingers. In this tutorial, I am going to walk you through everything you need to know to make your own felt mini bear pocket pals — from choosing the right felt to adding those tiny finishing touches that give each bear its own personality. By the end, you will have not just one bear, but the skills to make a whole menagerie.
Why Felt Pocket Pals?
Before we dive into the how-to, let me share why I think felt pocket pals are one of the best beginner crafts out there. First, they are genuinely easy. If you can cut a shape and squeeze a bottle of glue, you can make these bears. There is no complex stitching, no fiddly turning of fabric, and no frustration with thread tangles. Second, they are fast. A single bear takes about thirty to forty minutes from start to finish, which means you can actually complete the project in one sitting — and that sense of accomplishment matters, especially for little ones who are still building their crafting confidence. Third, they are portable. The materials are compact enough to toss in a bag for restaurant waits, doctor's appointments, or long car rides. I have made more pocket pals on park benches than I care to admit. Fourth, they are endlessly customizable. Change the ear shape, swap the nose color, add a tiny bow, and suddenly you have a completely different character. And fifth, they make the most wonderful gifts. A handmade pocket pal slipped into a birthday card or tucked into a lunchbox carries a love that no store-bought toy can match.
Materials You Will Need
One of the best things about this craft is how simple the materials list is. You probably already have many of these items at home. Let me walk you through each one so you know exactly what to look for.
Felt Sheets
Felt is the star of this project, and choosing the right kind makes a real difference in how your bear turns out. You have two main options: wool-blend felt and acrylic craft felt. Let me be honest with you about both so you can make the best choice for your project.
Wool-blend felt is my personal favorite for pocket pals. It typically contains about 35 to 60 percent wool mixed with rayon or viscose. What makes it special is its texture — it is soft, dense, and cuts with a clean edge that does not fray. Wool-blend felt has a lovely, natural hand-feel that makes your bear feel more like a keepsake than a craft project. It also holds its shape beautifully, even after being squished in a pocket all day. The downsides? It is more expensive, usually running three to five dollars per sheet, and it can be harder to find at big-box craft stores. You will often need to order it online or visit a specialty fabric shop. That said, a single sheet gives you enough material for three or four bears, so the cost per bear is still quite reasonable.
Acrylic craft felt is the affordable, accessible alternative. You can find it at any craft store, dollar store, or online for about twenty-five to fifty cents per sheet. It comes in a huge range of colors — literally dozens of options — which is wonderful for creating variety. Acrylic felt is also machine-washable, which matters if your bear is going to be a constant companion to a young child. However, it has a few drawbacks. It is thinner and less dense than wool-blend, which means it can stretch out of shape as you work with it, and the cut edges can develop a slightly fuzzy or pill-y look over time with heavy handling. It also does not glue together quite as cleanly as wool-blend felt. For a first project or a craft to do with a group of kids, acrylic felt is perfectly fine and budget-friendly. For a special gift or a bear you want to last for years, spring for the wool-blend.
For your first few bears, I recommend starting with acrylic felt just to practice the shapes and technique. Once you are comfortable, treat yourself to some wool-blend felt in a few beautiful colors — the difference is noticeable, and you will love how your bears turn out.
Fabric Glue
Since this is a no-sew project, glue is doing all the heavy lifting. Choosing the right glue is probably the most important decision you will make for this craft.
Fabric glue is my top recommendation for this project. True fabric glue is formulated to bond with fibers and remain flexible after drying, which is exactly what you need for a soft felt bear that will be handled and squished. Look for brands like Aleene's Fabric Fusion, Beacon Fabri-Tac, or Crafter's Pick The Ultimate. These glues dry clear, remain flexible, and create a strong, permanent bond between felt pieces. They do take a bit longer to set — usually about fifteen to thirty minutes of holding or clamping — but the wait is worth it for the quality of the bond. Fabric glue also has very little odor compared to other adhesives, which makes it a better choice for crafting with children in the room.
Hot glue is the quick-and-dirty option, and I will admit that I use it sometimes when I need instant gratification. Hot glue bonds felt almost instantly, which is satisfying, and it creates a very strong hold. However, there are significant downsides to consider. Hot glue creates a stiff, hard bond that can feel uncomfortable inside a small pocket pal. It also adds bulk, which can make your bear look lumpy rather than smooth and soft. And of course, hot glue guns get hot — very hot — and burns are a real risk if you are crafting with children. If you do use hot glue, use a low-temperature glue gun and supervise children very closely. I generally reserve hot glue for attaching larger pieces like the body to the head, and use fabric glue for the delicate face details.
Regular white school glue or tacky glue can work in a pinch, especially for a quick kids' craft that does not need to last forever. Tacky glue (like Aleene's Original Tacky Glue) is thicker than white school glue and dries clearer. It creates a decent bond with felt, though it is not as strong or flexible as proper fabric glue. White school glue is the weakest option — it dries stiff and can crack or peel over time. I only recommend it for adults crafting with very young children who might put things in their mouths, since white glue is non-toxic and washable.
Scissors
A good pair of scissors makes all the difference in felt crafting. Felt is thicker than regular fabric and can be tough on cheap scissors. I recommend a pair of sharp fabric scissors with a blade at least four inches long. Do not use your good fabric scissors on paper — felt is hard enough on them without adding paper cutting to the mix. For cutting small details like ears and noses, a pair of small embroidery scissors or detail scissors with a fine point is invaluable. These allow you to make precise cuts and get into tight curves. If you are crafting with children, let them use child-safe scissors on the larger, simpler shapes, and handle the small detail cutting yourself.
Buttons and Beads for Eyes and Nose
The face is where your bear gets its personality, and the eyes are the most important feature. For a no-sew bear, you have several options. Small buttons with two or four holes make wonderful eyes — they are classic, easy to find, and come in endless colors and sizes. Look for buttons that are about six to eight millimeters in diameter for a proportional bear face. Black or dark brown are the most natural-looking choices, but there is no rule against blue, green, or even brightly colored buttons if you want a whimsical bear.
If buttons feel too heavy or bulky, small seed beads or pony beads are a lovely alternative. Seed beads (size 6 or 8) are tiny and give your bear a more delicate, refined face. Pony beads are a bit larger and easier for little fingers to handle. For the nose, a single larger bead in black or dark brown works beautifully, or you can use a small heart-shaped bead for an extra-sweet touch.
For very young children (under three), safety is paramount. Skip the buttons and beads entirely and use fabric paint or embroidery floss to create the eyes and nose. I will talk more about safety considerations later in this tutorial.
Embroidery Floss
Even though this is a no-sew project, embroidery floss has a place in our bear-making. You can use it to create a smile or other facial features by gluing it onto the felt. Simply cut a short length of floss, arrange it into a smile shape on the bear's face, and glue it in place with a tiny dab of fabric glue. You can use a toothpick to position it precisely. Embroidery floss comes in every color imaginable, so you can match or contrast with your felt. I love using a dark brown or black floss for the smile, and a tiny pink stitch for the nose if I am not using a bead. You can also use floss to add eyebrows, eyelashes, or little rosy cheeks.
Polyester Fiberfill Stuffing
Stuffing gives your pocket pal its squishy, huggable quality. You can buy a bag of polyester fiberfill at any craft store for just a few dollars, and one bag will stuff dozens of bears. For small pocket pals, you do not need much — just a small handful per bear. Look for "premium" fiberfill that is soft and fluffy without lumps. Avoid using cotton balls or scrap fabric for stuffing — cotton balls are too dense and lumpy, and fabric scraps create uneven lumps that make your bear look bumpy. If you want an eco-friendly option, you can use wool roving or bamboo fiberfill, both of which are natural and biodegradable. Just be aware that wool stuffing can felt or compact over time with handling.
Pattern Templates
You do not need to buy patterns for these bears. I recommend drawing your own templates on cardboard or cardstock. A simple bear shape is just a circle for the head (about three inches in diameter), a slightly smaller circle for the body (about two and a half inches), two small half-circles or rounded triangles for ears (about one inch wide), four small oval shapes for arms and legs (about one and a half inches long), and a tiny oval or triangle for the nose. You can trace around a jar lid or a small cup to get perfect circles, then freehand the ears and limbs. Once you have your cardboard templates, you can trace them onto felt again and again, which makes it easy to make a whole collection of bears.
If drawing templates feels intimidating, there are plenty of free printable patterns online. Search for "no-sew felt bear pattern" or "felt pocket pal template" and you will find countless options. Print one on cardstock, cut it out, and you are ready to go. I like to keep a small envelope of my favorite templates tucked into my craft basket so I can make a pocket pal whenever the mood strikes.
Optional Embellishments
Once you have the basics down, you can dress up your bears with all sorts of extras. Tiny ribbons tied into bows, small fabric scraps for scarves or bow ties, mini pom-poms for tails or cheeks, felt flowers, small jingle bells (stitched on securely, not glued), and even tiny googly eyes for a silly look. The possibilities are limited only by your imagination and your stash of craft supplies.
Step-by-Step Instructions for Making Your Felt Mini Bear Pocket Pal
Now that we have gathered our materials, let us make a bear. Find a comfortable spot with good lighting, set out your supplies, and take a deep breath. This is going to be fun.
Step 1: Prepare Your Felt Pieces
Using your cardboard or cardstock templates, trace the following shapes onto your felt sheet with a fabric marking pen, a chalk pencil, or even a regular pencil if you are careful to cut just inside the line. For one standard pocket pal bear, you will need:
- Two head pieces (these will be glued together with stuffing in between)
- Two body pieces (these will also be glued together with stuffing)
- Two ear pieces per ear (so four total — two front ears and two back ears)
- Two arm pieces
- Two leg pieces
- One nose piece (a small oval or triangle in a contrasting color, like dark brown or black)
- Two small circles in pink or light brown for inner ears (optional, but adds lovely detail)
Cut each piece out carefully with your sharp scissors. Take your time with the curves — smooth, even cuts make the final bear look polished and professional. If you are making these with children, this is a good stage to let them help with the larger, simpler shapes while you handle the tiny details.
Step 2: Assemble the Ears
Take each pair of ear pieces (one front and one back) and apply a thin, even layer of fabric glue around the curved edge, leaving the straight bottom edge open. Press the two pieces together and hold them for about thirty seconds. If you are using inner ear accents (those small pink or light brown circles), glue them onto the front ear pieces before assembling the ears. Set the glued ears aside to dry completely while you work on the next steps. Placing them under a heavy book can help them dry flat and smooth.
Step 3: Create the Face
This is where your bear's personality starts to emerge. Take one of your head pieces (this will be the front) and lay it flat on your work surface. Arrange the facial features before gluing anything — this lets you adjust positions until you are happy with the look. Here is how I like to place the features:
- Eyes: Position them about halfway down the head and spaced about three-quarters of an inch apart. If using buttons, place them slightly toward the center of the face so your bear has a friendly, engaged expression. If you place them too far apart, the bear can look vacant or surprised.
- Nose: Place the nose centered between and slightly below the eyes. For a cute, rounded bear face, the nose should be about a quarter to a third of the way down from the eyes to the bottom of the head.
- Mouth: Use a short piece of embroidery floss to create a smile. A simple "V" shape or a soft curve works beautifully. Position it just below the nose. You can also add a tiny vertical line from the nose down to the mouth for that classic teddy bear look.
Once you are happy with the arrangement, glue everything in place. For buttons and beads, apply a small dot of fabric glue to the back and press firmly onto the felt. Hold each piece for about twenty seconds to ensure a good bond. For the embroidery floss mouth, apply a thin line of glue along the path of the smile, then press the floss into the glue and hold until it sets. A toothpick is very helpful for this fiddly step.
Let the face dry completely before moving on. This usually takes about fifteen minutes. I like to use this time to clean up my workspace or prep the next pieces.
Step 4: Assemble the Head
Once the face is dry, it is time to put the head together. Apply a thin layer of fabric glue around the edge of the back head piece, leaving a one-inch opening at the bottom. Place the front head piece (the one with the face) on top and press together. Before sealing the opening, gently stuff the head with a small amount of fiberfill. You want the head to be soft and squishy, not rock-hard — think of a firm marshmallow. Use the eraser end of a pencil or a chopstick to push the stuffing gently into the ears and the top of the head. Once you are happy with the amount of stuffing, glue the opening closed and press firmly.
Step 5: Assemble the Body
Repeat the same process for the body. Glue around the edge of one body piece, leaving an opening at the top (where the head will attach). Place the second body piece on top and press together. Stuff the body with fiberfill using the same marshmallow-firm approach, then glue the opening closed. If you want your bear to sit nicely on its own, add a bit more stuffing to the bottom of the body and shape it into a gentle curve as the glue dries.
Step 6: Attach the Arms and Legs
For each arm and leg, take the two corresponding pieces and glue them together around the edges, leaving the top (attachment end) open. You do not need to stuff the arms and legs heavily — just a tiny pinch of fiberfill gives them enough shape. A lightly stuffed limb is more flexible and looks more natural when attached to the body. Once the glue is dry, attach each limb to the body using fabric glue. Position the arms about halfway down the sides of the body and the legs at the bottom front. Hold each limb in place for at least thirty seconds to ensure a secure bond. For extra security, you can add a small reinforcement patch of felt on the inside of the body where the limbs attach — this keeps energetic children from accidentally pulling the limbs off during play.
Step 7: Attach the Head to the Body
This is the moment your bear starts to look like a real creature. Apply a generous layer of fabric glue to the top edge of the body (where you left the opening) and press the head firmly onto it. Hold in place for at least one minute. You can also add a thin line of glue around the seam where the head meets the body to reinforce the joint. Let the bear rest face-up for at least thirty minutes while the glue cures fully. I like to prop my bears against a small cup or jar during this stage so they dry in an upright sitting position.
Step 8: Add Finishing Touches
Once all the glue is dry, your bear is ready for its finishing touches. Here are some ideas:
- Tie a small ribbon bow around the bear's neck.
- Add rosy cheeks using a tiny dab of pink fabric paint or a pink chalk pastel (smudge gently with your fingertip).
- Give your bear a tiny belly button with a small dot of fabric paint or a tiny bead.
- Add paw pad details to the feet using small oval pieces of lighter-colored felt.
- Thread a small ribbon loop through the back so the bear can hang from a backpack or keychain.
Let all finishing touches dry completely before your bear heads out into the world.
Tips for Success
Safety Considerations for Crafting with Kids
Crafting with children is one of the great joys of parenthood, but it does come with some important safety considerations. Here is what I have learned from many hours of pocket-pal-making with my own little ones.
Age recommendations: For children under three, skip the small parts entirely. Make the bear's face with fabric paint or felt pieces cut into the shapes of eyes and a nose. Use white school glue or a non-toxic fabric glue, and supervise closely. For children ages three to five, you can introduce larger beads and buttons (at least six millimeters in diameter) with close supervision. For children ages six and up, most can handle the full project with adult guidance on the gluing steps.
Glue safety: Fabric glue is generally non-toxic, but it is still not something you want little ones to ingest. Work in a well-ventilated area and remind children that glue is for bears, not for mouths. Hot glue guns should only be used by adults or older children under direct supervision. If you are using hot glue with children, a low-temperature glue gun is significantly safer than a high-temperature one.
Button and bead safety: Buttons and beads are choking hazards for children under three. If your pocket pal is intended for a baby or toddler, embroider the face using embroidery floss and a needle (a very small amount of hand-sewing is worth the safety peace of mind) or use fabric paint. You can also cut tiny facial features from contrasting felt and glue them on — since they are the same material, they pose less of a choking risk than hard plastic or wooden beads.
Scissor safety: Invest in a pair of good-quality child-safe scissors for little hands. Teach children to cut away from their bodies and to keep fingers clear of the blades. For very intricate cuts, offer to help or do them yourself — frustration with difficult cutting can quickly turn a fun craft into a meltdown.
Allergy awareness: Some children have sensitivities to wool or certain adhesives. If you are crafting for a child with known allergies, stick with acrylic felt and hypoallergenic fabric glue. When in doubt, test a small piece of felt on the child's skin before proceeding with the full project.
Fun Variations: Expanding Your Pocket Pal Menagerie
Once you have mastered the basic bear, the same technique opens up a whole world of pocket pals. The construction is essentially the same — two-piece body, two-piece head, small limbs — but with a few shape adjustments, you can create an entire animal kingdom.
Felt Mini Bunny Pocket Pals
Bunnies are the natural next step after bears, and they are almost easier to make because their long ears are so expressive. To make a bunny, replace the short round bear ears with tall, narrow ovals about one and a half inches tall and half an inch wide. Cut each ear in a pair (front and back) and glue them together, leaving the bottom open. For extra cuteness, make the inner ear a contrasting color — pink or light gray inside a white or tan outer ear. Position the ears on top of the head rather than on the sides, with a slight outward angle so they look alert and perky. Give your bunny a tiny pink nose (a small felt circle or a pink seed bead) and add whiskers using three short pieces of embroidery floss on each cheek. A small white pom-pom tail on the back completes the look. Bunnies are especially popular for Easter baskets and springtime gifts, but honestly, they are adorable year-round.
Felt Mini Cat Pocket Pals
Cats are another wonderful variation, and they have a distinctive silhouette that is surprisingly easy to achieve with just a few adjustments. For cat ears, cut small triangles instead of half-circles. Make them about three-quarters of an inch tall with a slightly pointed tip. Position them close together on top of the head — cat ears sit closer together than bear ears. Give your cat a narrower face by making the head piece slightly oval rather than perfectly round. Use a tiny pink or red triangle for the nose and add whiskers just like the bunny version. For the eyes, try using green or yellow beads to give your cat that unmistakable feline gaze. Add a long, tapered tail — about three inches long and tapering to a point — and attach it to the back of the body. If you want to get creative, add tiny stripes with fabric paint or thin strips of contrasting felt glued onto the body and head. My daughter made a calico cat pocket pal using small patches of orange, black, and white felt, and it is honestly one of the cutest things I have ever seen.
Felt Mini Owl Pocket Pals
Owls are a bit more advanced but incredibly rewarding. The key difference is that owls have a distinct head shape and large, round eyes. Make the head piece slightly wider than the body — about three and a half inches in diameter for the head and two and a half inches for the body. Skip the separate ears entirely; instead, cut two small triangular points at the top of the head piece before assembling — these become the ear tufts. For the eyes, use large buttons or felt circles in two sizes: a larger white or yellow circle for the outer eye and a smaller black or dark brown circle for the pupil. Glue these concentric circles onto the face. The nose is a small, sharp triangle in orange or yellow — owl beaks are surprisingly tiny relative to their faces. For the body, add texture by gluing on overlapping semicircles of felt in a contrasting color to represent feathers. Use browns, grays, warm whites, and rust tones for an authentic owl palette. Wings are simple oval shapes attached to the sides of the body. Owls sit beautifully on a desk or bookshelf and make wonderful little study buddies.
More Ideas to Try
Once you have made bears, bunnies, cats, and owls, the floodgates open. Try making a fox with a pointed nose and a bushy orange tail, a mouse with large round ears and a long thin tail, a pig with a pink snout made from a small felt circle, a dog with floppy ears and a spot over one eye, or even a hedgehog with a spiky back made from brown felt cut into zigzag points. Each animal follows the same basic construction method — just adjust the shapes of the ears, nose, tail, and head to match the animal you are aiming for. I keep a small notebook where I sketch out new animal designs during my downtime, and I have filled dozens of pages over the years. There is something deeply satisfying about looking at a finished pocket pal and knowing that it started as a simple idea and a scrap of felt.
Caring for Your Felt Pocket Pals
With proper care, your felt mini bear pocket pals can last for years. Felt is surprisingly durable, but it does need a bit of gentleness. To clean your pocket pal, spot-clean it with a damp cloth and a tiny amount of mild soap. Rub gently — scrubbing can cause the felt to pill or fuzz. Do not submerge your bear in water, as the glue bonds can weaken over time with repeated soaking. If the bear gets truly dirty, you can hand-wash it quickly in cool water with a drop of baby shampoo, then squeeze out the water gently (do not wring) and lay it flat to dry. Reshape the bear while it is damp and let it air-dry completely away from direct heat or sunlight. Avoid machine washing or drying — the agitation and heat are too harsh for glued felt construction. If a limb or a button eye comes loose over time, simply re-glue it with a fresh dab of fabric glue. I have repaired many a beloved pocket pal this way, and the bears always look grateful for the attention.
Gift Ideas and Presentation
Felt pocket pals make some of the most heartwarming gifts I have ever given. Here are a few ways to present them that will make the recipient feel truly special. Tuck a single bear into a small gift box lined with tissue paper for a birthday present. Attach a bear to a greeting card using a tiny dot of removable adhesive for a surprise that leaps off the page. Create a set of four different animals — bear, bunny, cat, and owl — tied together with a ribbon for a baby shower gift. Make a matching pair of bears for a couple celebrating an anniversary. Sew or glue a small loop of ribbon to the back of a bear and thread it onto a keychain for a handmade accessory that goes everywhere. During the holiday season, I make a dozen or more pocket pals in seasonal colors and tuck them into stockings, gift bags, and even the branches of the Christmas tree as ornaments. The look on someone's face when they open a gift and find a tiny handmade creature inside is one of the great joys of crafting.
Conclusion
There is a reason that felt mini bear pocket pals have become such a beloved craft project. They are simple enough for a beginner, satisfying enough for an experienced crafter, and endlessly charming for everyone who sees them. In a world that often feels rushed and complicated, there is something beautifully grounding about sitting down with a few pieces of felt and some glue and creating a tiny creature with its own little personality. Each bear you make will be different from every other bear, and that is exactly how it should be. The slightly crooked smile, the button eyes that are not quite level, the ears that tilt at a jaunty angle — these are not flaws. They are the fingerprints of your hands, the evidence of your care, the marks that make your pocket pal uniquely yours.
I hope this guide has given you the confidence and the inspiration to make your own felt mini bear pocket pals. Start with one bear. Give it a name. Put it in your pocket or your child's pocket. And when you see that little felt face peeking out, reminding you of what you made with your own two hands, I hope you feel the same quiet joy that I feel every time I make one. Because that is what this craft is really about — not the perfection of the finished product, but the love that went into making it.
Happy crafting, dear friend. Your pocket pal is waiting to meet you.