Introduction
There is something deeply satisfying about pulling open a bundle of rubber-banded fabric and discovering what patterns the dye has painted underneath.
Every reveal is a surprise — no two tie-dyed pieces are ever exactly the same.
And in a summer when self-expression and handmade fashion are having a major moment, tie dye is the perfect craft to try.
Whether you are a complete beginner who has never touched a squeeze bottle of dye or a seasoned crafter looking for fresh accessory ideas, this guide will walk you through everything you need.
We will cover which dyes and supplies to buy, six folding techniques, three complete shirt tutorials, four accessory projects, and the proper methods for setting and washing your finished pieces so the colors stay bright wash after wash.
Best of all, tie dye is one of the most budget-friendly crafts you can do. A single starter kit priced under $25 can yield five to eight finished items, and the supplies are available at any craft store or online at ArtTools.com. Let us get started.
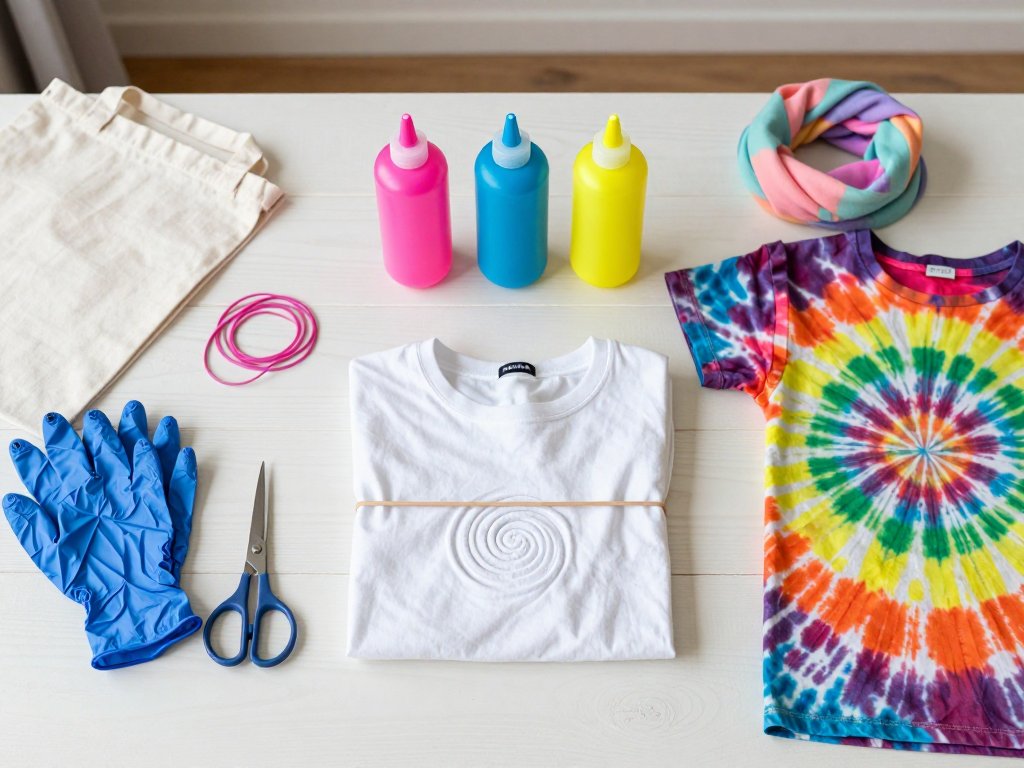
1. What You Will Need: The Complete Supply List
Before you mix a single drop of dye, gather your supplies. Organizing everything beforehand makes the process smooth and enjoyable rather than frantic.
Essential Supplies
- Fabric items. Pre-washed 100% cotton, rayon, or linen items work best. Thrift stores are an excellent source for cheap cotton shirts, pillowcases, and tote bags.
- Dye. Fiber-reactive dyes such as Tulip One-Step or Rit are ideal for natural fibers. Tulip One-Step kits are especially beginner-friendly because they do not require a soda ash pre-soak. For synthetic fabrics, use Rit Dyemore All-in-One.
- Squeeze bottles. Most dye kits come with them, but you can buy extra bottles at ArtTools.com so you can mix several colors at once.
- Rubber bands. Standard office-size bands work fine. Thicker bands are easier to handle and less likely to snap.
- Plastic gloves. Dye stains hands for days. Nitrile gloves are better than latex — they are stronger and less likely to tear.
- Plastic wrap or zip-top bags. For wrapping dyed projects while the dye sets.
- Drop cloth or trash bags. Protect your work surface. Dye will drip everywhere.
- Soda ash (optional). If you are using fiber-reactive dye that requires it, you can buy soda ash at ArtTools.com or make your own from washing soda.
Nice-to-Have Supplies
- Plastic squeeze bottles with precision tips. Great for fine lines and detailed patterns.
- Paper towels. For inevitable drips and spills.
- Cooling rack. Place it over a baking sheet to hold the dyed item while you work — prevents pooling on the underside.
- Apron or old clothes. You will get dye on yourself. It is a badge of honor, but better on an apron.
2. Understanding Dye Types: Which One Should You Use?
Not all dyes are created equal, and choosing the right type for your fabric makes the difference between a vibrant piece that lasts for years and a faded disappointment after one wash.
Fiber-Reactive Dyes (Best for Cotton, Linen, Rayon)
Fiber-reactive dye forms a permanent chemical bond with natural fibers. Tulip One-Step, Jacquard Procion MX, and Dharma Trading dyes fall into this category.
The result is wash-fast, vibrant color that does not fade significantly over time. Tulip One-Step kits are the gold standard for beginners because the dye already contains soda ash, so you skip the pre-soak step entirely.
Just add water, shake, and apply.
All-Purpose Dyes (Rit, Dylon)
Rit is the most widely available brand. Standard Rit works on natural fibers but requires a hot water setting step to make the color permanent.
Rit Dyemore All-in-One is specifically formulated for synthetic fabrics — it requires near-boiling water and a vinegar fixative.
All-purpose dyes are less vibrant than fiber-reactive dyes on cotton, but they offer the widest color range and are available at almost any grocery or craft store.
What About Fabric Paint?
Fabric paint sits on top of the fiber rather than bonding with it, which means it can crack and peel over time. It is fine for stenciling on items that will not be washed frequently, but for full-coverage tie dye, stick with fiber-reactive or all-purpose dye.
3. Six Classic Folding Techniques for Different Patterns
The way you fold and band your fabric determines the final pattern. Here are six techniques ranked from easiest to most advanced. Practice each one on a folded paper towel first — it gives you a clear preview of the pattern before you commit to dye.
Technique 1: Spiral (Classic Swirl)
Lay your damp shirt flat. Pinch the center with two fingers and twist it in a slow, steady circle until the entire shirt is pulled into a flat, round disc.
Secure with three to five rubber bands crossing through the center. Apply dye in wedges — three or four colors arranged in pie slices.
The result is a beautiful concentric swirl that everyone recognizes.
Technique 2: Crumple (Scrunch)
The crumple technique is the easiest and most forgiving. Simply scrunch the damp fabric into a tight ball, secure it with rubber bands crisscrossing in several directions, and apply dye randomly.
The result is a marbled, organic pattern with no clear lines. This technique is ideal for first-timers and for small accessories where a defined pattern is hard to achieve.
Technique 3: Accordion Fold (Stripes)
Fold the fabric back and forth like a paper fan, making each fold about one to two inches wide. Secure the long folded strip with rubber bands at intervals. Apply dye in parallel stripes for rainbow or monochromatic striped effects.
Technique 4: Bullseye (Concentric Rings)
Pinch a small point in the center of the fabric and pull it up. Secure a rubber band an inch below the tip.
Add another band an inch below that one, and continue until you have five or six bands down the cone.
Apply different colors to each section. The result is a target-like pattern of concentric rings radiating outward.
Technique 5: Triangle Fold (Shibori-Inspired)
Fold the damp shirt in half vertically, then fold it into a series of triangles similar to folding a paper snowflake. Secure with rubber bands at each corner and apply dye to each triangle section. When unfolded, you get repeating geometric diamond and triangle patterns.
Technique 6: Ice Tie Dye (Watercolor Effect)
Place your dry, soda-ash-soaked fabric on a cooling rack over a tray. Cover the fabric entirely with ice cubes and sprinkle powdered dye on top.
As the ice melts, it carries the dye down in unpredictable, watercolor-like patterns. This technique takes several hours but produces soft, ethereal results that are one of the biggest trends for summer 2026.
4. Shirt Tutorials: Three Projects for Beginners
Project 1: Classic Spiral Rainbow Tee
Supplies: White 100% cotton T-shirt, Tulip One-Step Tie Dye Kit (Rainbow pack, or individual bottles in red, orange, yellow, green, blue, purple), rubber bands, plastic gloves, plastic wrap, drop cloth.
Cost estimate: Under $20 if you already own a white tee from a thrift store.
Step 1: Wash the shirt in hot water without fabric softener. Keep it damp but not dripping wet.
Step 2: Lay the damp shirt flat on your covered work surface and smooth out all wrinkles.
Step 3: Pinch the center and twist clockwise until the shirt forms a round disc about eight to ten inches across. Stretch three rubber bands across the disc dividing it into six pie-like sections.
Step 4: Following rainbow order (red, orange, yellow, green, blue, purple), apply dye to each wedge. Saturate fully — the dye should soak through to the other side. Flip the disc and apply dye to any white spots on the reverse.
Step 5: Wrap the disc in plastic wrap, place in a zip-top bag, and let sit for eight to twenty-four hours. Longer setting equals deeper colors.
Step 6: Unwrap over a sink and rinse under cold running water until mostly clear. Remove rubber bands and continue rinsing until water runs completely clear. Wash in hot water with detergent and dry on high heat.
Pro tip: For a neon summer 2026 twist, swap standard colors for neon pink, neon yellow, electric blue, and bright orange.
Project 2: Ice-Dyed Pastel Watercolor Tee
Supplies: White 100% cotton T-shirt, soda ash (if not using Tulip One-Step), powdered fiber-reactive dye in pastel shades (pink, lavender, mint, sky blue), ice cubes (two to three trays), cooling rack, plastic bin or tray, rubber bands, gloves.
Cost estimate: $25–$35 for powdered dye and soda ash, but they will last for many future projects.
Step 1: Soak the dry T-shirt in a soda ash solution (one cup soda ash per gallon of warm water) for fifteen minutes. Wring it out and arrange it flat on a cooling rack over a plastic bin. The shirt should be dry to the touch.
Step 2: Scrunch the shirt loosely or fold into a crumple pattern. Secure with a few loose rubber bands.
Step 3: Cover the fabric completely with a single layer of ice cubes. Sprinkle powdered dye generously over the ice.
Step 4: Let the ice melt completely — four to eight hours depending on room temperature. Do not disturb the setup while the ice is melting.
Step 5: Once all ice has melted, wrap the shirt in plastic and let it batch for another twelve to twenty-four hours. Rinse, wash, and dry following the same steps as Project 1.
Project 3: Two-Tone Bullseye Tank Top
Supplies: White cotton tank top, Rit All-Purpose Dye in two complementary colors (try fuchsia and turquoise, or terracotta and sage green), rubber bands, plastic gloves, plastic wrap.
Cost estimate: $15–$20 for dye and tank top.
Step 1: Wash the tank top and leave it damp. Pinch the center of the front panel and pull it upward into a cone shape. Secure the tip with a rubber band one inch from the top, then add two more bands spaced two inches apart down the cone.
Step 2: Mix your first color and apply it to the top section (innermost ring). Mix your second color and apply it to the middle and bottom sections.
Step 3: Wrap in plastic and let sit for six to eight hours. Rinse in cool water until clear, remove rubber bands, wash in hot water, and dry on high heat.
Pro tip: Earth tones are trending for summer 2026. Try terracotta with sage green, or mustard yellow with warm brown. These combinations look sophisticated and pair well with jeans or linen pants.
5. Accessory Tutorials: Four Projects Beyond the T-Shirt
Accessories are excellent small-scale experiments for testing new color combinations before committing to a whole shirt. Here are four projects using techniques you have already learned.
Project 4: Tie-Dyed Canvas Tote Bag
Supplies: Plain canvas tote bag (100% cotton), Tulip One-Step dye in two or three colors, rubber bands, gloves, plastic wrap. Cost: $10–$15.
Step 1: Wash the tote and leave it damp. Insert a piece of plastic bag inside to prevent bleeding to the back.
Step 2: Scrunch the front panel into a tight ball using the crumple technique. Secure with rubber bands.
Step 3: Apply your lightest color over about two-thirds of the bundle and your darkest color over the remaining one-third.
Step 4: Wrap in plastic, let set for twelve hours, rinse, and wash. Canvas holds dye exceptionally well due to its thick weave. A tie-dyed tote makes a perfect summer beach bag or gift.
Project 5: Bullseye Bucket Hat
Supplies: White cotton bucket hat, Tulip One-Step dye in two or three colors, rubber bands, gloves, plastic wrap. Cost: $12–$18.
Step 1: Dampen the hat. Pinch the center of the crown and pull it upward into a cone. Secure with rubber bands spaced one inch apart.
Step 2: Apply three analogous colors such as coral, peach, and yellow for a sunset gradient.
Step 3: Wrap in plastic, let set for twelve to twenty-four hours, rinse, and wash. Bucket hats are back in a big way for summer 2026 and a tie-dyed version adds a playful pop to any outfit.
Project 6: Striped Cotton Scrunchies (Set of Four)
Supplies: White cotton scrunchies, Tulip One-Step dye in three colors, small rubber bands, gloves, plastic wrap. Cost: Under $10.
Step 1: Dampen the scrunchies. Accordion-fold each into a small strip about half an inch wide. Secure with a rubber band at each end and one in the middle.
Step 2: Apply the first color to one end, second to the middle, and third to the opposite end of each scrunchie.
Step 3: Wrap each in plastic, let set for eight hours, rinse, and wash. A single Tulip kit can produce a dozen scrunchies — perfect for party favors or small gifts.
Project 7: Ice-Dyed Cotton Socks
Supplies: White cotton crew socks (three to six pairs), powdered fiber-reactive dye in two colors, ice cubes, cooling rack, tray, rubber bands, gloves. Cost: $10–$15.
Step 1: Soak socks in soda ash if required, then wring thoroughly. Roll each into a tight snail-shell spiral and secure with a rubber band.
Step 2: Place on a cooling rack over a tray. Cover with ice and sprinkle powdered dye — one color on the left half of the tray, a complementary color on the right.
Step 3: Let ice melt completely, then batch for another twelve hours. Rinse and wash. Socks ice-dye beautifully because the small surface area creates intense, saturated patterns.
6. Color Trends for Summer 2026
To keep your tie-dye projects looking current, here are the color palettes dominating summer 2026.
- Neon + Pastel combos. Pair electric neon pink or lime green with soft pastel lavender or baby blue. The contrast is striking and youthful. Try this on the spiral tee or bucket hat.
- Earth tones. Terracotta, sage green, warm mustard, and chocolate brown create a grounded, organic look. These work beautifully on canvas totes and linen shirts and are forgiving of slight dye bleeding.
- Ice tie dye (pastel watercolor). Soft pink, lilac, mint, and sky blue through ice dyeing produce a delicate, sophisticated effect that pairs well with neutral wardrobes.
- Black and white (high contrast). Dye fabric black over a white base using the crumple or spiral technique, but leave significant white space. The graphic look feels more elevated than rainbow tie dye.
7. How to Set and Care for Tie-Dyed Items
Properly setting and washing your tie-dyed items is the difference between a piece that stays vibrant for years and one that fades after three washes.
Setting the Dye
After applying the dye, wrap the item tightly in plastic wrap and place it in a zip-top bag.
Let it sit for at least eight hours, and ideally twenty-four hours. Longer batch times yield deeper colors.
Keep the wrapped item in a warm place — on top of the refrigerator or in a sunny window works well.
Do not unwrap early to check progress; every peek lets in air and can affect the final result.
For Rit all-purpose dye, rinse in cool water, wash in hot water with detergent, then dry on high heat or iron thoroughly. This heat step is essential for Rit's colorfastness.
First Wash
Unwrap your item over a sink. Rinse under cool running water, gently squeezing as you go.
Continue rinsing until the water runs mostly clear, then remove the rubber bands. Rinse until the water runs completely clear, then wash in your machine on the hottest setting with a small amount of detergent.
If the rinse water still shows color, run another hot wash cycle. Dry on high heat once the rinse water is clear.
Important: Always wash tie-dyed items separately for the first two or three washes. Loose dye can transfer to other clothing.
Long-Term Care
Wash in cold water and turn items inside out before washing. Avoid bleach and fabric softeners — both can strip dye over time. Line drying in the shade preserves color better than machine drying. With proper care, fiber-reactive tie dye lasts for years.
8. Troubleshooting Common Problems
- Colors are too faint. You likely used too little dye or did not let it set long enough. Saturate the fabric fully and increase batch time to a full twenty-four hours. If using soda ash, make sure the concentration is correct.
- White spots where dye did not reach. Flip the bundled item over halfway through dye application and apply dye to the back side. A cooling rack helps by elevating the item so you can see both sides.
- Colors bled into each other and turned muddy. Apply dye to a drier fabric base and leave some white space between color sections. Choose analogous colors (next to each other on the color wheel) that blend more harmoniously.
- Color washed out almost completely. The dye did not set properly. Confirm you are using the correct dye type for your fabric and that you followed the proper batch time and heat setting.
- Rubber bands left deep white crease marks. This is actually desirable for most patterns. For softer creases, use looser bands or reduce the number of bands.
9. Safety Tips and Workspace Setup
- Wear gloves. Dye stains skin and nails. Nitrile gloves are preferred. If you do get dye on your skin, rubbing alcohol can help lift fresh stains.
- Cover your work surface. Use a plastic tablecloth or trash bags taped down flat. Dye will drip, splatter, and sometimes squirt unexpectedly.
- Wear old clothes. An apron over old clothes is the safest setup.
- Work in a well-ventilated area. Powdered dyes create fine dust that should not be inhaled. If mixing powdered dye, do it outdoors or wear a dust mask.
- Keep dye away from food and pets. Store all supplies out of reach of children and animals.
- Dispose of dye water properly. Rinse items in a utility sink or large bucket and dispose of the water in a toilet or outdoor drain. Small amounts of diluted dye are safe for standard plumbing.
10. Where to Buy Supplies on a Budget
Tie dye does not have to be expensive. Here is how to keep costs low without compromising quality.
Fabric items: Thrift stores are your best friend. Look for 100% cotton T-shirts, canvas totes, pillowcases, and cotton button-downs for two or three dollars each. Wash them thoroughly before dyeing.
Dye kits: ArtTools.com carries Tulip One-Step kits starting at under $15. A single kit contains enough dye for five to eight projects, depending on size. For bulk projects, buy individual squeeze bottles of dye — they work out cheaper per project.
Rubber bands and gloves: Dollar stores sell bags of assorted rubber bands for a dollar. A box of disposable nitrile gloves costs about $10 for a hundred pairs from any hardware store.
Soda ash: Available at pool supply stores (sold as pH increaser) for a fraction of the craft-store price. Make sure the only ingredient is sodium carbonate with no additives.
Conclusion
Tie dye is one of those rare crafts that is simultaneously beginner-friendly, budget-friendly, and capable of producing genuinely beautiful, wearable results.
A twenty-dollar kit and an afternoon of folding and squeezing can yield a summer wardrobe full of shirts, totes, hats, and accessories that no one else will have.
The patterns are unpredictable, the colors are joyful, and every finished piece carries the satisfaction of having made it yourself.
Start with a simple spiral or crumple project to get a feel for how the dye behaves.
Once you have that down, branch into ice dyeing, try the shibori-inspired triangle fold, or experiment with the current color trends.
Before long you will be looking at every white cotton thing in your house and wondering, "What would that look like tie-dyed?" — and that is exactly how the obsession begins.
Visit ArtTools.com for all the supplies you need — Tulip kits, individual dyes in every color, blank T-shirts, canvas totes, bucket hats, and more. Happy dyeing, and enjoy your colorful summer.