Introduction
There is a new craft taking over summer social feeds, farmers' market stalls, and handmade gift baskets everywhere. It is not complicated. It is not expensive. And honestly? It might be the most satisfying project you will finish all year.
Crochet fruit — tiny, adorable, amigurumi-style fruits made with a hook and a few scraps of yarn — has quietly become one of the biggest craft trends of 2026. And here is the best part: you do not need to be an experienced crocheter to join in. If you can make a chain stitch and a single crochet, you can make a whole fruit bowl of them.
In this guide, I will walk you through everything you need to know to start making crochet fruit. I will cover the supplies you actually need (no, you do not need that giant hook set), the three easiest fruits to start with, the basic techniques in plain language, and how to turn your tiny creations into gifts, decor, or even a small side income. By the end of this article, you will have the tools and confidence to make your first piece of crochet fruit this afternoon.
Why Crochet Fruit? The Appeal of Tiny Makes
If you have been crocheting for a while, you know most beginner patterns are either flat rectangles that feel endless, or complex garments requiring shaping. Crochet fruit is different. Each piece is small enough to finish in one sitting. A single strawberry takes about 20 minutes. A lemon takes 15. That instant gratification builds momentum, and it teaches you the exact skills needed for larger amigurumi.
There is also something inherently joyful about making tiny food. A bowl of crochet strawberries on your kitchen counter draws smiles from everyone. A lemon tucked into a birthday card says "I made this for you" in a way store-bought gifts cannot. For parents, crochet fruit is soft, unbreakable, washable play food that children can actually chew on safely.
The trend has grown so quickly that Etsy searches for "amigurumi fruit" have more than doubled since last summer. Craft fairs routinely sell out of crochet fruit keychains. And the materials cost per piece? About thirty cents worth of yarn and a pinch of stuffing.
What You Will Need: The Honest Supply List
Let me be clear about something: you do not need a lot of supplies to start crocheting fruit. In fact, I recommend buying as little as possible until you finish your first piece. Here is exactly what you need, nothing more.
Yarn
For fruit, you want a worsted weight (size 4) cotton yarn. Cotton holds its shape better than acrylic, which can go fuzzy and lose definition. It is also safer for children's toys since it does not shed microplastics. My personal favorites for fruit are Lily Sugar'n Cream and Paintbox Cotton DK for a slightly smaller scale. You will need small amounts in several colors: red or pink for strawberries, yellow for lemons, green for leaves and stems, orange for oranges and carrots, and purple for grapes. One small ball of each color will make dozens of pieces. If you are just starting, pick one fruit and buy two colors: the fruit color and a green for the leaf. That is all you need for your first project.
Crochet Hook
A 3.5mm (E) or 4.0mm (G) hook is perfect for worsted weight yarn and fruit amigurumi. The slightly smaller hook (relative to the yarn weight) creates tighter stitches that hold the stuffing in place and give your fruit a smooth, professional finish. If you already own a hook in this range, use it. If you are buying one for the first time, get a 3.5mm with an ergonomic handle — your hands will thank you after the tenth strawberry.
Stuffing
Polyester fiberfill is the standard choice. A small bag costs about five dollars and will stuff hundreds of pieces. For very small fruit like cherries or blueberries, you can use scrap yarn clippings instead of buying stuffing — just make sure they are clean and color-safe.
Additional Tools
- A yarn needle for weaving in ends and embroidering details
- Small scissors (embroidery scissors or snips work wonderfully)
- Stitch markers (or safety pins, or scrap yarn in a contrasting color)
- Optional but nice: a set of plastic safety eyes for animal-themed fruit, and a small piece of pink or brown craft felt for face details
That is it. If you have these four things — yarn, hook, stuffing, and a needle — you can make any fruit in this guide.
The Three Stitches You Need to Know
Crochet fruit is worked in the round using amigurumi technique. You only need three stitches to make every fruit in this article. If you are new to crochet, take a few minutes to practice these on a scrap piece of yarn before starting your first fruit.
1. Chain Stitch (ch)
The foundation of every crochet project. Make a slip knot on your hook, yarn over, and pull through the loop on the hook. Practice until you can make a smooth, even chain without thinking about it. You will use the chain stitch to start the magic ring and for the stems and leaves.
2. Single Crochet (sc)
The workhorse stitch of amigurumi. Insert your hook into the stitch, yarn over, pull up a loop (you now have two loops on your hook), yarn over again, and pull through both loops. That is one single crochet. Your fruit body will be made almost entirely of single crochet stitches worked in a continuous spiral. The tightness of single crochet is what gives amigurumi its firm, smooth surface.
3. Increase (inc) and Decrease (dec)
To make a sphere — and most fruits are variations on a sphere — you need to increase the number of stitches as you grow the shape, then decrease to close it. An increase is simply two single crochet stitches in the same stitch. A decrease is joining two stitches into one: insert your hook into the next stitch, pull up a loop, insert into the following stitch, pull up a loop, yarn over, and pull through all three loops on your hook. In amigurumi patterns, this last technique is called an invisible decrease, and it leaves no gap in your work.
If you are a visual learner, there are excellent video tutorials on YouTube for each of these stitches. Search for "single crochet amigurumi" and "invisible decrease" and practice for five minutes. You will be surprised how quickly your hands learn the rhythm.
Fruit 1: The Beginner Strawberry
The strawberry is the perfect first fruit project. It is small, forgiving, and instantly recognizable. The basic shape is a simple sphere with a slightly pointed top, a green leaf cap, and tiny seed details. Here is how to make one.
Materials: Red or pink worsted weight cotton yarn, small amount of green yarn for the leaf, 3.5mm hook, polyester stuffing, yarn needle.
Body (worked in continuous rounds in red yarn):
Round 1: Make a magic ring and work 6 single crochet into it (6 stitches).
Round 2: Increase in every stitch around (12).
Round 3: Single crochet 1, increase — repeat around (18).
Round 4: Single crochet 2, increase — repeat around (24).
Round 5-8: Single crochet in every stitch for 4 rounds (24).
Round 9: Single crochet 2, decrease — repeat around (18).
Round 10: Single crochet 1, decrease — repeat around (12).
Stuff firmly.
Round 11: Decrease around (6). Close the opening by weaving the yarn tail through the front loops of the remaining 6 stitches and pulling tight.
Fasten off and weave in the end.
Leaf cap (green yarn):
Make a magic ring. Chain 3, then slip stitch into the ring — repeat 5 times to create 5 small loops. Fasten off, leaving a long tail. Sew the leaf cap onto the top of the strawberry body, allowing the "leaves" to fan outward.
Seeds: Using a small length of yellow or cream yarn, make tiny straight stitches scattered across the red body. Do not pull too tight — you want the seed stitches to sit on top of the surface, not sink into the stuffing. Place about 8 to 12 seed stitches in a loose pattern. The irregular placement is what gives a handmade strawberry its charm.
And that is it. Your first crochet strawberry takes about 20 minutes once you are comfortable with the stitches. Make a small batch of three or four and place them in a tiny bowl on your kitchen counter. I promise they will make you smile every time you walk past.
Fruit 2: The Cheerful Lemon
Lemons are even simpler than strawberries because they have no seeds to embroider and a simpler leaf shape. The bright yellow color is universally cheerful, and a bowl of crochet lemons looks beautiful in a summer kitchen or as part of a tablescape.
Body (yellow yarn):
Round 1: Magic ring with 6 sc (6).
Round 2: Inc around (12).
Round 3: Sc 1, inc — repeat (18).
Round 4-7: Sc around for 4 rounds (18).
Round 8: Sc 1, dec — repeat (12).
Stuff firmly.
Round 9: Dec around (6). Close as for the strawberry.
The key difference from the strawberry is the stitch count: a lemon has 18 stitches per round instead of 24, giving it a more elongated oval shape. The body is also one round shorter, which keeps the lemon from becoming too spherical. Just those two small adjustments — fewer increases and fewer rounds — create a completely different silhouette.
Stem and leaf: With green yarn, chain 6. Slip stitch into the second chain from the hook and single crochet in the remaining 4 chains. This creates a small pointed leaf. Sew it to the top of the lemon. For the stem, chain 4, slip stitch back into the first chain, and fasten off. Attach the stem above the leaf. The combination of the bright yellow body and the tiny green top is instantly recognizable.
Make two lemons, one lime (same pattern in green), and one orange (same pattern with 24 stitches per round for a rounder shape), and you have a citrus collection that rivals anything from a boutique home store.
Fruit 3: The Playful Watermelon Slice
Watermelon slices are slightly more advanced because they involve color changes, but the result is absolutely worth the extra effort. Unlike the spherical fruits above, the watermelon slice is worked flat in a semi-circle shape.
Materials: Dark green, light green, white, and pink yarn; 3.5mm hook; yarn needle.
Rind (green yarn):
Chain 8. Single crochet in the second chain from the hook and in each chain across (7). Chain 1 and turn. Single crochet in each stitch across for 11 more rows. This creates a rectangle that will become the curved back of the slice.
Flesh (pink yarn, working along the long edge of the rind):
Attach pink yarn to the corner of the rind rectangle. Work two single crochet in the first stitch, then single crochet in each stitch across until the last stitch, then two single crochet in the last stitch. This is an increase row that starts the curved shape of the slice. Next row: single crochet across (no increases). Alternate one increase row and one straight row until the pink section is about 2.5 inches wide at the center. Fasten off.
White transition layer: Before starting the pink, work one row of white yarn between the green rind and the pink flesh. This gives the watermelon its characteristic look. Simply switch to white after the green rectangle, work one row of sc across, then switch to pink for the flesh rows. Carry the unused yarn along the edge of your work to minimize the number of ends to weave in.
Seeds: Using dark brown or black yarn, make small straight stitches in a scattered pattern across the pink section. The classic watermelon slice has 4 to 6 visible seeds.
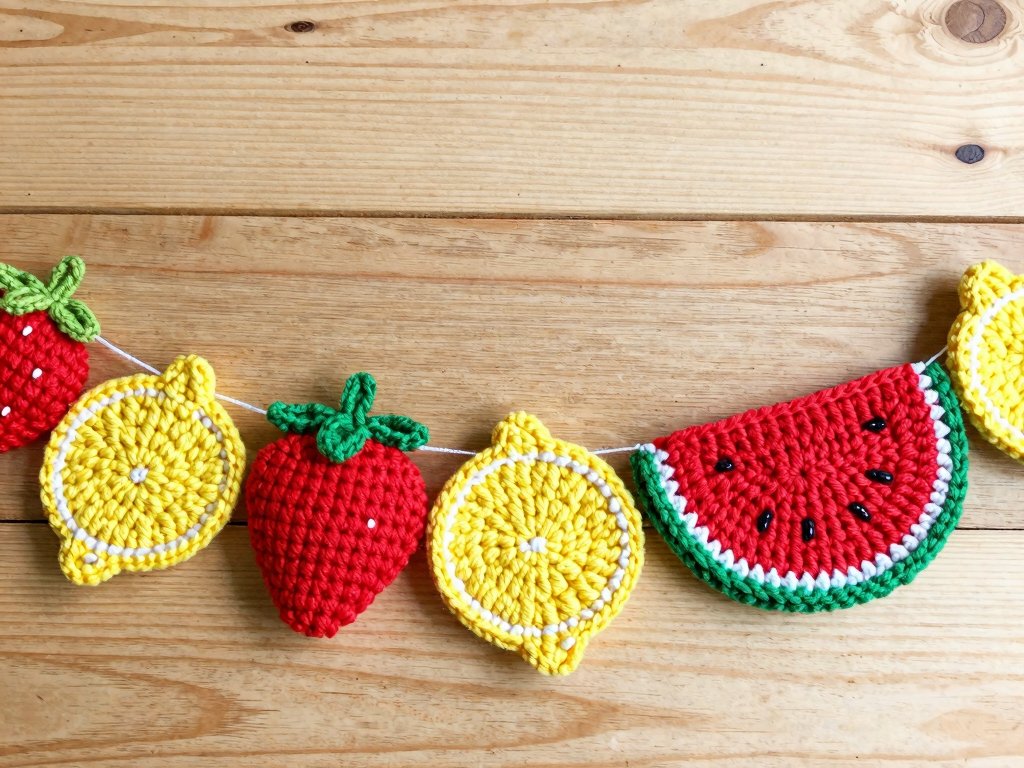
Watermelon slices are wonderful as pretend play food for children, as refrigerator magnets (sew a small magnet to the back of the green rind), or as decorative garlands (string several on a piece of embroidery floss). They take about 30 minutes each once you get the hang of the color changes.
Taking It Further: More Fruits and Variations
Once you have mastered the strawberry, the lemon, and the watermelon slice, a whole world of possibilities opens up. Here are the next fruits to try, in order of difficulty:
- Cherries: Two small red or dark pink spheres, each made with only 12 stitches per round, connected by a brown chain-stitch stem. The smallest fruit in the collection, they take about 10 minutes each.
- Banana: Worked in a long oval shape with yellow yarn and a brown curved stem. Requires increasing to 30 stitches per round for the widest part, then decreasing back down. A slightly more advanced pattern, but the yellow crescent shape is deeply satisfying to finish.
- Grapes: A cluster of small purple or green spheres (each 12 stitches, worked in a spiral) sewn together in a triangular bunch, with a brown stem at the top. Great for using up small yarn scraps.
- Avocado: A dark green oval body worked flat and seamed, with a large brown circle (the pit) sewn onto the front. The flat shape makes it perfect for keychains and bag charms.
- Pineapple: The most advanced fruit in the collection. A yellow oval body covered in textured surface crochet or embroidery stitches to mimic the pineapple's diamond pattern, with a green leaf crown. This is a weekend project, but it is the showstopper of any crochet fruit collection.
Each of these fruits teaches you a new technique: cherries teach you how to make tiny pieces and assemble them. Bananas teach you elongated shaping. Grapes teach you how to sew multiple pieces together into a cohesive cluster. Avocados teach you flat construction and appliqué. Pineapples teach you surface texture techniques. By working through this progression, you will build a complete amigurumi skill set without ever feeling like you are studying.
Turning Your Fruit Into Gifts and Decor
Once you have a small collection of crochet fruit, you will find that people want them. Here are the most popular ways to use them, from simple to entrepreneurial.
Play food for children: Crochet fruit is soft, lightweight, and virtually indestructible. A bowl of crochet fruit in a play kitchen or toy shopping cart provides hours of imaginative play. Because cotton yarn is washable, you can toss the whole bowl in a laundry bag and run it through a gentle machine cycle when it gets grubby.
Keychains and bag charms: Attach a small keyring or lobster clasp to the top of any fruit and you have an instant accessory. Lemon keychains are particularly popular because the bright color is visible from across a room. Attach a small loop of chain or ribbon at the top of the fruit before closing the final round, and you will have a built-in attachment point.
Kitchen decor: A bowl of crochet fruit on the kitchen counter is a conversation starter. It adds a pop of color, it never spoils, and it costs a fraction of what you would pay for similar decorations at a home goods store. Arrange strawberries, lemons, and limes in a white ceramic bowl for a fresh, modern look.
Gift toppers: Instead of a ribbon or a bow, attach a crochet strawberry to the top of a birthday or hostess gift. It is a gift in itself — a tiny handmade treasure that the recipient can keep long after the main gift is used up. Tuck a small lemon inside a thank-you card. Attach a cherry to a bottle of wine.
Garlands and mobiles: String alternating fruits on a length of cotton twine or embroidery floss for a cheerful garland. A watermelon slice, a lemon, a strawberry, a blueberry — repeat as needed. Hang the garland across a mantel, in a child's room, or above a kitchen window. For a mobile, suspend individual fruits from an embroidery hoop at varying heights using clear fishing line. The effect is whimsical and modern.
Selling your fruit: If you find yourself making more crochet fruit than you know what to do with, you have a potential side income. A single crochet fruit keychain sells at craft fairs for $5 to $8. A set of three fruits in a small gift box sells for $15 to $20. A dozen-piece fruit collection with a recipe card (real or pretend) can fetch $35 to $50. Many makers report selling out of crochet fruit within the first two hours of a weekend market. The materials cost is negligible — your profit margin on a $5 keychain is about 90 percent. The limiting factor is your time, which makes this a perfect project-based income for evenings and weekends.
Tips for Beginners From Someone Who Has Made Dozens
I have made more crochet fruit than I care to count — for my own kitchen, as gifts, for my son's play kitchen, and for craft fairs. Here are the things I wish someone had told me before I started.
Count your stitches after every round. Use stitch markers to mark the first stitch of each round, and count before you move to the next round. It takes ten seconds and saves hours of frogging.
Tension matters more than speed. Tight, even stitches produce a smooth surface that holds stuffing. If your stitches feel loose, switch to a hook one size smaller.
Embrace your imperfections. Your first strawberry will not look like the photos on Pinterest. The stitches might be uneven. The leaf cap might sit slightly crooked. That is fine — it is handmade. Do not aim for perfection. Aim for finished.
Use the magic ring, not a chain ring. The magic ring creates a tight center that leaves no hole. A chain ring always leaves a small gap that looks like a belly button. Learn the magic ring.
Leave long tails for sewing. Cut the yarn tail about 8 to 10 inches long. A tail that is too short is impossible to sew with. I use the tail for sewing on leaves, stems, and assembling multi-piece fruits.
Block your finished pieces. Blocking — gently shaping and steaming your finished crochet — smooths out wrinkles and sets the stitches. For small amigurumi, simply spritz with water, shape with your fingers, and let dry overnight. The difference between an unblocked and a blocked piece is striking: the blocked piece looks crisp, professional, and finished.
Troubleshooting Common Problems
Even experienced amigurumi makers run into issues. Here is how to solve the most common ones.
My fruit has a hole where I started. The magic ring was not tightened enough. Before working your second round, pull the yarn tail firmly to close the ring completely. If a hole remains, use the yarn tail to sew it shut.
Stuffing is visible between stitches. Your stitches are too loose. Switch to a smaller hook and practice keeping even tension.
My fruit is lopsided. The most common cause is uneven tension. Count your stitches to verify the correct number. If the count is right, try stuffing less firmly.
My leaf cap keeps falling off. Sew it on with at least 8 to 10 passes through both the leaf and the body, anchoring deep into the stuffing. A dab of fabric glue on the back adds insurance for frequently handled pieces.
Color changes look messy. Complete the last yarn over of the previous stitch with the new color. This creates a clean transition line.
My yarn is splitting. Use a hook with a smooth, rounded tip and insert it cleanly under both loops. Try a different brand if splitting persists — some cottons are more tightly plied than others.
Conclusion
Crochet fruit is more than a trend. It is a perfect entry point into a craft that has brought comfort, creativity, and connection to makers for generations. The projects are small enough to fit into a busy day, affordable enough to make in quantity, and charming enough to bring a smile to anyone who sees them. A strawberry that takes twenty minutes to make can brighten a desk, a kitchen, or a child's playroom for years.
The best time to start making crochet fruit is now, while the summer light is long and the farmers' markets are full of real produce to inspire you. Pick a fruit — start with the strawberry, it is the friendliest — gather your yarn and hook, and give yourself twenty minutes to make something small and sweet. If the first one is not perfect, make another. The second one will be better. By the third or fourth, you will be hooked — pun intended.
And when a friend asks where you bought that adorable little lemon keychain, you will get to say the words that never get old: "I made it."