Introduction
Bead embroidery is simple in concept: you sew beads onto fabric to build pattern, texture, and shine. That is the whole craft. No machine, no expensive frame.
You will notice it everywhere once you start looking. Denim jackets with a scatter of glass beads along the collar. Vintage linens edged in tiny seed beads. Wedding veils and heirloom samplers kept in cedar chests for generations.
Here is the encouraging part for a beginner. Bead embroidery is mostly one stitch, repeated. Learn the backstitch bead technique once and you can outline a leaf, fill a flower, or border a hem.
The shine does the rest of the work. A single strand of size 11 seed beads catches light in a way flat thread simply cannot.
This guide covers supplies, fabric prep, the two core stitches, and two small projects you can finish over a weekend.
What You Will Need
You do not need much to begin. A starter kit fits in a sandwich bag, and most of it lasts for years.
Beads
- Size 10 or 11 seed beads. The workhorse bead for beginners — large enough to thread without squinting, small enough for fine detail.
- A second color for filling. Two colors are enough for one motif, and they keep a first project from turning into a shopping trip.
Needles
- Beading needles, size 10 to 12. Long, thin, and flexible, so a size 12 slides through a size 11 bead hole without forcing.
- Embroidery needles. Stronger but thicker, and best for stitching a base outline before the beads go on top.
Thread
- Beading thread. Nymo or One-G thread is made for this work — thin, strong, and sold in colors that match your beads.
- Or doubled sewing thread with beeswax. Two strands of ordinary sewing thread drawn across wax works well and costs nothing if you already own it.
Tools and Extras
- A small hoop or frame. A 4 to 6 inch hoop keeps fabric taut, which is the single biggest factor in even beadwork.
- Beeswax. Drag your thread across it to stop tangling and fraying before it starts.
- Sharp scissors. Small embroidery snips are ideal. Dull blades crush thread instead of cutting it.
- A beading mat or felt square. Beads roll, and a textured surface stops them from escaping to the floor mid-project.
What to Skip on Your First Project
Skip the scroll frame, the bead scoop, and the whole rainbow of colors. Two colors, one motif, one evening.
Budget substitutions work fine here. A felt square from a craft store stands in for a beading mat, and a plain cotton tea towel is a cheaper practice ground than linen.
Preparing Your Fabric
Fabric choice matters more in bead embroidery than in most hand sewing. Beads are heavy, and they pull on the cloth.
Choose a Stable Woven Fabric
Cotton, linen, wool felt, and quilting cotton all hold beads well. Stay away from stretch knits such as jersey or rib knit, because the fabric moves with every stitch and the beadwork never sits straight.
When in doubt, hold the fabric up to a window. If you can see through the weave easily, beads may tear through it.
Back the Hoop Area with Interfacing
Cut a piece of fusible interfacing slightly larger than your hoop and fuse it to the wrong side of the fabric.
This is the step beginners skip, and it is the one that saves projects. Interfacing spreads the weight of the beads across the cloth rather than letting them tear small holes.
For heavy beadwork on denim, use two layers instead of one.
Transfer a Simple Motif
Pick something with clean lines: a leaf, a lavender sprig, a small heart, or a monogram letter.
- Place the fabric in the hoop and tighten it until it sounds like a drum.
- Draw or trace your motif with a water-soluble pen, testing the pen on a scrap first.
- Keep the lines simple. A single outline is far easier to bead than a shaded drawing.
- Add small guide dots where you plan to fill with your second color.
The Core Stitch: Backstitch Beads
Almost all bead embroidery runs on two techniques. Learn both and you can bead nearly anything.
Backstitch Beads
This is the efficient method. You string several beads at once, then lock them down in one pass.
- Bring your needle up through the fabric at the start of your drawn line.
- Pick up three or four beads and slide them down the thread to rest against the cloth.
- Lay the beads along the line and push the needle back down just past the last bead.
- Bring the needle up between the first and second bead, then pass it back through the second bead. Repeat for each bead in the group.
That final pass is what makes a row sit flat instead of lifting off the cloth. Work in groups of three or four so the line does not wander.
Couching: Attach One Bead at a Time
For tight curves, single beads, or a spot that needs precision, place the beads one at a time.
- Bring the needle up exactly where you want the bead to sit.
- Slide one bead onto the needle and lay it flat against the fabric.
- Take a tiny stitch over the thread on the far side of the bead to anchor it.
- Bring the needle up at the next position and repeat the process.
This method is slower, but it gives you total control. It is also the friendlier choice for a first attempt at curved lines.
How to Start and End Thread
Do not tie knots in the fabric. Knots create bumps under beads and can pull through the cloth over time.
To start, either use a waste knot — a temporary knot on the front that you snip away once a few beads are anchored — or take three small backstitches where the beading will cover them.
To end, weave the thread back through the holes of the last five or six beads, then trim close. Bead holes grip thread better than any knot.
Reading and Planning a Bead Pattern
Bead patterns are easier to read than cross-stitch charts, because they follow the same grid logic on paper.
Beading Graphs
On a beading graph, each square equals one bead. Count the squares across a row to know how many beads you need.
Fill your design in with colored pencils, or print a chart and shade it. Either approach works fine.
Add a Color Legend
Write a small key beside the graph: A is matte ivory size 11, B is dark olive size 11, C is size 15 for fine accents.
The legend matters because bead finish changes how a color reads. A shiny bead and a matte bead of the same dye look like two different colors side by side.
Spacing Beads on a Curved Line
On a curve, beads fan wider on the outside of the turn and crowd together on the inside.
To fix it, drop to smaller beads on the inner curve, or leave one empty space every few beads. Both keep the line looking smooth.
Why Bead Size Changes the Scale
A size 11 seed bead measures roughly 2.1mm across, so about 12 of them span an inch. Size 15 beads run closer to 1.5mm and give you finer detail.
If you swap sizes partway through a project, your motif grows or shrinks. Choose the bead size before you draw the lines.
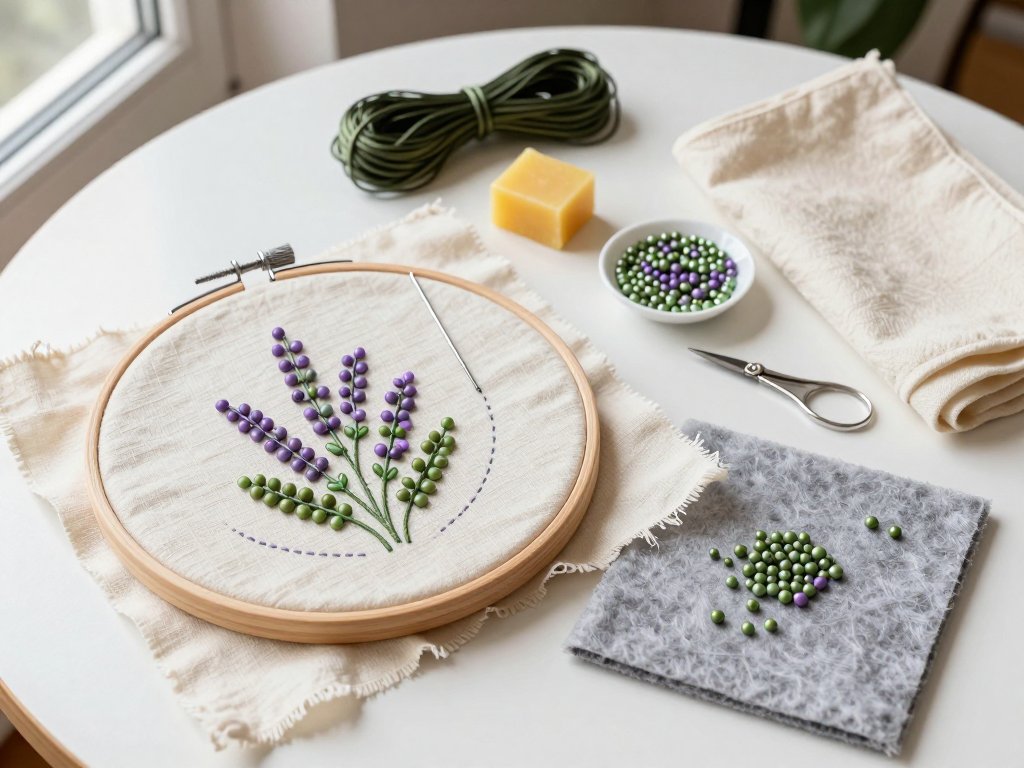
Project One: A Beaded Lavender Sprig Tea Towel
Start here. A cotton tea towel, one motif, two bead colors, and a single evening's work.
What You Need
- One plain cotton tea towel, or a 16-inch pillow cover
- Size 11 seed beads in two colors: soft green for stems, lavender for the flower heads
- Size 12 beading needle, Nymo thread, beeswax, a 5-inch hoop, and fusible interfacing
Steps
- Fuse a square of interfacing behind the area you plan to bead.
- Draw a lavender sprig: one gently curved stem with three small flower heads at the top.
- Work the stem in backstitch beads with your green color, three beads per group.
- Outline each flower head in green, then fill the inside with lavender beads using couching.
- Add two or three small leaves along the stem in a lighter green.
- Weave the thread ends back through the last beads and trim.
Finishing the Back
Cut a patch of fusible interfacing slightly larger than the finished beadwork.
Fuse it to the wrong side of the towel, directly over the back of the stitching. This covers the thread passes and stops beads from snagging on laundry or fingers.
Press from the front on a towel-covered ironing board, never directly on the beads themselves.
Project Two: A Beaded Motif on Denim
Denim is the most forgiving fabric for bead embroidery. It is sturdy, it hides thread, and it wears well.
The trade-off is that denim flexes, and beads do not.
Choose a Dense Small Motif
Pick something compact and solid: a small star, a bee, a strawberry, or a tiny crescent moon.
Dense shapes hold up better than thin lines because each bead supports its neighbors. Skip long single-bead trails on denim.
Use a Heavier Backing
Use two layers of fusible interfacing, or a patch of lightweight iron-on stabilizer cut slightly larger than the motif.
Denim also blunts needles quickly, so keep a spare size 12 on hand.
Avoid Beading Across Seams
Do not run beadwork across a pocket seam, a side seam, or a waistband join.
Seams flex and shift when you move, and beads stitched across one get sheared off with wear.
Place your motif on flat fabric instead — the pocket face, the upper back, or a sleeve away from the elbow.
Anchor and Rivet the Design
Once your outline is stitched, add a few larger accent beads at the widest points and double-stitch each one.
This spreads strain across many beads rather than letting it land on a single stitch. A riveted motif survives real wear.
Troubleshooting Bead Embroidery
Five problems account for nearly every frustrating first project. All of them have simple fixes.
Beads Slide Around
This usually means your thread is too loose or your hoop is not tight enough. Re-hoop the fabric and take smaller anchoring stitches.
If a row still shifts, pass the thread back through each bead a second time to lock it down.
Thread Frays or Snaps
Short lengths are the fix. Cut Nymo to about 18 inches, and never longer.
Long threads abrade against the fabric with every pass through it. Run the thread across beeswax before you begin, and check the needle's eye for a rough edge.
The Needle Will Not Fit Through the Bead
Your needle is too thick for that bead size. Move down a size: a size 12 needle for size 11 beads, a size 13 for size 15 beads.
Budget bead mixes often have inconsistent holes. Cull the tight ones and set them aside for a project that uses larger beads.
Beads Pull Through the Fabric
The cloth is too loosely woven for the bead weight, or you skipped the interfacing step.
Back the area with fusible interfacing. If a bead already slipped through, stitch a small patch of matching fabric behind the hole and re-bead over it.
The Work Puckers
Puckering means you are pulling the thread too tight. Beads should rest on the fabric surface, not sink into it.
Relax your tension and let each bead dictate the stitch length. Then re-stretch the fabric gently in the hoop.
Care and Longevity
Beadwork lasts for decades when you handle it kindly. A little care goes a long way.
Machine Washing, Carefully
- Turn the item inside out so the beads face inward.
- Place it in a mesh laundry bag.
- Wash on cold using a gentle or delicate cycle.
- Remove it immediately and lay it flat or hang it to air dry.
Never put a beaded item in the dryer. Heat softens thread, and tumbling breaks the bead connections.
Hand Washing Is Kindest
Hand washing in cool water with a mild soap is the gentlest option, and it takes five minutes.
Squeeze the water out gently and do not wring. Lay the piece flat on a towel to dry, reshaping it while it is still damp.
Storing Beaded Pieces
Store flat or rolled, never folded through a beaded area. A fold pressed into beadwork for months can set a permanent crease.
Conclusion
Bead embroidery rewards patience more than talent. You need one stitch, a taut hoop, and the willingness to go slowly for an evening.
Start with the tea towel. It is inexpensive, it forgives mistakes, and it teaches you how your hands handle small beads.
Then let your eye wander to the denim jacket at the back of the closet. That plain pocket is an empty canvas waiting for one dense little motif.
A handful of seed beads really can turn plain fabric into something heirloom-worthy. One calm stitch at a time.
If you enjoy working with thread and shine, you may also like ribbon embroidery, which uses the same fabric-prep habits with a very different material for its sparkle.