Introduction
Last year I bought a pack of flag stickers for a Fourth of July barbecue.
Twenty stickers in a pack, eight dollars, and by the end of the afternoon half of them had peeled off the cooler they were stuck to.
The red stripes bled into the white when the ice melted, and what was supposed to look festive looked like a craft project that had been left out in the rain — because, well, it had been left out in the rain.
That is when I started thinking about making my own. If I could control the materials, I could control the quality.
Watercolor paper is more absorbent than the glossy sticker paper most commercial stickers use, which means the ink bonds better and lasts longer.
And if I painted the flags myself, the inevitable little imperfections would look charming rather than cheap.
A homemade flag with a slightly wobbly stripe looks intentional. A mass-produced one with a printing error looks defective.
This tutorial walks you through the whole process: how to paint watercolor American flags, how to turn them into stickers, and how to make sure they hold up through an afternoon of lemonade, hamburgers, and happy chaos.
The whole project takes about two hours of active work spread across two days — one hour for painting, one hour the next day for cutting and adhering.
That might sound like a lot for a sticker, but you will end up with fifteen to twenty of them from a single sheet of paper.
That is enough for a party, a set of gifts, and a few for yourself.
What You Will Need
The supply list is short and none of it is expensive. You probably have most of this already.
- Watercolor paper — 140 lb cold press is ideal. It is thick enough to hold water without buckling, and it takes sticker adhesive well. A single sheet costs about a dollar and will make fifteen to twenty stickers.
- Watercolor paints — Red, white, and blue. A basic student-grade set works fine. You do not need professional-grade paint for stickers.
- A fine brush — Size 2 or 3 round brush for the stripes and stars.
- Sticker paper — Printable adhesive sheets from any craft store or online retailer. A pack of ten sheets costs about eight dollars. You will use one or two sheets for this project.
- Scissors — For cutting out the finished stickers.
- A pencil and ruler — For sketching your flag layout before painting.
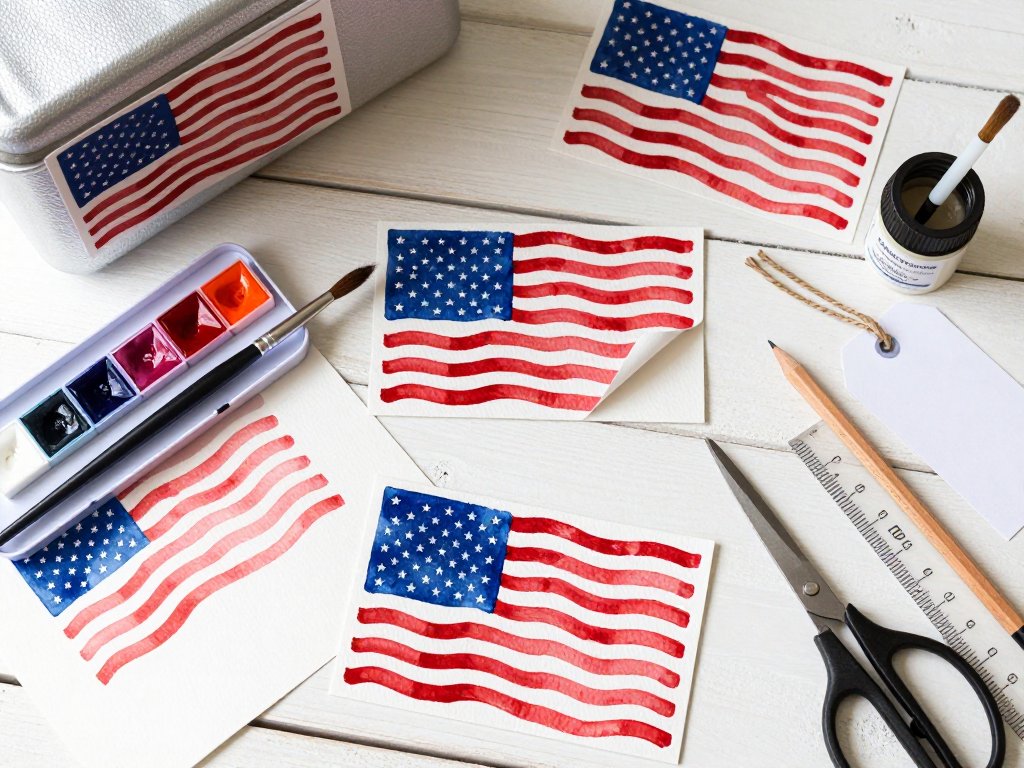
Painting the Flags
The trick to painting a good watercolor flag is keeping the layers thin and working from light to dark.
Watercolor is translucent, so you need to plan your layers: white stays white (you leave the paper bare), blue goes on next, and red goes on last.
If you paint red before blue, the red will show through the blue and turn it muddy.
The order matters.
Start by sketching your flag grid in light pencil. If you are painting a standard American flag, the proportions are 1.9 units wide to 1 unit tall.
For a sticker that is five centimetres tall, it should be about nine and a half centimetres wide.
Mark the blue canton in the upper left corner — it should span the top seven stripes and reach about two-fifths of the way across the flag's width.
Lightly sketch thirteen horizontal stripes below and to the right of the canton. Do not press hard with the pencil.
The lines should be just visible enough to guide your brush. Once the paint is on, they will mostly disappear.
Wet the area where the blue canton will go with clean water using your brush.
While the paper is damp, apply a thin wash of ultramarine or cobalt blue. Let the paint spread naturally — the wet-on-wet technique gives the blue a soft, luminous quality that contrasts beautifully with crisp red stripes.
If the blue pools in one area, tilt the paper gently to distribute it. Let this dry completely before moving to the next step.
A hair dryer on low heat speeds this up significantly, but hold it at least twenty centimetres away to avoid warping the paper.
For the stripes, work left to right across the flag, alternating red and white. Use a light red wash — alizarin crimson mixed with plenty of water — and paint each stripe in a single smooth stroke.
The white stripes are just bare paper; the red stripes should be transparent enough that the paper's texture shows through.
If the colour looks too intense, blot it with a tissue while it is still wet.
If it looks too faint, let it dry and add a second wash. Let the stripes dry fully between coats.
One common mistake is making the red stripes too dark on the first pass. Watercolor dries lighter than it looks when wet, but only by about thirty percent.
If the wet stripe looks the same intensity as the final colour you want, it will dry too dark.
Aim for a shade that looks noticeably lighter than your target, and you will hit it almost exactly once it dries.
Once everything is dry, add the stars. This is the part most people worry about, but it is easier than it looks.
Use the tip of your brush to place a tiny dot of white gouache or thick white watercolor for each star.
You do not need fifty precise five-pointed stars. Fifty tiny white dots arranged in nine staggered rows — five in the first row, four in the second, alternating — reads clearly as stars from a normal viewing distance.
The slight variation in size and shape from hand-painting them is part of their charm.
If you want more defined stars, dip a toothpick in white gouache and use the tip to make each dot. The toothpick gives you more control than a brush and produces consistently smaller dots. Let the stars dry for at least an hour before handling the painting.
Turning Your Paintings into Stickers
When the paint is completely dry — and I mean completely, give it an extra hour to be safe — you are ready to turn them into stickers. Trim the painted flag from the watercolor paper, leaving a small border if you want a white edge around the sticker.
Apply a thin, even layer of adhesive to the back of each painting. If you are using printable sticker sheets, cut a piece slightly larger than your flag, peel the backing, and press the flag onto the adhesive side.
Smooth out any bubbles with the edge of a credit card or a bone folder.
If you are using a glue stick or liquid adhesive designed for paper, apply it evenly to the back of the flag and press it onto a sheet of backing paper.
Let the adhesive cure for twenty-four hours before using the stickers. This waiting period is the single most important step. If you stick them on anything before the adhesive has fully set, they will peel off within hours — exactly like those eight-dollar store-bought stickers I started with.
For a more professional finish, trim each flag with a small border of white around the edges instead of cutting right along the painted area.
A two-millimetre white border frames the watercolor nicely and makes the sticker look intentional rather than hastily cut.
Use a metal ruler and a craft knife for straight edges, or small sharp scissors for curved corners.
Take your time with this step — a cleanly cut sticker looks twice as expensive as one with ragged edges, regardless of the quality of the painting inside.
Where to Use Your Stickers
Watercolor flag stickers are surprisingly versatile. Here are a few ideas to get you started:
- Party coolers — Stick them on a white or silver cooler for an instant festive look. The watercolor texture stands out against the metallic surface.
- Gift tags — Attach one to a hostess gift or a birthday present for someone hosting a July 4th gathering.
- Cards and invitations — A single flag sticker on the front of a blank card turns it into a handmade Independence Day greeting in seconds.
- Water bottles — Seal the sticker with a layer of clear packing tape or mod podge if you want it to survive the dishwasher.
- Party favors — Make a sheet of small flags and let guests pick one as they leave. It is a tiny, personal keepsake that costs pennies to produce.
Making Them Last
Unsealed watercolor stickers are beautiful but delicate. They are fine for indoor use on surfaces that do not get handled much — cards, gift wrap, journal covers.
For outdoor use, or for anything that will be touched repeatedly, seal the front of the sticker with a thin coat of matte mod podge or a clear acrylic spray sealer.
Test the sealer on a practice sticker first to make sure it does not reactivate the watercolor and cause bleeding.
If you are sticking them to fabric — a tote bag, a t-shirt, a napkin — use a fabric adhesive instead of paper adhesive, and seal the front with fabric medium or iron-on vinyl.
Watercolor on fabric is a slightly different process, but the same painted flags work beautifully as iron-on patches.
Store any unused stickers flat in a dry place between sheets of wax paper. Humidity is the enemy of both watercolor paper and sticker adhesive.
If you live in a humid climate, add a silica gel packet to your storage container.
Stickers stored this way will last until next year's celebration without yellowing or losing their tack.
Troubleshooting Common Problems
Even with a straightforward project like this, things can go wrong. Here is how to fix the most common issues.
The paper buckled. This happens when you use too much water or paper that is too thin.
Switch to 140 lb cold press paper, which is thick enough to handle wet washes without warping.
If your painting is already warped, press it under a stack of heavy books for a day before applying the adhesive.
The red bled into the white stripes. The red wash was too wet or you did not let the previous stripe dry completely. Wait until each stripe is bone-dry before painting the adjacent one. A hair dryer on low heat between stripes prevents this entirely.
The stars smudged. White gouache needs time to set. Let the stars dry for at least an hour, and do not stack the finished flags on top of each other. Lay them flat in a single layer on a drying rack or a sheet of wax paper.
The sticker peeled off after a few hours. The adhesive did not cure long enough. Wait the full twenty-four hours. If you are in a hurry, use a stronger adhesive like Aleene's Tacky Glue applied in a very thin layer, but still give it at least twelve hours to set.
Why Handmade Beats Store-Bought
There is a practical argument here: handmade stickers cost about fifteen cents each in materials, compared to eight dollars for a pack of twenty store-bought ones. If you are decorating for a party of thirty people, the savings add up. But that is not really why you should make them.
You should make them because the process of painting fifty tiny stars, one at a time, is genuinely satisfying.
You should make them because a sticker you painted yourself tells a story about who made it and why.
And you should make them because the flag on your cooler this year will still be there next year, faded just a little, held in place by adhesive you chose and applied yourself.
That is worth more than an eight-dollar pack from the store.
The best time to start this project is about a week before the Fourth. That gives you plenty of time to paint, let things dry properly, test a few stickers on different surfaces, and still have a day left to paint more if you run out.
Give yourself that buffer, and you will walk into the celebration with a stack of handmade flags and the quiet satisfaction of having made them yourself.
That is a feeling no pack of stickers from a store shelf can match.