Introduction
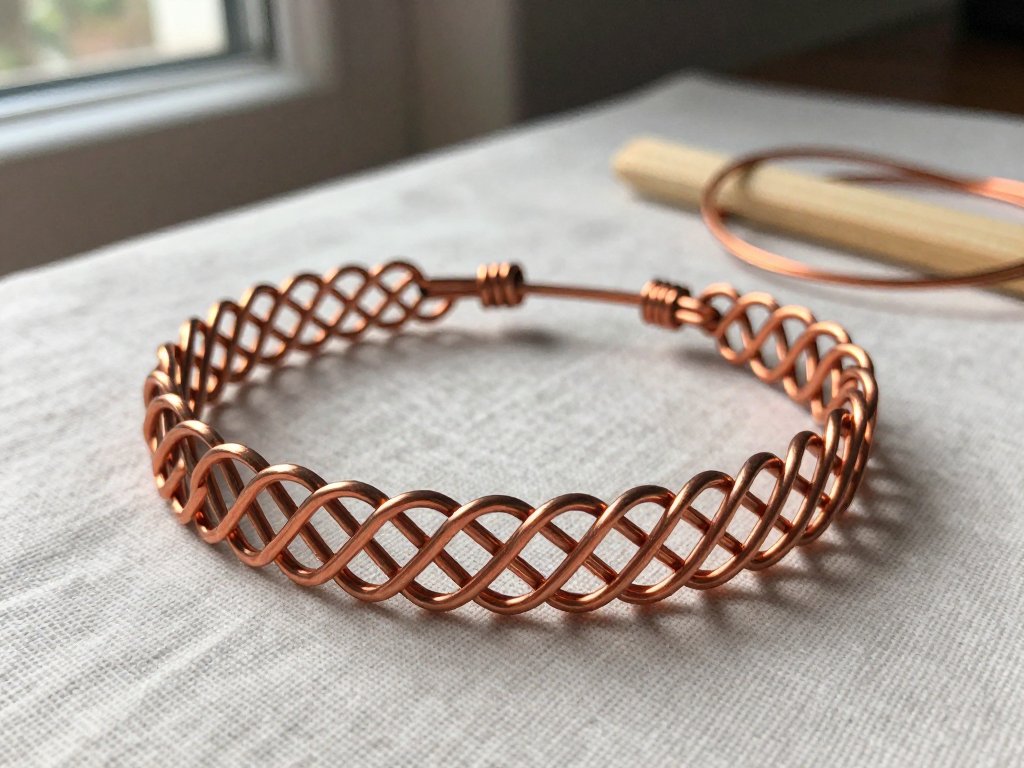
Viking knit begins with one length of fine wire and a wooden dowel. There is no loom, no solder, and no seam. What appears at first is a loose cage of loops.
Then you anneal it and pull it through a draw plate. The cage compresses into a dense, supple mesh that behaves like a chain and reads like woven metal.
The technique is old — Norse in origin, and still taught by metalsmiths who value its economy. One wire, one continuous motion, one structure that holds itself.
It is also exacting in a specific way. The loops must be even, the tension consistent, and the wire dead soft. Get those three things right and the rest follows.
This guide takes the method in order: wire, mandrel, first loops, the working rhythm, joins, the pull, and the finish. You will end with a bracelet.
What Viking Knit Is, and Why the Mesh Is Structural
Viking knit is a looped mesh. One wire passes through the loops of the row beneath it, again and again, spiralling down the mandrel as a continuous tube.
Nothing is knotted and nothing is soldered. The fabric holds because each loop locks through its neighbours, and tension spreads load across the whole tube.
That is why the mesh is structural rather than decorative. A pattern applied to a surface is ornament; a loop passing through another loop is the structure itself.
Off the mandrel the tube is loose and springy, almost too open to trust. Pulling it through a draw plate closes the loops against each other and consolidates them.
The same pull lengthens the tube, often by a third or more. A short, fat cylinder becomes a long, slender chain with a soft metallic drape.
It is worth naming the difference from ring weaving. Chain maille is built ring by ring, each one closed with pliers. Viking knit is one wire, looped.
Choosing Wire: Gauge, Temper, and Metal
Use 28, 29, or 30 gauge wire — roughly 0.25 to 0.32 mm. Heavier wire will not pack tightly enough at the draw plate; lighter wire kinks under tension.
For a first bracelet, 28 gauge is the most forgiving. It holds a loop shape while you work and still compresses cleanly when drawn.
Temper matters more than gauge. You want dead-soft wire — fully annealed, with no springback. It should bend and stay bent under almost no pressure.
Dead-soft copper is the ideal teacher. It is inexpensive, it re-anneals easily with a small torch, and it shows every flaw honestly.
Fine silver — pure silver, not sterling — is the other correct choice. It arrives dead soft and does not oxidise the way copper does.
Sterling silver is harder and work-hardens quickly. At 28 gauge it will fight you, particularly at the joins, where the wire must twist around itself.
Craft-store "silver" wire is usually plated copper or a nickel alloy in a hard temper. It kinks at the loop and cracks at the join. Leave it on the shelf.
Learn the structure on copper. Once your hands know the motion, move to silver and the material stops being the obstacle.
A different wire structure worth learning alongside this one is wire-wrapped jewelry basics, which builds form by binding rather than looping.
Your Mandrel and the First Loops
The mandrel is the form the tube is built around. A hardwood dowel or a smooth metal rod works, between 1/4 inch and 3/8 inch in diameter.
Choose by the tube you want, not the bracelet you want. A 3/8-inch mandrel gives a generous, soft tube; a 1/4-inch mandrel gives a finer, denser one.
The dowel must be smooth. Sand it to 400 grit and wax it, or the loops will catch and drag as you pull them around.
Clamp the dowel upright in a vise, or hold it between your knees, with a few inches clear below the working end. The tube needs room to hang.
Cut your wire into working lengths of about three feet. Longer lengths tangle at the join; much shorter lengths mean constant interruptions.
Keep a small dish of water, a torch, a draw plate, a brass brush, and a fine file within reach. Everything else is optional.
Starting the First Row of Loops
Every tube begins with a small ring of loops that later becomes one end of the chain.
- Leave a six-inch tail and make a loose loop around the dowel near the top.
- Twist the tail once around the standing wire to fix that first loop in place.
- Continue wrapping the working wire around the dowel, side by side, until the row closes.
- Keep each new loop touching the one before it, never crossing over it.
- Slide the loops together so they sit in a single neat row around the dowel.
- Check that the tail hangs inside the dowel and the working wire hangs outside.
Five or six loops will close the circle on most dowels. A larger mandrel takes one or two more than a small one.
The row should look like a short coil, not a spiral staircase. If the loops climb, slide them back down and begin again.
This first row is the only place with a visible seam. It gets hidden inside the end treatment, so do not fuss over it.
The Core Motion
Hold the dowel in your non-dominant hand and keep the working wire hanging below the row. The tube grows downward, away from the clamp. This is single knit: one loop through one.
The motion: bring the working wire up across the front of the dowel, over the top edge, and down the back. Pass it through the next loop, back to front.
Pull the wire forward and down until the new loop sits snug against the row above it. That is one loop completed.
Rotate the dowel a little and repeat with the next loop along. Work all the way around in one direction, never reversing.
When you reach the loop you started from, the round is closed. The new row sits directly below the first, loop for loop.
Because the wire spirals rather than circles, the column of loops drifts slowly around the dowel. That drift is what gives the mesh its subtle diagonal grain.
Building Height
Height is repetition. Each completed round adds roughly one wire diameter of length to the tube.
At 28 gauge that is about 0.3 mm per round, so sixty rounds produce well under an inch of undrawn tube.
Do not count rounds. Measure the working tube against your wrist and remember that drawing will lengthen it considerably.
Through Two, Add One
Single knit — one loop through one — makes a light, open mesh. The denser classic look comes from working through two loops, then adding one.
The rhythm is: pass the wire through two adjacent loops at once and pull up one new loop. Then make one plain loop around the dowel without passing through anything.
Two loops are consumed and two are created, so the count around the dowel stays constant. That is why the tube does not narrow as it grows.
The result is a thicker, more interlocked fabric with a pronounced braided face. It compresses less at the plate, but it looks richer.
Choose one rhythm and keep it for the whole piece. Switching mid-tube changes the density and leaves a visible step in the mesh.
For a first bracelet, single knit is the wiser choice. Learn the double rhythm on a sample tube you never intend to wear.
Tension, and Three Mistakes Beginners Make
Tension in Viking knit is the size of the loop, and it has to be identical all the way around.
Pull every loop to the same snugness — enough to close against the row above, not enough to strangle the dowel. Consistency beats tightness.
Mistake one: loops of different sizes. The tube bulges, and the draw plate cannot fix it. A bulge simply compresses unevenly and stays.
Mistake two: pulling the working wire sideways. That drags the loop out of round. Pull straight down, in line with the tube.
Mistake three: gripping the dowel too hard. A tense hand rotates the dowel in jerks, and every loop inherits the jerk.
If your hand aches after twenty minutes you are holding too tightly. Set the work down, shake out your fingers, start slower.
Check the tube every few rows in raking light. Uneven loops cast uneven shadows, and the eye catches them faster than the fingers do.
Joining a New Length of Wire
There is no knot in Viking knit and no need for one. A join is an overlap, and the draw plate conceals it.
- Stop with the old wire hanging inside the tube, against the dowel.
- Lay the new wire alongside it, overlapping by about half an inch.
- Twist the two tails around each other two or three times, keeping the twist flat.
- Continue looping with the new wire as though nothing has changed.
- Trim the short ends to a quarter inch and push them inside the tube.
Make joins on the inside face of the tube, never on the outside where they will show. The mesh closes over them as it compresses.
Never place two joins in the same round. Space them at least an inch apart so no weak point accumulates in one place.
A join made this way is mechanically sound. The twist transfers load, and the compressed mesh grips both tails.
If a tail works loose during drawing, stop and push it back inside with a fine awl. Do not cut it flush until the pull is finished.
Removing the Tube, Annealing, and the Draw Plate
Slide the finished tube off the dowel. It will look alarming — loose, oversized, and far too open to be jewellery.
That is the correct state. The mesh only becomes metal fabric once it is compressed.
Anneal first. Heat the tube with a torch to a dull red, hold it there briefly, then quench. Copper can go straight into water.
Annealing softens the wire that work-hardened during looping. Without it the tube resists compression, and the wire may crack instead of closing.
Thread the tube through a draw plate hole close to its outside diameter, grip the protruding end with pliers, and pull steadily.
Move to the next smaller hole and pull again. Drop one hole size at a time, never two, or you will shear the wire.
Lubricate the tube with a little wax or soap before each pull. Friction breaks wire far more often than force does.
Re-anneal every two or three holes. The mesh hardens as it compresses, and a hardened tube stops moving through the plate.
Without a Draw Plate
You can consolidate the mesh without a plate, though the result is softer and less uniform. Anneal the tube thoroughly first.
Lay it on a smooth hardwood block and roll it with a second block, using light downward pressure and long, even strokes.
Rotate the tube a quarter turn every few passes so it compresses evenly around its circumference.
A hardwood block drilled with a graded series of holes makes a serviceable draw plate. Sand each hole glass-smooth, or it will scratch.
Finishing the Ends
Both ends of the tube are open loops, and both need closing into something a clasp can hold.
Gathering: run a length of 24-gauge wire through every end loop, pull it up like a drawstring, and twist the bundle tight.
Form that twisted bundle into a loop, wrap it back on itself a few turns, and trim. The loop becomes your clasp attachment.
Wrapping: bind the gathered loops with fine wire, close against the mesh, until the end reads as a solid collar.
Bead cap: set a bead cap over the gathered end and trap it with the same binding wire. No adhesive is needed.
Work both ends identically. A bracelet with one tidy end and one lumpy end will always look like a mistake.
File any wire ends flush and burr them with a cup bur. A sharp tail will find skin, and it will find it every time.
Polish, Patina, and Seal
Work the surface in stages. A brass brush removes annealing scale and raises a soft lustre without eroding the weave.
For more brightness, follow with rouge on a soft wheel, keeping the wheel moving so the thin mesh never overheats.
On copper, liver of sulfur darkens the recesses. Buff back lightly and the raised loops stay bright against the shadow.
Dilute the liver of sulfur well, dip briefly, and rinse at once. Neutralise in a baking soda bath, rinse again, dry completely.
Seal a patinated piece with a thin coat of microcrystalline wax or clear lacquer. Unsealed, the colour keeps shifting with handling.
A First Bracelet, Start to Finish
This is the whole method in one project. Expect three to five hours, spread across two sittings.
- Cut about nine feet of 28-gauge dead-soft copper, in three lengths.
- Mount a 3/8-inch dowel upright and start five or six loops at the top.
- Work single knit rounds until the undrawn tube measures four and a half inches.
- Join new lengths as needed, keeping every join on the inside face.
- Slide the tube off, anneal it to dull red, and quench.
- Draw it down through the plate one hole at a time, re-annealing as it stiffens.
- Stop when the tube measures about seven inches and the mesh has closed.
- Gather both ends, bind them, and form a loop at each.
- Add a hook clasp, then polish with a brass brush.
Four and a half inches of undrawn tube will typically draw out to roughly seven. The exact ratio depends on your tension and how far you pull.
Measure the wrist, not the tube. A bracelet should sit with about half an inch of ease, plus the length the clasp adds.
If the finished tube comes up short, you cannot stretch it back. Work longer next time and stop drawing the moment the length is right.
Troubleshooting
Uneven loops. Usually tension, not wire. Slow down and pull each loop to the same point before starting the next one.
Collapsed tube. The loops were too large, or the wire too soft for the compression. Anneal less and start with a tighter hole.
Kinked wire. A kink is a permanent bend and will not pull out. Cut above it, join a new length, carry on.
Work-hardening. The wire stiffens, then snaps. Anneal the whole tube, not just the working end, and keep your lengths shorter.
A tube that will not compress. Almost always unannealed, or the first plate hole is too small. Anneal, then begin one size larger.
Mesh that opens after drawing. The pull was too fast. Draw slowly and let the plate do the work instead of the pliers.
Keep a failed sample. Cut it open lengthwise and you will see exactly how the loops interlock — the fastest lesson in the craft.
Where to Take It Next
Once the single knit is reliable, the variables open up quickly. Gauge changes density; mandrel size changes the tube's proportion and drape.
Two or three wires worked together make a striped tube. A fine wire wound alongside a heavier one produces a quiet barber-pole grain.
Shape is the next frontier. A tapered mandrel makes a tube that widens along its length, which suits earrings and long pendants.
Copper takes a liver-of-sulfur patina beautifully. Dip, rinse, neutralise in baking soda, and seal with wax to hold the dark tone.
Fine silver needs less intervention. A brass brush and a soft polish bring up the weave without darkening the recesses.
A cord finish skips the clasp entirely: gather the ends, bind them, and run a leather cord through the loops with a sliding knot.
From here the technique scales down to earrings and up to necklaces. The method does not change — only the length of wire and your patience.