Introduction
I was standing in the backyard at 10 AM on July 3rd last year, holding a crumpled piece of polyester that was supposed to be a flag.
It had lasted maybe four hours at my Memorial Day cookout before the wind caught a loose seam and turned the whole thing into a tangled mess.
Thirty-five dollars. One afternoon. Gone.
My wife asked if I'd picked up new decorations for the Fourth. I told her I'd figure something out.
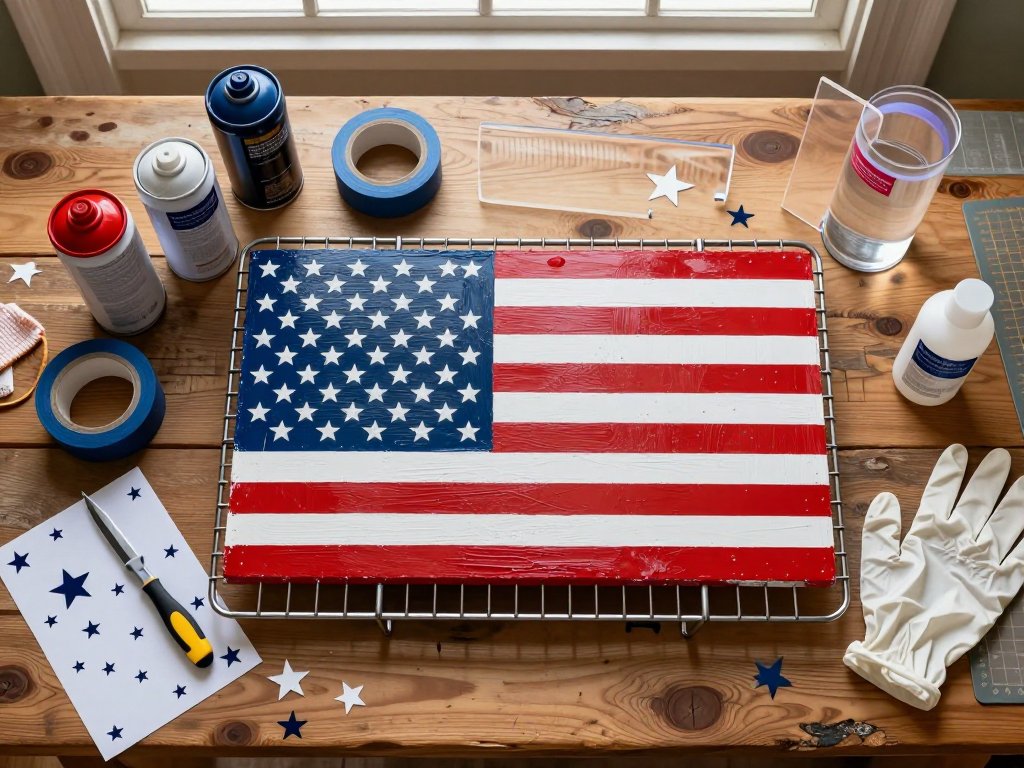
Then I walked inside, grabbed the cooling rack off the kitchen counter — the one I'd been meaning to replace for two years because it wobbled — and had a thought that felt almost too practical to be real: What if I just spray-painted this thing?
Two hours and about eight dollars later, I had a flag that looked better than the one I'd thrown away.
It didn't flap, it didn't tear, and it didn't cost me another trip to the big-box store.
My neighbor asked where I bought it. I told him the kitchen aisle at Goodwill.
He didn't believe me.
That's the thing about cooling racks — they're grid-shaped, lightweight, and already have that perfect rectangular proportion. You're basically staring at a flag blank every time you pull one out of the oven. You just don't realize it yet.
Materials
Here's the full list. You probably already own half of this.
- One rectangular cooling rack. Look for roughly 12 x 17 inches — that's the standard half-sheet size and gives you the best proportions. Thrift stores are gold mines for these. Expect $2 to $5. Avoid nonstick-coated racks if you can — bare stainless or chrome takes paint better.
- Spray paint in red, white, and blue. You need three cans. Go with a brand that advertises "bonding" or "multi-surface." Rust-Oleum Universal or Krylon ColorMaster work well. Budget about $5 per can, but you'll use less than half of each.
- Painter's tape. FrogTape or ScotchBlue, 1-inch width. The "delicate surface" version is worth the extra dollar because it peels cleanly from painted metal.
- Star stencil or star stickers. A small star stencil costs about $3 at any craft store, or grab a sheet of peel-and-stick star decals. If you have a steady hand, you can cut your own from cardboard or acetate.
- Clear acrylic sealer. Matte or satin finish. This is not optional — it protects the paint from UV rays, humidity, and handling. Skip it and your flag looks faded by Labor Day.
- Optional: Disposable gloves, a drop cloth or newspapers, rubbing alcohol, and a scrap piece of cardboard to spray on.
Total cost if you buy everything from scratch: About $25 to $30. If you already have a cooling rack and some leftover spray paint? You're looking at maybe $8.
Why a Cooling Rack Works for This
An American flag has a 10:19 width-to-length ratio. A standard rectangular cooling rack, especially the half-sheet variety, lands right in that ballpark.
The wire grid gives you a natural guide for taping straight stripes, and the gaps between the wires let light pass through — meaning your flag looks good mounted on a wall or freestanding in a window.
You also get durability that fabric can't match. A fabric flag left outside in July fades in about two weekends.
A painted metal rack outlasts your grill. The clear sealer adds UV protection, and since it's one solid piece, there are no seams to split, no grommets to rust, no hem to fray.
Plus, it's portable. Hang it on a fence, prop it on a buffet table, or stash it in a closet until next year without it wrinkling. Try that with a fabric flag.
Step 1: Prep the Cooling Rack
This is the step most people rush, and it's the one that makes or breaks the whole project.
Paint won't stick to a greasy surface. Period. Your cooling rack has been in the kitchen — it's got oils, cooking residue, and a layer of grime that the paint will detect and reject.
Wash the rack thoroughly with warm, soapy water and a stiff brush. Pay special attention to the corners and the spots where the wires cross — that's where grease hides.
Rinse completely, then wipe the whole thing down with rubbing alcohol on a lint-free cloth.
The alcohol removes any remaining residue and evaporates clean, leaving a bare surface that's chemically ready for paint.
Common mistake: Using dish soap alone and thinking that's enough. Dish soap leaves a microscopic film. The alcohol step is non-negotiable.
If your rack has a nonstick coating and you're committed to using it anyway, you'll need a high-adhesion spray primer. But honestly, if you haven't bought the rack yet, just get an uncoated one. It'll save you a step.
Once the rack is clean and dry, lay it flat on your drop cloth. You're going to spray both sides, so set yourself up somewhere well-ventilated — a garage with the door open, a driveway on a calm day, or a balcony.
Wind is your enemy, so pick a still day if possible.
Step 2: Taping the Stripes
This is where the project starts to look like a flag. Your cooling rack has a grid of horizontal and vertical wires. Use the horizontal wires as your stripe guides.
Here's the key: the top-left corner of the flag — the "union" or canton — is blue and covers the first seven stripes on the hoist side, about 40 percent of the flag's length. Before you paint anything, you need to block off that area.
Start by measuring about 40 percent of the rack's width for the blue union area.
Mark it with a small piece of tape on the edge. Then run a vertical strip of painter's tape from top to bottom at that mark.
This tape line separates the blue canton from the red and white stripes.
Now, working left to right from that tape line, use the horizontal wires as your guides.
The stripes on a cooling rack are the gaps between the wires, not the wires themselves.
Paint goes through the gaps and coats the wires, so the visual effect is a solid stripe from a distance even though the rack is open.
That's the trick — the air gaps become part of the design.
Mistake to avoid: Don't press the tape down so hard that it creeps into the gaps you want to paint.
A firm seal at the edges is fine, but leave the center of each taped section slightly proud so paint doesn't wick underneath.
And keep everything square to the rack's grid. Your eyes forgive a lot, but they won't forgive crooked stripes.
Step 3: Spray Painting the Base Colors
If you've never spray-painted a wire object before, here's the short version: thin coats, light passes, and way more patience than you think you need.
Start with white. Paint the uncovered horizontal gaps with white spray paint. Hold the can about 8 to 10 inches from the rack and use a sweeping motion — start your pass before the rack, spray across it in a smooth even line, and release after you clear the far edge.
This prevents pooling at the start and end of each stripe. Apply two light coats, letting each dry for at least 10 minutes.
If you rush, the paint runs and you restart. While the white dries, clean the nozzle by holding the can upside down and spraying for two seconds.
Do this after every color change.
Second color: red. Remove the tape from the red stripes. Apply red in the same light sweeping passes. Two coats, 10 minutes between each.
Third color: blue. Tape off the entire area where the blue canton will go — a clean rectangle in the top-left section of the rack. The blue covers roughly seven stripes deep on the left side, so make sure your tape lines are straight. Spray two light coats.
Here's a nuance most tutorials skip: the blue should be a true navy, not a royal or baby blue. Look for colors labeled "Patriotic Blue" or "Navy Blue." Err slightly darker than you think you want.
Technique tip for even coverage: Because cooling rack wires are round, paint tends to miss the underside.
After your first coat on one side, wait 15 minutes, flip the rack over, and spray the back side.
This gives you full coverage on both sides of the wire, which matters when the flag is displayed in front of a light source.
Common mistake: Your instinct will be to hold the trigger down and saturate the rack so you're done faster. Resist it. Heavy paint fills the gaps between the wires and turns your open grid into a solid blob. Light, dry passes. Trust the process.
Step 4: Adding the Stars
The union is the most recognizable part of the flag, so this is where you want to be careful. You have three solid options.
Option 1: Star stickers (easiest, most consistent). Buy a sheet of small white star stickers at any craft or dollar store.
Place them in a grid pattern on the blue canton. Takes about 10 minutes, perfectly uniform, and if you mess up you just peel and reposition.
The clear sealer in the next step helps them blend in.
Option 2: Star stencil (most authentic, more work). Use a reusable star stencil — craft stores sell multi-size packs for around $3.
Hold or tape it in position and lightly dust white spray paint over it. The stars become part of the painted surface.
The downside is the stencil won't sit perfectly flat on a wire grid, so you'll get some overspray.
A light trigger pull and a steady hand give the best results.
Option 3: Stenciled stars on cardstock (if you're a perfectionist). Cut a piece of cardstock to fit the blue union, punch star holes through it, tape it to the rack, and spray.
The cardstock creates a flat barrier that prevents overspray on the rest of the rack.
More setup, crispest result.
Whichever method you choose, place the stars in nine horizontal rows staggered so they alternate — four stars in the first row, five in the second, and so on. This is the official arrangement. Nobody at your cookout will count them, but it's a nice touch.
Mistake to avoid: Don't skimp on the star count. I made 13 stars on my first attempt because I was tired and thought "close enough." Someone noticed. Spend the extra five minutes to do it right.
Step 5: Sealing and Finishing
You're almost done. The paint is dry, the stars are placed, and you're looking at a cooling rack that now looks suspiciously like an American flag. But if you stop here, all that work fades, chips, or peels within weeks.
Apply a clear acrylic sealer — matte or satin finish, not gloss. Gloss makes the rack look like plastic.
Matte preserves the metal look while protecting the paint. Hold the can about 10 inches away and apply two even coats, front and back, using the same light-sweep technique.
Let each coat dry for at least 20 minutes.
The sealer does three things: it locks the stars in place (if you used stickers), it blocks UV light that fades the red and blue, and it creates a smooth surface that's easy to wipe clean.
If you display this flag outdoors, the sealer is what gets you through the summer.
Let the sealer cure for 24 hours before you handle the flag aggressively. I know you want to hang it up right now. Wait. Give the chemistry time to finish working.
Display Ideas
You've built the flag. Now where does it go?
1. Lean it on a buffet table. Prop the rack against a stack of plates or a wooden crate on your serving table. The open grid lets light through, so it reads as a flag without blocking the view. Zero-effort display that works surprisingly well.
2. Hang it on a fence or wall. Use two small nails or Command hooks through the wire grid — the rack is lightweight, so nothing fancy needed. Space the hooks about 12 inches apart so the rack doesn't wobble. This gets the most compliments from neighbors.
3. Mount it on a wooden base. Screw a short 2x4 to the back of the rack as a stand, then set it on a tabletop or mantle. Gives you a freestanding flag that looks like folk art. Great for indoor displays with no wall holes.
4. Wire it to a shepherd's hook. If you have a garden hook for hanging plants, zip-tie the cooling rack to it. Instant flagpole alternative. The rack spins a little in the wind, which looks kind of cool.
5. Make a set of three. Build three cooling-rack flags at different sizes and arrange them as a triptych. This is the "I have too much time" option, but it's genuinely stunning. I did this for a block party and someone asked if I'd commissioned an artist.
Budget Breakdown
Let's be honest about the economics, because Mason Reed doesn't write articles that pretend money doesn't matter.
| Item | Cost |
|---|---|
| Cooling rack (thrifted) | $3.00 |
| Red spray paint | $5.00 |
| White spray paint | $5.00 |
| Blue spray paint | $5.00 |
| Painter's tape | $4.00 |
| Star stickers or stencil | $3.00 |
| Clear acrylic sealer | $5.00 |
| Total DIY Cost | $30.00 |
| Comparable store-bought metal flag | $35–$50 |
| Comparable fabric flag (3x5 ft) | $15–$25 |
Here's the real savings: that fabric flag lasts one season, maybe two. A painted and sealed cooling rack holds up for years. Over five years:
- Store-bought fabric flags (annual replacement): $75 to $125
- This DIY project (one-time build): $30
You save between $45 and $95 over five years. Plus you get the satisfaction of making it yourself, which sounds like a cliché until someone at your party asks where you bought it and you get to say "I made it from a cooling rack." Their face is worth the price of admission alone.
And if you already own a cooling rack and a can of spray paint? Your cost drops to maybe $12. You can't buy lunch for that.
Variations to Try
Once you've made one, you'll see possibilities everywhere.
Mini flags for place settings. Use small round cooling racks (the kind meant for cupcakes) and make mini flags for each place setting. Same technique, smaller scale. Prop against the plate. Guests get to take them home.
Reverse flag for military decor. Paint the union on the right side instead of the left — that's the reverse flag worn on uniforms. Same process, flipped orientation.
Rustic version. Skip the clear sealer and use matte chalk paint instead of standard spray paint. The flat, slightly textured finish looks like it's been hanging in a barn for 50 years. Pair with a wooden frame.
Color swap for other holidays. The technique isn't limited to July 4th. Paint a rack green and white for St. Patrick's Day, red and pink for Valentine's, or orange and black for Halloween. The grid pattern and open structure are what make it unique.
Tools That Make This Easier
You don't need specialized gear for this project, but a few things from arttools.com will make the process smoother.
A self-healing cutting mat gives you a clean surface for spray painting and protects your workbench from overspray. The grid lines also help keep your tape lines straight.
A precision hobby knife set lets you trim painter's tape to exact widths and cut custom stencils if you want to make your own star pattern.
Disposable nitrile gloves keep paint off your hands and cost pennies. I do not recommend the "I'll just wash it off later" approach — spray paint doesn't wash off. It wears off. Over about four days. Don't ask me how I know.
Common Mistakes to Avoid
I've made every mistake on this list so you don't have to. Here they are in order of annoyance.
1. Skipping the alcohol wipe. Paint peels off in sheets two days later. You'll stare at it and wonder what went wrong. It was the grease. It's always the grease.
2. Spraying too close or too heavy. Paint drips are the number one reason people give up on spray-paint projects.
Hold the can a full 10 inches away and move your arm, not your wrist.
If a drip forms while the paint is wet, gently blot it with a paper towel or sand it smooth after drying.
3. Not flipping the rack. Bare metal on the backside catches the light and looks unfinished. Flip and spray. It takes five minutes.
4. Rushing the sealer. I skipped the sealer on my second build because I wanted to hang the flag the same day. By mid-August, the red had faded to pink and the blue looked gray. The sealer costs $5 and takes 20 minutes. Don't negotiate with yourself on this one.
5. Crooked tape lines. Measure before you tape. "Eyeballing it" works about 60 percent of the time, which means it fails 40 percent of the time. Use a ruler, use the rack's wire grid, and check your lines from a distance before you spray.
Conclusion
That crumpled polyester flag I threw away last year? I found it in the trash can the morning of my July 4th cookout and pulled it out to check.
It was beyond saving — faded, torn, and tangled in ways that no amount of ironing or seam tape would fix.
I tossed it back and went inside to grab the cooling rack flag I'd made the day before.
It hung on the fence all afternoon. Kids ran past it. Adults leaned against the fence and talked next to it.
Nobody mentioned it looked like a repurposed kitchen tool, because it didn't. It looked like a flag — sturdy, intentional, and surprisingly handsome for something that started its life under a batch of chocolate chip cookies.
At the end of the night, I brought it inside, wiped it down with a damp cloth, and set it in the garage. Eleven months later it's still on the wall of my workshop, looking exactly the same as the day I built it.
The $35 flag lasted four hours. This one has lasted eleven months and counting. You do the math.
Now go check your kitchen. You probably have a cooling rack that's about to get promoted.