Introduction
There is something quietly magical about resin jewelry. You mix two clear liquids together, pour them into a mold, and a day later you are holding a glossy pendant that catches the light like a piece of sea glass.
For a long time I assumed resin was a craft for people with studios and serious equipment.
Then I tried it at my kitchen table with a simple kit, and I discovered the truth: resin jewelry is one of the most forgiving ways to begin making your own accessories.
The materials are patient with you, the mistakes are usually fixable, and the results feel far more expensive than the supplies cost.
In this guide, I will walk you through casting your first pair of earrings and your first pendant, step by step.
We will talk about choosing a resin, setting up a safe workspace, mixing with confidence, adding color and dried flowers, and finishing your pieces so they look polished rather than homemade.
By the end, you will have two finished pieces of jewelry — and the knowledge to keep going.
Why Resin Jewelry?
Resin has a reputation for being fiddly, but that reputation mostly comes from people who skipped the basics.
When you understand why resin behaves the way it does, the whole process becomes calm and predictable.
Resin is a two-part liquid plastic: a resin and a hardener that react when combined.
As the reaction progresses, the liquid thickens, traps and releases air, and eventually cures into a solid, glass-like surface.
What makes it so appealing for jewelry is the range of creative choices. You can embed dried flowers, gold leaf, tiny charms, or photographs.
You can tint it with mica powders for shimmer, alcohol inks for jewel tones, or leave it crystal clear.
Every piece is one of a kind, and the learning curve is gentle enough that your very first pour can be wearable.
There is also a lovely rhythm to the craft. Mixing, pouring, waiting, unmolding — each stage asks for a different kind of attention. On a quiet afternoon, resin work feels almost meditative, and the small win of unmolding a perfect piece is deeply satisfying.
Choosing Your Resin: Epoxy vs. UV
Before you buy anything, decide which type of resin fits your life. The two options for jewelry making are epoxy resin and UV resin, and they behave quite differently.
Epoxy resin comes in two bottles — part A (resin) and part B (hardener) — that you mix by exact ratio.
It has a working time, called pot life, of about twenty to forty-five minutes, then cures over twenty-four to seventy-two hours.
Epoxy is ideal for pendants and larger pieces, and it gives you time to arrange inclusions and work carefully.
It also self-levels beautifully in molds.
UV resin is a single liquid that hardens in minutes under a UV lamp or direct sunlight.
It is perfect for small earrings and quick projects, and it allows you to build layers — cure a layer, add a flower, pour another layer.
The trade-off is that UV resin tends to be more expensive per ounce, and larger or thicker pieces can be tricky because the light must reach every part of the resin.
For your first project, many crafters find epoxy more forgiving because the longer pot life removes the pressure of racing the lamp.
But if you only want to make small stud earrings and you love instant gratification, UV resin is a delight.
Start with whichever appeals to you; the techniques in this guide work for both, with small adjustments noted along the way.
The Supplies You'll Need
You do not need a huge collection of tools to begin. Here is the core list, most of which fits in one shoebox:
- Resin kit. A beginner epoxy kit with small bottles (around 8 ounces total) is plenty for your first projects. Look for one labeled jewelry-safe or casting resin.
- Silicone molds. Choose simple geometric earring molds and a small pendant mold. Silicone releases resin easily and comes in endless shapes.
- Mixing cups. Clear plastic cups with measurement marks. You will use one cup per batch and throw it away afterward — do not reuse cups for resin.
- Craft sticks. Wooden or silicone stir sticks for mixing. Silicone sticks create fewer bubbles than wood.
- Nitrile gloves. Unmixed resin and hardener can irritate skin, so gloves are non-negotiable.
- Heat tool or lighter. A small butane torch or even a kitchen heat gun, used very briefly, pops surface bubbles after pouring.
- Optional extras. Dried flowers, mica powders, alcohol inks, glitter, gold leaf, jump rings, earring posts or hooks, and jewelry pliers for assembly.
That is genuinely it. Everything else — like mixing stations and curing boxes — is a comfort, not a requirement. A clean, flat surface and a little patience will do more for your results than any gadget.
Setting Up a Safe, Calm Workspace
Resin is safe to work with when you treat it with respect. Two rules matter most: ventilation and skin protection.
Work in a room where you can open a window, wear nitrile gloves, and avoid getting resin on your skin or in your eyes.
Uncured resin fumes can be irritating, so if you are sensitive, a simple mask adds comfort.
Cover your work surface with a silicone mat, craft sheet, or disposable tablecloth — drips happen, and cured resin is difficult to remove from wood.
Temperature matters more than people expect. Resin cures best in a warm, stable room around seventy to seventy-five degrees Fahrenheit.
If your room is cold, the resin thickens, bubbles cling stubbornly, and curing slows. If you can, pour on a day when your kitchen is warm, or pre-warm your resin bottles in a bowl of warm water for ten minutes before mixing.
Finally, think about dust. Resin is a magnet for lint and pet hair while it cures. Cast your pieces somewhere with low traffic, and cover the molds with a cardboard box or an inverted plastic bin while they cure. This single habit will save you hours of sanding.
Understanding Mixing Ratios
The most important step in resin work is also the most boring: measuring correctly. Every resin has a ratio — commonly 1:1 or 2:1 by volume — printed on the bottles.
Follow it exactly. Too much hardener leaves your piece sticky forever; too little leaves it soft and cloudy.
There is no room for eyeballing here, and this is where beginners usually go wrong.
Here is the method that works. Pour both parts into the same measuring cup, using the markings on the side.
Then stir slowly and thoroughly for a full two to three minutes. Scrape the sides and bottom of the cup as you go, because unmixed resin hides there.
Slow, deliberate stirring keeps bubbles to a minimum — vigorous whisking whips air into the mixture.
You will know the resin is ready when it looks uniformly clear with no swirls or streaks.
When you are casting a batch of earrings and pendants, it is easy to misjudge how much resin to mix.
Too much and you waste expensive liquid; too little and you run out mid-pour. A quick way to estimate your needs is to use the resin calculator, which tells you the volume your molds require so you can mix exactly the right amount.
It takes the guesswork out of batch sizing and saves your supplies for future projects.
Casting Your First Pair of Earrings
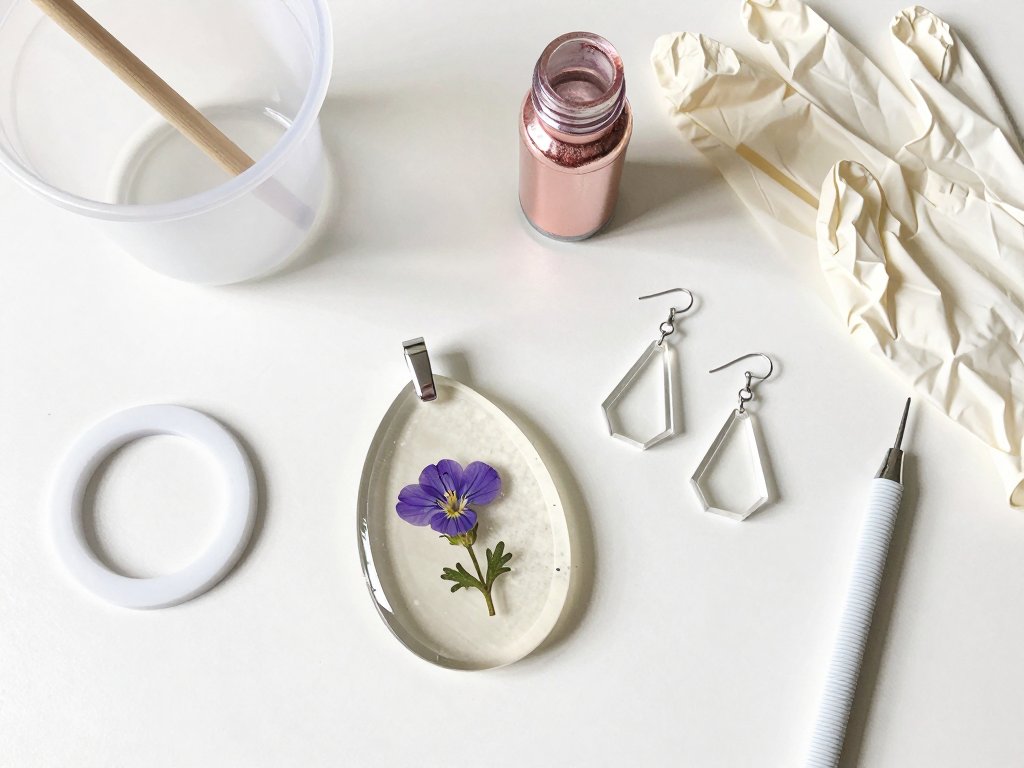
Let us make something small first, because small pieces teach you the process without wasting materials. These earrings are simple geometric shapes — circles, teardrops, or diamonds — which look modern and forgiving of tiny imperfections.
Step 1: Prepare your molds. Place the silicone earring molds on a perfectly level surface. A slight tilt will make one earring thicker than the other. Check with a small spirit level if you have one, or trust a flat counter.
Step 2: Mix your resin. Following the ratio method above, mix a small batch — about one ounce is enough for a pair of small earrings. Stir slowly for two to three minutes, scraping the cup.
Step 3: Pour slowly. Pour the resin into each mold cavity in a thin, steady stream. Fill to just below the rim. Then let the resin sit for a moment and watch the bubbles rise.
Step 4: Pop the bubbles. Pass a heat tool or lighter flame briefly over the surface of each mold, holding it a few inches away.
The bubbles will rise and pop like tiny balloons. One or two quick passes is enough — too much heat can damage the mold or scorch the resin.
Step 5: Cover and wait. Set the molds under a dust cover and let them cure according to your resin's instructions, usually twenty-four to forty-eight hours. Resist the urge to peek and poke; the surface needs undisturbed time to level itself.
Step 6: Unmold. Once fully cured, flex the silicone mold gently and the earrings will pop out. If you are using UV resin, you would instead cure each layer under the lamp before moving on.
That is the entire process. Your first pair might have a bubble or a slightly uneven edge, and that is perfectly normal. The second pair will be smoother, and the tenth will look like something from a design studio.
Casting a Pendant: Adding Color and Inclusions
Now that you have the rhythm, let us make a pendant — a piece with more presence, where you can play with color and texture. A pendant gives you a larger canvas, and it is the project where resin really becomes an art medium.
Step 1: Prepare your inclusions. Gather what you want to embed — a dried flower, a sprinkle of mica powder, a few flakes of gold leaf. Arrange them near your workspace so you are not fumbling mid-pour.
Step 2: Mix a slightly larger batch. A pendant mold typically needs one to two ounces of resin.
Mix as before, and this time stir in your colorant — a tiny pinch of mica powder for shimmer, or a single drop of alcohol ink for a translucent jewel tone.
Start with less than you think you need; you can always deepen the color in the next layer.
Step 3: Pour a base layer. Fill the pendant mold about one-third full and pop the bubbles with your heat tool. This first layer will become the back of the pendant and keeps your inclusions from touching the mold wall.
Step 4: Place your inclusions. Gently lay the dried flower or charm onto the base layer.
Use a toothpick to position it, and press it down just enough to wet the underside.
If the flower floats, that is fine — you can hold it in place with the toothpick while the resin begins to thicken.
Step 5: Pour the top layer. Slowly pour the remaining resin over the inclusion, filling the mold to the rim. Pop bubbles again, working carefully around the flower so you do not disturb it.
Step 6: Cure, then unmold. Cover and let the pendant cure fully. When it is ready, flex the mold and admire the piece. The flower will appear suspended in glass, and the mica will shift as the light moves.
If you want a layered look — a flower floating between two clear layers — simply pour, cure, add, pour again. UV resin makes this especially easy, but epoxy works too if you wait for each layer to gel before pouring the next.
Working with Dried Flowers and Other Inclusions
Dried flowers are the most beloved resin inclusion, and they are also the source of the most common beginner disappointment.
The secret is that flowers must be completely, thoroughly dry before they meet resin. Any remaining moisture turns brown or murky inside the cured piece, and no amount of polishing will fix it.
Buy pre-dried flowers from a craft store for your first projects, or dry your own in a flower press or between the pages of a heavy book for two to three weeks.
Tiny flowers — pansies, violas, baby's breath, and small daisies — work best because they lie flat in thin pendants.
Avoid thick or juicy flowers like roses until you are comfortable with layering.
Beyond flowers, try these inclusions:
- Mica powder. Shimmering pigments that create a pearlescent, metallic, or glittering effect. Stir into the resin before pouring, or dust into the mold for a color gradient.
- Alcohol ink. Creates dreamy, translucent color swirls. Drop it into the mixed resin and stir once or twice — do not overmix, or the swirls disappear.
- Gold and silver leaf. Tiny flakes that catch the light beautifully. Press them onto the base layer with a dry brush before adding the top layer.
- Glitter and sequins. Fun, affordable, and forgiving. Mix in lightly so they stay suspended rather than sinking.
- Photographs and paper. Laminate or seal paper before embedding, and keep it away from the mold edges so resin can surround it.
The golden rule with all inclusions is to prepare them before you mix your resin. Once the clock starts on your pot life, you do not want to be hunting for a pair of tweezers.
Troubleshooting Common Problems
Every resin artist has a drawer of imperfect first attempts, and that is part of the craft. Here are the problems you are most likely to meet, and the gentle fixes.
Sticky or tacky surface. This is almost always a ratio problem — too much hardener, or the two parts not mixed thoroughly enough.
It can also happen in cold rooms. If the surface is only slightly tacky, try setting the piece in a warm spot for another day; sometimes curing just needs more time.
If it remains sticky, the piece is a loss, but the resin was inexpensive compared to the lesson.
Cloudy or foggy finish. Humidity is the usual culprit. When the air is very humid, moisture reacts with the resin surface and creates a cloudy film.
Pour on dry days when you can, and remember that a layer of clear resin or a coat of resin-compatible varnish can sometimes rescue a cloudy piece.
Stubborn bubbles. Bubbles love cold resin, vigorous stirring, and textured inclusions. Warm your bottles before mixing, stir slowly, and let the poured resin rest for a few minutes before using your heat tool. If bubbles cling to a flower, nudge them with a toothpick after popping the surface ones.
Soft or bendy results. This usually means the resin did not cure long enough, or the ratio was off.
Give the piece a few more days before judging it — resin continues to harden after the initial cure.
If it is still flexible after a week, the batch ratio was wrong.
Yellowing over time. All resins yellow somewhat with age and sunlight. Choose a resin labeled UV-stable or non-yellowing for jewelry, and store finished pieces away from direct window light.
Most importantly, do not let a failed piece discourage you. Each problem teaches you something about the material, and the next pour will go better because of it.
Finishing and Assembling Your Jewelry
Unmolding is not quite the finish line. A few simple finishing steps turn a good cast piece into a professional-looking one.
First, examine the edges. If the back of your earring or pendant has a slightly rough rim where it met the mold, sand it gently with fine sandpaper — 400-grit, then 800-grit — under running water. Work in small circles and check often; resin sands quickly.
For extra gloss, apply a thin coat of resin-compatible polish or buff the piece with a soft cloth.
Some crafters add a final thin layer of clear resin to the back of a pendant for a uniform, glassy finish on both sides.
This is optional, but it makes the piece feel substantial.
Then comes the satisfying part: assembly. For earrings, glue earring posts to the back of each shape with jewelry glue, or drill a small hole near the top with a tiny hand drill and attach hooks.
For pendants, either glue a bail onto the back or drill a hole through the top and thread a chain.
Jewelry pliers make opening and closing jump rings easy, and a little patience here means your jewelry will actually be comfortable to wear.
Finally, attach your findings to a chain or ear wires, and step back. You made that. From two bottles of liquid and a silicone mold, you created something you can wear tomorrow.
How Much Resin Should You Mix?
One question comes up in every beginner class: how much resin do I mix for my molds?
The honest answer is that it depends on the size and depth of each cavity, which is exactly why guessing wastes so much resin.
Mix too little and you are stuck mid-pour with a thickening cup; mix too much and you are throwing away liquid that costs real money.
The resin calculator was built for this moment.
You enter your mold's dimensions, and it tells you the volume you need, with a sensible buffer for spills and air pockets.
Keep the calculator open while you work and you will always mix the right amount — no more, no less.
It is the kind of small tool that quietly makes the whole craft more affordable.
As you gain experience, you will develop instincts for batch size. But even seasoned resin artists keep a calculator handy, because a few seconds of math saves ounces of material on every single project.
Conclusion: Your Next Project
You now know everything you need to cast your first resin earrings and pendants — and, more importantly, you understand why each step works.
You know to measure carefully, stir slowly, pop bubbles gently, and let the resin cure in peace.
You know how to embed flowers, tint with color, and finish pieces that look store-bought.
That knowledge is yours forever, and it grows every time you pour.
This weekend, mix a small batch and make something for yourself. Choose a simple shape, add a favorite color, and give the piece the quiet time it needs.
If your first pair has a bubble or two, wear them anyway — they will remind you that handmade things carry a little imperfection and a lot of love.
When you are ready for the next challenge, try layered pendants with suspended flowers, resin coasters to match your jewelry, or a set of earrings as gifts for friends.
And when you plan that bigger batch, remember the resin calculator so every drop counts.
Happy pouring — your jewelry box is about to get a beautiful new chapter.