Introduction
There is something magical about walking through a farmers' market in July and catching the scent of fresh peonies and sunflowers.
The colors are impossibly vivid — deep magenta, buttery yellow, coral pink — and you wish you could bottle that feeling and bring it home.
But fresh flowers wilt. Bouquets last a week if you are lucky. And buying new arrangements every few weeks adds up quickly, especially if you love filling your home with blooms.
Crepe paper flowers solve this problem beautifully. They capture the same joy and color as real flowers, but they last for years.
With just crepe paper, floral wire, and a few basic tools, you can create arrangements that are every bit as stunning as the real thing — and nobody will believe they are made of paper until they touch the petals.
I have been making crepe paper flowers for years, and I still get a thrill every time a friend reaches out to touch a petal and says, "Wait, that is paper?" The texture of good crepe paper is remarkably close to real flower petals.
It has a natural stretch that allows you to cup and shape each petal, giving the finished flower a lifelike quality that flat paper crafts simply cannot match.
In this guide, I will walk you through everything you need to know to make your own crepe paper flowers.
You will learn which supplies to buy, how to cut and shape crepe paper petals, and how to assemble them into stunning blooms.
By the end, you will have a bouquet that never fades, never needs water, and costs a fraction of what you would pay at a florist.
What You Will Need
The supply list for crepe paper flowers is short and affordable. Here is exactly what you need to get started.
Essential Supplies
- Crepe paper. This is the most important supply. Look for high-quality Italian or German crepe paper, which has better stretch and more realistic texture than the cheap party-streamer kind. Buy it in sheets or rolls, available at most craft stores and online. Budget about eight to ten dollars per pack, which makes about fifteen to twenty medium-sized flowers. For your first project, choose two or three colors that coordinate well together — a main flower color, a contrasting accent color, and green for leaves and stems.
- Floral wire. Standard 18-gauge or 20-gauge floral wire works well for stems. You will also need 24-gauge or 26-gauge wire for securing petals and leaves. A bundle of fifty stems costs about five dollars.
- Floral tape. Stretchy green or brown tape that sticks to itself. This is used to wrap stems and attach leaves. One roll costs around three dollars and lasts for dozens of flowers.
- Scissors. A sharp pair of scissors for cutting paper. Reserve a dedicated pair for paper crafts so they stay sharp. You will also want a small pair of wire cutters or heavy scissors for cutting floral wire.
- White glue or hot glue gun. Tacky white glue works well for most crepe paper projects. A hot glue gun is faster but can melt delicate crepe paper if you are not careful. Low-temperature glue sticks are safer for this application.
- Templates. You can find free printable petal templates online, or you can freehand your shapes. For beginners, printed templates are helpful until you develop an eye for petal proportions.
Nice-to-Have Extras
- A cutting mat and rotary cutter. For cutting straight strips of crepe paper cleanly and quickly.
- Paper flower tool kit. Many craft stores sell kits with ball tools, foam pads, and veiners specifically designed for shaping crepe paper petals. These are not essential but make the shaping process much easier.
- Styrofoam blocks or florist foam. For arranging finished flowers in a vase or container.
- A spray bottle with water. Lightly misting crepe paper makes it more pliable and easier to shape. Let it dry completely before assembling.
- Tweezers. Useful for handling small petals and delicate details.
Understanding Crepe Paper Grain
Before you start cutting, there is one concept that makes or breaks crepe paper flowers: grain direction.
Crepe paper has a grain — the direction in which the paper stretches. You must cut your petals with the grain running vertically (from the base of the petal to the tip) for the paper to stretch and cup properly.
To test the grain, hold a strip of crepe paper between your thumbs and forefingers and gently pull.
If it stretches easily, the grain runs horizontally. If it holds firm, the grain runs vertically.
Petals cut with the grain running the wrong way will not shape correctly and will look flat and unconvincing.
Mark the grain direction on the back of your paper with a light pencil line before cutting. This small step saves a lot of frustration later. Every petal, leaf, and strip you cut should have the grain running from base to tip.
Step-by-Step Instructions
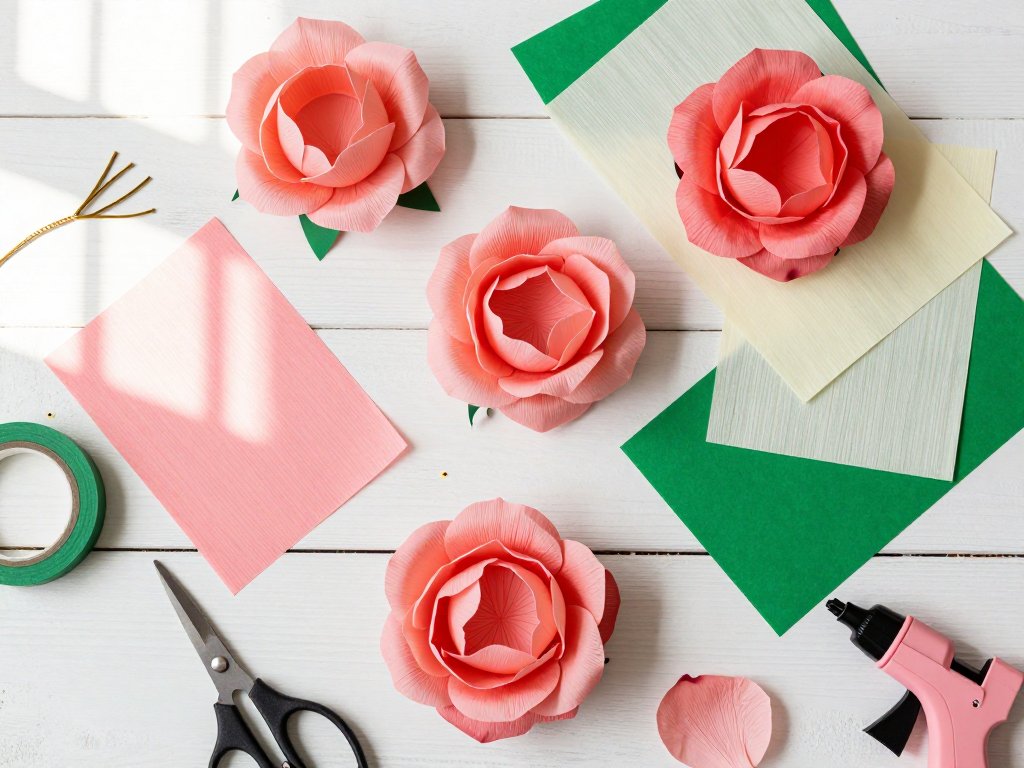
Now for the hands-on part. I will show you how to make a classic crepe paper rose, which is the perfect starter flower. Once you master this technique, you can apply it to peonies, tulips, daisies, and any other bloom you love.
Step 1: Cut Your Petals
Using your template or freehand shapes, cut six to eight petals for the inner layers and eight to ten petals for the outer layers.
The inner petals should be slightly smaller than the outer ones. Each petal should be roughly teardrop-shaped, about two to three inches long and one to one and a half inches wide at the widest point.
Place your template on the crepe paper so the longest dimension follows the grain. Trace lightly with a pencil and cut carefully along the line.
Stack two or three layers of paper and cut them at once to save time, but do not stack more than three — the paper shifts and the shapes become uneven.
Cut an additional strip of green crepe paper for the calyx (the green base that holds the petals). This should be about one by three inches, cut with the grain running vertically. Cut small pointed leaf shapes from green crepe paper for the leaves, two or three per flower.
Step 2: Shape the Petals
This is where the magic happens. Hold a petal between your thumbs and gently stretch it outward from the center.
The crepe paper will begin to cup, forming a natural bowl shape that mimics real flower petals.
Work slowly — crepe paper stretches easily, and you can always stretch more, but you cannot unstretch it.
For the outer petals, curl the edges slightly outward by wrapping them around a pencil or your finger.
This creates the gentle ruffled edge that makes paper flowers look so realistic. For the inner petals, keep the cupping tighter and the edges less curled — inner petals should be more closed and compact.
If you have a ball tool and foam pad, use the small end of the ball tool to press the center of each petal against the foam pad, creating a subtle concave depression. This adds another layer of realism that makes the petals look truly three-dimensional.
Step 3: Prepare the Stem
Take a piece of 18-gauge floral wire and bend a small hook at the top end.
This hook will anchor the center of the flower and prevent the petals from sliding off the stem.
Cut the wire to your desired stem length — about twelve inches is standard for a bouquet flower, but you can make stems longer or shorter depending on your arrangement.
Cut a small rectangle of crepe paper in a color that matches your petals, about one by two inches.
Fold it in half and wrap it around the hook at the top of the wire.
This creates the flower's center bud. Secure it with a dab of glue. Let it dry for a minute before proceeding.
Step 4: Attach the Inner Petals
Take one of your smaller inner petals and apply a thin line of glue along the base.
Wrap it around the center bud, pressing gently to secure. The grain should cause the petal to naturally curve around the bud.
Repeat with the remaining inner petals, overlapping each one slightly as you go around the center.
As you add petals, rotate the stem in your hand so the petals are evenly spaced around the center.
Tug each petal gently outward after attaching to open the flower shape. You want the inner petals to be relatively tight and closed — they will form the heart of the flower.
Step 5: Attach the Outer Petals
Once all inner petals are attached, move to the larger outer petals. Apply glue to the base of each outer petal and attach it slightly lower on the stem than the inner petals. Overlap each outer petal by about half its width for a full, lush look.
As you add outer petals, gently cup them outward with your fingers to open the flower. This is where the real flower silhouette emerges. Take your time and adjust each petal before the glue sets. Once the glue dries, the petals are locked in place and difficult to reposition.
Step 6: Add the Calyx and Leaves
Take the green crepe paper strip you prepared for the calyx. Wrap it around the base of the flower, covering the glued petal ends.
Secure with floral tape, stretching the tape slightly as you wrap to activate its stickiness.
Wrap the tape down the entire length of the stem, covering the floral wire completely.
As you wrap, insert the leaves by placing them against the stem and wrapping tape over their bases.
Position leaves at different heights along the stem for a natural look — do not cluster them all at the same spot.
Wrap the tape all the way to the bottom of the stem and trim any excess.
Step 7: Final Shaping
Once the flower is fully assembled, take a moment to arrange the petals. Gently pull outer petals outward and downward to create a natural open bloom shape.
Curl any petals that look too flat by wrapping them around your finger. Fluff the center petals to make sure they are not stuck together.
Hold the flower up and look at it from all angles. Adjust any petals that look out of place. Step back and observe the overall silhouette. A real flower is never perfectly symmetrical, and your crepe paper version should not be either. A little imperfection adds to the realism.
Choosing Your Flower Type
Once you are comfortable with the basic rose technique, here are other flowers that translate beautifully to crepe paper.
- Peonies. These are arguably the most stunning crepe paper flowers you can make. They require many more petals — twenty to thirty per flower — but the result is spectacular. Use a softer crepe paper with more stretch for the ruffled, billowy petals that peonies are known for. Layer the petals in dense concentric circles and leave the center slightly loose.
- Tulips. Tulips are simpler and faster because they use fewer petals — typically six large petals arranged in two layers of three. The petals are more upright and cup-shaped. Use a heavier-weight crepe paper that holds a crisp shape. For closed tulips, keep the petals tight around each other. For open tulips, curl the tips outward.
- Sunflowers. Sunflowers require a different approach because of their large, dark centers. Cut a circle of dark brown or black crepe paper, fringe the edges, and attach it to the stem as the center. Then surround it with ten to twelve long, pointed yellow petals arranged in two layers. Sunflowers look wonderful in summer arrangements and are instantly recognizable.
- Daisies. The simplest paper flower. Cut a strip of white crepe paper and fringe it along one edge, then roll it tightly to form the center. Surround it with eight to ten long, narrow white petals arranged in a single layer. Daisies are perfect for filler flowers and beginners' first projects.
- Cherry blossoms. Delicate five-petal flowers on thin, branching stems. Cherry blossoms look beautiful in clusters and are surprisingly easy to make. Use pale pink crepe paper and five small, rounded petals per flower. Attach several flowers to a single branch-like stem for a dramatic effect.
Color Selection Guide
Choosing the right colors can make your arrangement look professionally designed. Here are some tried-and-true combinations that work beautifully together.
Sunset palette. Coral, peach, gold, and cream. This warm combination evokes summer evenings and works well in living rooms and entryways. The warm tones are inviting and create a cozy atmosphere.
Garden romantic. Blush pink, dusty rose, lavender, and sage green. Soft and dreamy, this palette is perfect for bedrooms, bathrooms, and feminine spaces. It pairs beautifully with vintage decor and distressed furniture.
Bold and bright. Hot pink, orange, yellow, and turquoise. This energetic combination is great for kids' rooms, craft rooms, and summer parties. The high contrast colors make a statement and lift the mood of any space.
White wedding. Cream, ivory, white, and pale green. Elegant and timeless, this monochromatic palette works for weddings, bridal showers, and sophisticated home decor. Using different shades of white and cream adds depth without losing the clean, unified look.
Seasonal harvest. Burgundy, mustard, rust, and olive green. Perfect for fall decorating, this warm, earthy palette pairs beautifully with pumpkins, dried branches, and autumn centerpieces. The rich, deep colors feel cozy and grounded.
Troubleshooting Common Problems
- My petals will not hold their shape. The grain is probably running the wrong direction. Check that the grain runs from the base of the petal to the tip. If it runs horizontally, the petal will not cup properly and will flop instead of holding a curve. Recut with the correct grain orientation.
- My flower looks flat and two-dimensional. You are not stretching the petals enough. Crepe paper is designed to stretch — use that property. Gently cup each petal between your thumbs and pull outward from the center. The paper should form a natural bowl shape. If the petals still look flat, you may need a higher-quality crepe paper with more stretch.
- The glue is showing through the paper. You are using too much glue. Apply a thin line — about the width of a toothpick — along the base of each petal. If glue seeps through, let it dry completely (it dries clear on most crepe papers) and test a less generous amount on the next petal.
- My flower is falling apart. The glue may not have dried fully before you handled the flower. Allow each layer to dry for at least thirty seconds before adding the next. If you are using hot glue, work quickly because it cools and sets fast. For white glue, give each petal a full minute to bond before moving on.
- The petals are tearing when I stretch them. You may be pulling too hard or too fast. Crepe paper stretches best with slow, even pressure. If your paper tears easily, it may be old or low-quality crepe paper that has lost its elasticity. Consider investing in a better brand for your next project.
- My stems are wobbly and cannot support the flower head. Use heavier floral wire for larger flowers. Peonies and large roses need 16-gauge or even 14-gauge wire. If you already assembled with thin wire, insert a second piece of wire alongside the existing stem and wrap both together with floral tape for added support.
Caring for Your Crepe Paper Flowers
Crepe paper flowers require very little maintenance, but a few simple care tips will keep them looking beautiful for years.
Keep them out of direct sunlight, which can fade the paper over time. A gentle dusting every few weeks with a soft paintbrush or compressed air keeps them looking fresh.
Do not use water or cleaning sprays — crepe paper is not waterproof and will lose its shape if it gets wet.
Store extra flowers in a cardboard box with tissue paper between layers to prevent crushing.
If a petal gets bent or flattened, you can often reshape it by gently stretching the crepe paper back into its original cupped shape.
The paper has a memory effect and will return to its formed shape with a little encouragement.
If your flowers are displayed in a vase without water, use florist foam or pebbles to hold the stems in place.
The lightweight paper flowers will not stay upright in an empty vase — they need something to anchor them.
A layer of marbles, decorative stones, or glass beads at the bottom of the vase adds weight and visual interest.
Display Ideas
Crepe paper flowers are incredibly versatile. Here are some ways to use them in your home.
Mantel arrangement. Create a cluster of three to five flowers in a ceramic pitcher or mason jar for a focal point on your fireplace mantel or dining table.
Mix flower types and heights for visual interest. A tall sunflower next to a medium peony with a few shorter daisies creates a pleasing triangular composition.
Wreath. Attach small crepe paper flowers to a grapevine or foam wreath base using hot glue.
Mix with dried branches, ribbons, or artificial greenery for a seasonal door decoration that lasts all year.
A wreath made from twenty to thirty small flowers makes a stunning first impression on your front door.
Gift topper. Instead of a ribbon, attach a single crepe paper flower to a wrapped gift. The recipient gets a bonus decoration they can keep. This is especially nice for Mother's Day, birthdays, and housewarming gifts. Use the gift recipient's favorite flower and color for a personal touch.
Wall art. Arrange a collection of crepe paper flowers in a shadow box frame or attach them directly to a canvas.
This creates three-dimensional wall art that changes with the light as the paper petals catch shadows.
A single large peony in a deep frame makes a striking minimalist statement piece.
Event decor. Crepe paper flowers are perfect for weddings, bridal showers, baby showers, and birthday parties because they can be made weeks in advance and will not wilt on the day of the event.
Create centerpieces, ceremony arches, photo backdrops, and boutonnieres entirely from paper. The flowers can be kept as souvenirs by the hosts or guests after the event.
Final Thoughts
Crepe paper flowers are one of those crafts that looks impossibly difficult until you try it and realize how straightforward it really is.
The materials are affordable, the techniques are learnable in an afternoon, and the results are genuinely stunning.
Every time someone reaches out to touch a petal and says, "That is made of paper?" you will feel a little thrill of satisfaction.
Start with a single rose. Once you have the hang of shaping petals and assembling the flower, try a peony or a tulip.
Each new flower type teaches you something new about how crepe paper behaves, and before long, you will be designing your own arrangements and experimenting with colors and sizes.
The best part is that these flowers do not die. That bouquet you make this weekend will still be on your dining table next summer, looking just as fresh and beautiful as the day you made it.
No watering, no wilting, no trips to the florist. Just the quiet satisfaction of having made something lovely with your own two hands.