Introduction
Have you noticed the explosion of beautiful, eclectic journals filling your social media feeds lately?
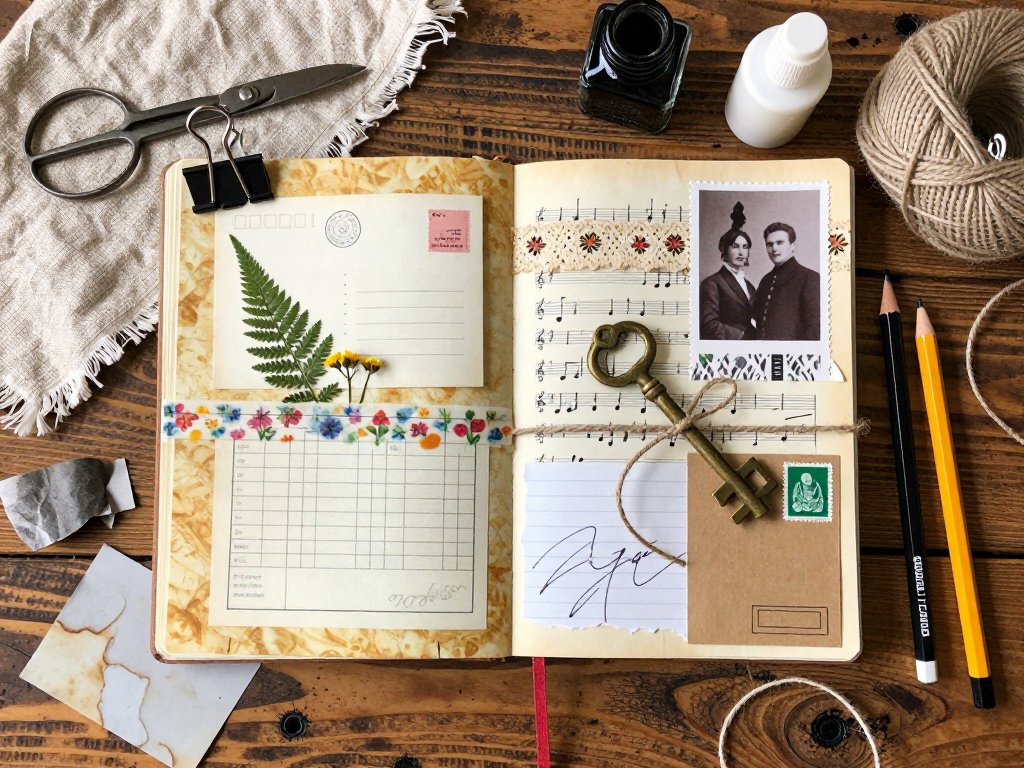
Pages layered with vintage book text, snippets of sheet music, envelope pockets holding handwritten notes, and delicate thread bindings holding it all together.
This is junk journaling — and it has become one of the most popular craft trends of 2026 for good reason.
Junk journaling is the art of creating one-of-a-kind journals from found and recycled materials. Old books, discarded sheet music, paper bags, receipts, postcards, fabric scraps — virtually anything flat and paper-based can find a home in a junk journal.
The result is a deeply personal, textured, and utterly unique book that you can use as a diary, a sketchbook, a travelogue, a gratitude journal, a recipe collection, or a gift for someone you love.
If you are new to junk journaling, the movement can feel overwhelming. There are so many techniques, so many supplies, so many stunning examples online.
Let me simplify it for you. You do not need a room full of specialty supplies.
You do not need expensive tools. You do not need to master every technique before you begin.
What you need is a willingness to experiment, a bit of patience, and this guide to walk you through the fundamentals step by step.
What Exactly Is a Junk Journal?
A junk journal is a handmade book made primarily from repurposed materials. Unlike a pristine store-bought journal with crisp white pages, a junk journal is deliberately eclectic.
Its pages come from different sources, so you might find a page from an old dictionary next to a piece of brown kraft paper next to a vintage map next to a scrap of sheet music.
Some pages are left blank for writing. Others are decorated with stamps, collages, or pockets that hold loose notes and ephemera.
The beauty of junk journaling is that there are no rules. Some journalers create elaborate, themed journals with coordinated color palettes and intricate binding.
Others make simple five-page booklets in an afternoon using nothing but a single sheet of paper, scissors, and glue.
Both approaches are valid. Both produce something meaningful.
Junk journaling appeals to a wide range of crafters because it combines so many different creative skills: paper crafting, bookbinding, collage, calligraphy, stamping, and storytelling. But you do not need to be skilled at any of these to start. The journal itself teaches you as you go.
What You Need to Begin: The Essential Starter Kit
One of the best things about junk journaling is how little you need to start. Here is a practical list of the essential supplies, organized by what you can find at home and what you might want to purchase.
What You Already Have at Home
Before you buy anything, look around your house. You probably already have most of what you need to start junk journaling.
Paper. Start collecting interesting paper from your daily life. Brown paper bags, envelopes from bills, pages from old books (check thrift stores for damaged books no one wants), sheet music, maps, seed catalogs, magazines, calendar pages, wrapping paper, receipts, ticket stubs, greeting cards, and cardboard packaging. Any of these can become journal pages. Scissors. A regular pair of scissors is all you need to start. If you have a pair with a decorative edge, that is a bonus, but straight scissors work perfectly well. Glue. A basic glue stick works for most paper-on-paper applications. White school glue diluted with a little water makes an excellent decoupage medium for attaching larger pieces. Avoid rubber cement unless you are working in a well-ventilated area. Needle and thread. If you have a basic sewing needle and any kind of thread or embroidery floss, you can bind your journal. Waxed linen thread is ideal, but regular sewing thread doubled over works fine for beginners. Ruler and pencil. For measuring and marking folds and cuts. Awl or thick needle. For punching holes in paper for binding. A pushpin works in a pinch.What You Might Want to Purchase
Once you have exhausted your home supplies, these inexpensive items will expand your options considerably.
Bone folder. This simple tool — a flat piece of bone or plastic used for creasing paper — makes a world of difference in the quality of your folds. It costs about five to eight dollars and lasts forever. You can use the back of a butter knife in the meantime. Paper trimmer. A small guillotine-style paper trimmer makes cutting straight edges much easier than scissors. A basic twelve-inch trimmer costs around fifteen dollars. You can skip this and use a ruler and craft knife if you prefer. Craft knife and cutting mat. For detailed cutting, a sharp craft knife and a self-healing cutting mat are essential. A basic A5 mat and a pack of blades will run you about twelve dollars total. Rubber stamps and ink pads. A few simple stamps — a date stamp, a small floral or leaf motif, an alphabet set — add personality to your pages. Start with one or two ink pads in neutral colors like brown, black, and navy. Wax seals. Wax seals add a gorgeous vintage touch to envelopes and pockets. A basic wax seal kit with a spoon, wax beads, and a stamp head costs about ten dollars.Your First Junk Journal: A Step-by-Step Guide
Let us make your first junk journal. This is a simple, three-signature journal with a soft cover, approximately five by seven inches when closed. You can complete it in one afternoon.
Step 1: Gather Your Paper
Collect twenty to thirty sheets of paper in roughly the same size. They do not need to be identical — in fact, variety is the point.
Aim for a mix of textures and colors: a few plain white pages for writing, a few kraft paper pages for texture, a few printed pages from an old book or sheet music, and a few decorative pages from a magazine or calendar.
Tear some pages by hand for rough edges. Cut others straight. The variety will make your journal visually interesting.
Fold each sheet in half and stack them into three piles of roughly equal thickness. These piles will become your signatures — the small booklets that you will bind together.
Step 2: Create Your Signatures
Take one pile of folded sheets and nest them inside each other, with the folded edges aligned. This nested group is one signature. Repeat with the other two piles. You should now have three signatures, each containing seven to ten pages.
Use a bone folder or the back of a spoon to sharpen each fold. Run the tool firmly along the crease from the center out to the edges. Clean folds make for a neater finished journal.
Step 3: Punch Holes for Binding
Open one signature to the center fold. Along the fold line, mark three evenly spaced points for your binding holes.
A common pattern is to mark the center point first, then mark points one and a half inches above and below the center.
Use your ruler to ensure the marks are aligned.
Place a piece of scrap cardboard or a cutting mat under the paper. Use your awl or thick needle to punch through each marked point, working from the inside of the signature out. Push straight through all the layers at once. Repeat for all three signatures.
Step 4: Prepare the Cover
Your cover can be made from heavy cardstock, kraft board, or even the front and back covers of an old hardcover book.
Cut two pieces slightly larger than your pages — about a quarter inch wider and a quarter inch taller on each side.
Cut a spine piece about one inch wide and the same height as your covers.
Arrange the two covers with a half-inch gap between them for the spine. Apply glue to the spine piece and attach it across the gap, bridging the two covers. Allow it to dry under a heavy book for fifteen minutes.
Step 5: Bind the Journal
Thread your needle with a length of waxed thread or doubled regular thread about three times the height of your journal.
Starting from the outside of the cover, push the needle through the bottom hole of the first signature, through the cover, and into the inside of the signature.
Leave a tail of about four inches outside.
From the inside, push the needle through the center hole, back through the cover, and out to the outside.
Then through the top hole, back into the inside. You have now sewn the first signature with three stitches.
Repeat this pattern for the remaining two signatures, connecting them by passing the thread through the adjacent signature's holes where they meet.
When all three signatures are sewn, tie off the thread securely to the tail you left at the beginning. Trim the ends to about half an inch. Your journal is bound.
Step 6: Add Ephemera and Embellishments
With the structure complete, the fun part begins. Add pockets to some pages by gluing an envelope or a folded piece of paper along three edges, leaving the top open.
Tuck in small notes, tags, or photographs. Add a bookmark by attaching a ribbon or a strip of fabric to the spine.
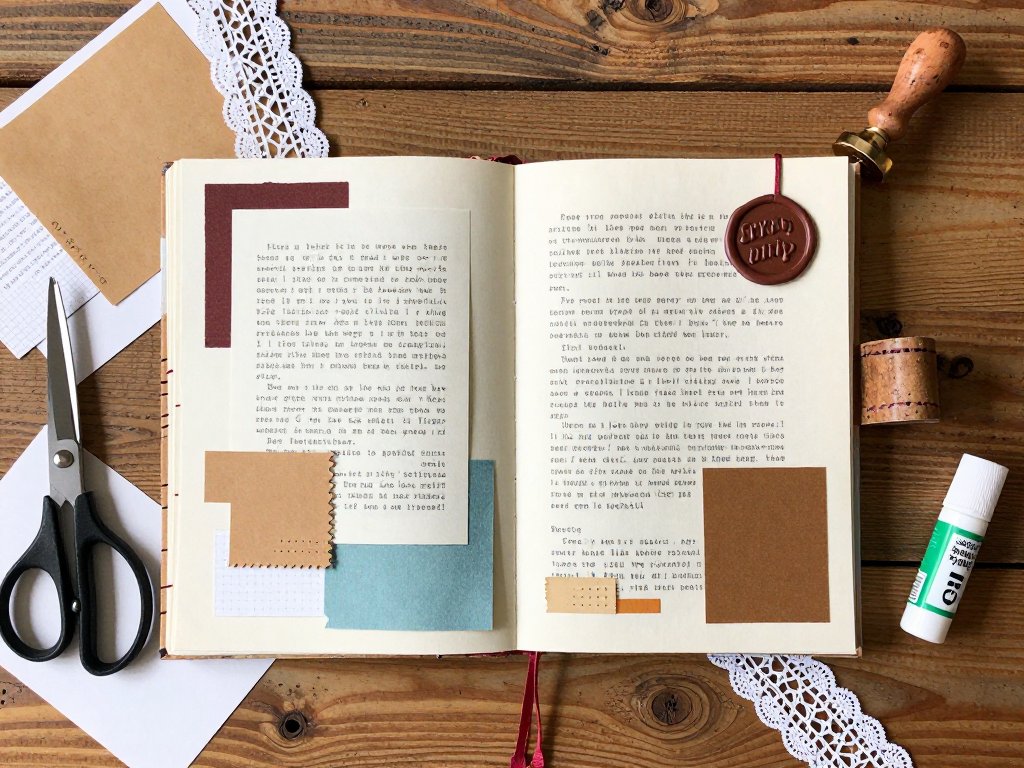
Stamp dates and small images on random pages. Glue in a wax seal on the first page as a decorative title element.
Remember: there is no wrong way to embellish a junk journal. If you like how something looks, it belongs there. If you try something and it does not work, you can cover it with another layer or leave it as a reminder that creativity is a process.
Where to Find Materials on a Budget
One of the best things about junk journaling is that it actively discourages buying everything new. Here are the best sources for materials without breaking your budget.
Thrift stores. Old books, sheet music, maps, postcards, and greeting cards are abundant at thrift stores and typically cost less than a dollar each. Look for books with yellowed pages, interesting typography, or beautiful covers. Avoid rare or valuable books — the goal is to repurpose things that would otherwise be discarded. Freecyclen and Buy Nothing groups. People are often happy to give away old books, craft supplies, and paper goods. Join your local Buy Nothing group on social media and ask if anyone has old books, scrapbook paper, or envelopes they are clearing out. Library sales. Many libraries sell withdrawn books for pocket change. These books are damaged, outdated, or simply no longer circulating. They are perfect for junk journaling. Your own recycling bin. Before you throw anything away, ask yourself: could this be a journal page? Cardboard packaging, food boxes with interesting patterns, paper bags, shipping envelopes, and catalog pages all have journal potential. Estate sales. Estate sales often have boxes of old paper goods — letters, postcards, stamps, and documents — sold by the pound. These are treasure troves for the junk journaler.Techniques to Try as You Grow
Once you have made your first journal, you will likely want to explore more advanced techniques. Here are a few to try as your confidence grows.
Tea or Coffee Dyeing
Soak plain white paper in strong black tea or instant coffee for fifteen to thirty minutes, then hang it to dry.
The result is paper with a beautiful aged, vintage look. The longer you soak it, the darker the color.
You can scrunch the paper before dyeing for a more textured effect, or lay it flat for an even tone.
This technique transforms printer paper into something that looks centuries old.
Collage Layering
Build visual depth by layering multiple paper pieces on a single page. Start with a large background piece, add a medium piece, then a small focal piece on top.
Use paper with contrasting colors and textures. Layer a piece of book text under a sheet music scrap, topped with a stamped image on kraft paper.
Each layer adds visual interest and tells a small story.
Pocket Pages and Tuck Spots
Create pockets by gluing paper along three edges. You can make simple rectangular pockets, triangular pockets, or envelope-style pockets with flaps.
Pockets hold loose items: handwritten notes, pressed flowers, tickets, photographs, or small tags. They add an interactive element to your journal — each pocket is a small discovery for whoever flips through the pages.
Stitching on Paper
Hand-stitching on paper adds texture and visual interest. You do not need to be an embroiderer.
Simple running stitches, cross stitches, or zigzag patterns along the edge of a page or around a focal image add a handmade quality that no machine can replicate.
Use embroidery floss in contrasting colors for maximum impact.
Wax Seals
A wax seal on the first page or on an envelope closure adds an undeniably vintage touch.
Melt a spoonful of wax beads, pour it onto the paper, and press your stamp into it before it hardens.
The seal cools in about thirty seconds. Practice on scrap paper first — the first few seals are rarely perfect, and that is part of their charm.
Organizing Your Junk Journaling Space
Junk journaling requires more space than some other paper crafts because you will accumulate a collection of papers, ephemera, and tools. Here is a simple way to keep everything organized without taking over your home.
Designate one box or bin for your paper collection. A standard bankers box works perfectly.
Within the box, use magazine holders or file folders to separate paper by type: book pages, music sheets, maps, kraft paper, colored paper, and envelopes.
Keep your current project in a separate box or tray so it is easy to pick up and put down.
Store your tools in a small caddy or cup on your workspace: scissors, bone folder, awl, needle, thread, glue stick, and a few pens.
Stamps and ink pads can live in a small drawer or tin. Keeping your tools visible and accessible means you can work for fifteen minutes at a time without spending half that time finding what you need.
For the paper collector, a simple rule helps prevent overwhelm: if you bring home a new piece of paper, remove an old one. This keeps your collection fresh without growing beyond your storage space.
Why Junk Journaling Resonates in 2026
Junk journaling has surged in popularity over the past year, and it is not hard to understand why.
In a world dominated by digital communication, there is something deeply satisfying about creating a physical object with your hands.
A junk journal cannot be backed up to the cloud. It cannot be duplicated. It exists in the world as a unique, tangible artifact of your creativity.
Junk journaling is also profoundly sustainable. It asks you to see value in what others discard.
An old book that would have been thrown away becomes the foundation of a beautiful object.
A ticket stub from a concert years ago becomes a treasured pocket insert. The craft itself teaches you to look at the material world differently — to see potential in what most people overlook.
And perhaps most importantly, junk journaling is forgiving. There is no way to do it wrong.
If you cut a page too short, you can glue another piece onto it. If you spill ink, it becomes part of the design.
If your binding is crooked, it adds character. In a culture that so often demands perfection, junk journaling offers a space where imperfection is not just accepted but celebrated.
Conclusion: Start with What You Have
The single most important thing you can do as a beginning junk journaler is to start.
Not when you have collected the perfect paper. Not when you have watched every tutorial on YouTube.
Not when you have bought all the tools. Start now, with what you have in your house right now.
Find a few sheets of interesting paper. Fold them in half. Punch some holes. Sew them together with whatever thread you can find.
Call it a journal. Add to it as you find more materials. Experiment with techniques one at a time.
Your first journal will not be your best — and that is exactly how it should be.
Every journal you make teaches you something, and each one is a record of where you were in your creative journey when you made it.
Junk journaling has grown into a worldwide community of makers who share techniques, trade materials, and celebrate each other's work.
Join a local or online group. Share your pages. Ask questions. The junk journaling community is one of the warmest and most generous in the crafting world, and it welcomes beginners with open arms.
Your first journal is waiting. Gather your paper. Thread your needle. Begin.