Introduction
There is something quietly enchanting about a ceramic bead. Unlike glass or metal beads, which arrive fully formed from a factory, ceramic beads carry the memory of their making in every subtle irregularity — the slight oval of a hand-rolled sphere, the faint ridge left by a needle tool, the way glaze pools in the crevices of an impressed pattern.
When you make them yourself, each bead becomes a tiny ceramic object unto itself, a miniature vessel that holds not space but light and shadow.
For the jewelry maker who craves a deeper connection to materials, handcrafted porcelain beads offer a world of creative possibility that commercial findings simply cannot replicate.
In this guide, you will learn the complete process of making ceramic beads for jewelry from porcelain clay.
We will move step by step through clay selection and preparation, rolling and shaping techniques, surface decoration and texture, proper piercing methods, and the glazing and firing sequences that transform soft clay into durable, lustrous beads.
Whether your aim is to produce a matched set of delicate pearls for a bridal necklace or a collection of earthy, textured beads for a bohemian bracelet, the techniques you develop here will serve as a foundation for endless variation.
Understanding Your Clay: Porcelain and Its Alternatives
The choice of clay body shapes every aspect of your bead-making experience. Porcelain is the most celebrated clay for jewelry beads, and for good reason.
Its fine, dense particle structure allows you to roll beads with a smoothness that other clays cannot match.
When fired to maturity, porcelain becomes vitreous — glass-hard, non-porous, and capable of luminous translucency in thin sections.
This is why porcelain beads make such convincing ceramic analogues of pearls or semi-precious stones, with a weight and ring that feels substantial without being heavy.
That said, porcelain has its challenges. It is a finicky clay, prone to slumping and distortion if handled too wet, and demands patience during drying as uneven moisture loss can produce hairline cracks around bead holes.
For the beginner, a mid-range stoneware body such as a porcelainous stoneware or a smooth white earthenware may prove more forgiving while still offering a fine surface.
These clays fire to a smooth, off-white canvas that accepts glaze beautifully and are less likely to slump during bisque.
If you are working in a shared studio or with limited kiln access, consult your supplier about a cone 5 or cone 6 porcelainous stoneware — it behaves much like porcelain during forming but offers a wider firing window and greater thermal shock resistance.
For the purposes of this guide, we will assume you are working with a standard cone 6 porcelain, which is widely available from most ceramic suppliers and suitable for both wheel-thrown and hand-built bead forms.
If you choose a different clay body, adjust the firing recommendations to match your clay's published maturity temperature.
Essential Tools and Materials
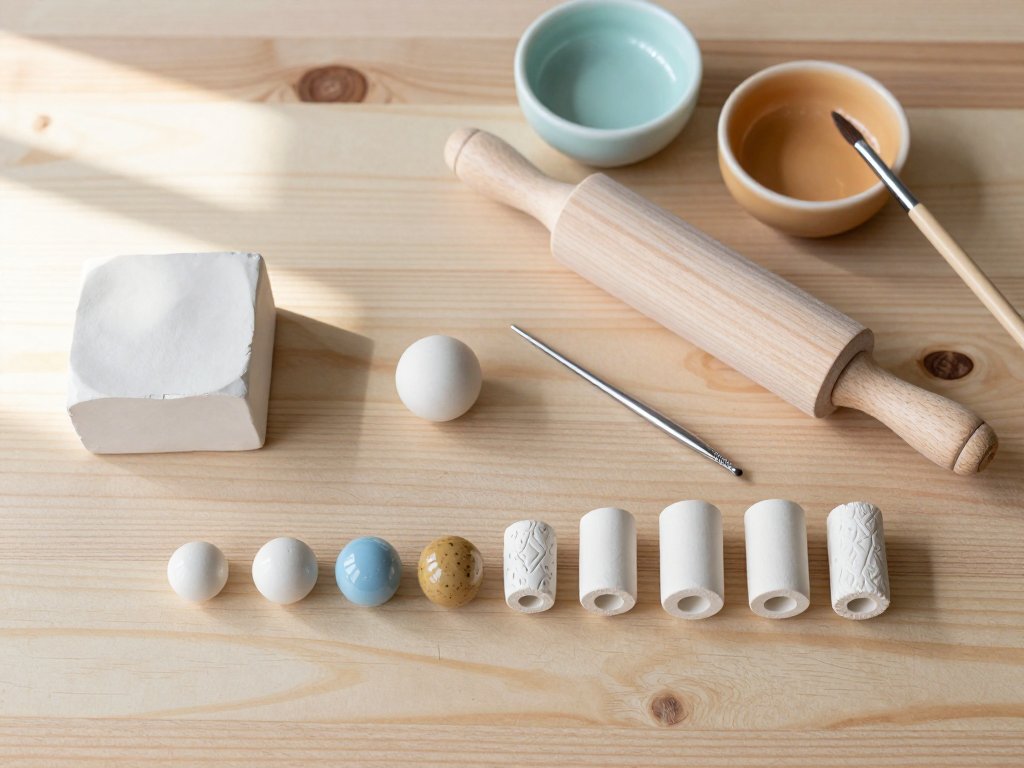
Before you begin, assemble your workspace with the following tools. You likely own many of these already if you do any kind of ceramic hand-building; the rest are inexpensive additions to your toolkit.
Clay. One to two pounds of porcelain or smooth white stoneware will yield dozens of beads, depending on their size. Keep the clay well-wedged and free of air bubbles before you begin.
Rolling surface. A smooth, non-porous surface is essential. A plaster bat is ideal because it gently wicks moisture from the clay, but a sheet of heavy canvas or even a clean Formica countertop will serve admirably. Avoid wooden surfaces, which leave grain impressions and absorb moisture unevenly.
Rolling guides. Two wooden dowels or slats of equal thickness — typically one-eighth or three-sixteenths of an inch — placed on either side of your clay as you roll ensure consistent bead thickness across your batch.
Needle tool or piercing tool. A sharp, smooth metal needle tool is your most important shaping instrument, used for piercing holes, carving texture, trimming rough edges, and cleaning up stray clay. A dental pick or a long sewing needle mounted in a cork handle works equally well.
Ribs and shaping tools. A soft rubber rib smooths bead surfaces and helps round shapes. A metal rib trims and cuts. Wooden modeling tools with various tip shapes — ball-tipped, knife-edged, pointed — give you control over surface details and pattern work.
Texture tools. This category is as broad as your imagination. Rubber stamps, lace, coarse fabric, leaves, found objects, and commercially available texture mats all transfer patterns into soft clay with satisfying clarity. Keep a collection of textural odds and ends in a box near your workspace.
Bead rack or drying board. Beads must dry slowly and evenly. A simple foam board into which you have inserted stiff wire pins at intervals works well; the beads rest on the pins by their holes, allowing air to circulate all around them.
Alternatively, you can string beads on a wire suspended across a box, keeping them from touching one another.
Kiln and glazes. You will need access to a kiln capable of reaching cone 6 (approximately 2230°F or 1222°C) and a selection of food-safe, mid-range glazes.
For beads, look for glazes with a compatible coefficient of expansion — most commercial cone 5/6 glazes work well with standard porcelain bodies.
Low-fire glazes on high-fire clay risk crazing, so match your glaze to your clay's firing temperature.
Conditioning and Preparing the Clay
Proper clay preparation is the single most important factor in bead quality. Begin with thoroughly wedged clay free of air pockets.
Any trapped air will expand during firing and may crack the bead from the inside — a heartbreaking discovery after glazing.
Use the spiral wedging technique if you are experienced with it; otherwise, the ram's head method works perfectly.
Cut your wedged clay in half with a wire tool and inspect the cross-section for small holes or uneven color.
If you see any, re-wedge and check again.
Once your clay is homogeneous, roll it into a coil approximately the diameter of your thumb.
Slice this coil into equal segments using a wire cutter — each segment will become one bead.
For consistent bead sizes, weigh each segment on a kitchen scale. A five-gram segment produces a bead roughly the size of a pea; ten grams makes a bead closer to a marble.
For a matched set, precision here saves you from having to sort beads by size after they are fired.
Set the cut segments on your work surface and cover them with a damp cloth to keep them from drying out.
Clay that dries too quickly on the surface while remaining soft inside will develop a crust that flakes or cracks later.
If your studio is particularly dry, mist the covered clay lightly with water before covering.
Rolling, Shaping, and Forming Beads
The most fundamental bead shape is the sphere, and achieving a convincing roundness requires a technique that blends pressure, motion, and patience.
Take one of your prepared clay segments and roll it between your palms with gentle, even pressure.
Do not squeeze or compress the clay aggressively — you want to coax it into roundness, not force it.
As the clay begins to take shape, transfer it to your work surface and roll it lightly under your palm in a circular motion.
A perfectly round bead should rotate freely without wobbling, indicating that its mass is evenly distributed.
For cylindrical or barrel-shaped beads, roll the clay into a short coil with your fingers, then trim the ends flat with a needle tool.
For oval beads, shape a sphere first and then elongate it by rolling gently between your palms in a back-and-forth motion, applying slightly more pressure along the long axis.
Disc shapes are formed by pressing a sphere gently between your thumb and forefinger until it flattens to your desired thickness, rotating frequently to maintain an even edge.
Faceted beads — shapes with planar surfaces — require a different approach. Roll a cube from your clay segment by pinching and pressing it against a flat surface, turning and repeating until all faces are roughly equal.
Refine the faces with a metal rib once the clay firms up slightly. Faceted ceramic beads catch light beautifully and pair well with metal findings in modern geometric jewelry designs.
As you work, keep a small bowl of water nearby for moistening your fingers if the clay begins to stick.
A tiny amount of water creates a lubricating film that prevents surface tearing. Be sparing — too much water turns the clay into slurry, which will peel and crack during drying.
Surface Decoration: Texture, Impressions, and Carving
Plain ceramic beads have a quiet elegance, but textured and decorated beads invite the eye to linger on every surface detail.
Because ceramic beads are small, your surface treatments should be bold enough to read at jewelry scale — fine, delicate patterns tend to disappear once the bead is strung and worn.
Texture is best applied while the clay is still soft but firm enough to hold an impression without slumping.
Test your texture tools on a scrap of clay first. Press stamps and texture mats evenly onto the bead surface, applying firm, direct pressure without twisting — twisting smears the impression and blurs the pattern.
For spherical beads, you can roll them across a textured surface to create a pattern that wraps continuously around the bead.
This works wonderfully with coarse fabrics like burlap, lace, or linen.
Carved decoration requires the clay to be leather-hard — firm enough to hold a carved line without tearing, but still damp enough to carve smoothly.
A needle tool or fine loop tool is ideal for this work. You can carve geometric patterns, botanical motifs, or abstract lines that follow the bead's contour.
For pierced or carved-through patterns, carve from the surface inward, stopping short of the bead hole.
Carved-through beads, sometimes called lattice beads, are striking but fragile; handle them gently during glazing.
Sgraffito works beautifully on bead surfaces. Apply a thin layer of colored slip or underglaze to a leather-hard bead, allow it to set until no longer tacky, and carve through the colored layer to reveal the porcelain body beneath.
The contrast between white porcelain and darker slip produces a cameo-like effect particularly suited to ceramic jewelry.
Piercing: Methods for Clean, Centered Holes
The hole is the most technically demanding element of a ceramic bead. A poorly pierced hole — off-center, tapered, ragged, or too small — compromises the bead's stability and its appearance on the string.
The goal is a clean, cylindrical hole that runs precisely through the bead's center, with a diameter wide enough to accommodate your chosen stringing material.
For most beads, a hole diameter of one-sixteenth to one-eighth of an inch is appropriate.
Thinner stringing materials such as silk thread or beading wire need the smaller end of this range; leather cord or thick cotton twine needs the larger end.
Remember that clay shrinks during drying and firing — typically twelve to fifteen percent for porcelain — so your hole must be pierced larger than your final desired diameter.
The recommended method is to pierce from both ends of the bead toward the center, rather than pushing the tool straight through from one side.
This produces a clean, uniform hole on both faces and prevents the clay from bulging out around the exit point.
Hold the bead between your thumb and forefinger, position the needle tool at the exact center of one face, and rotate the tool back and forth as you press it into the clay.
Rotate, do not push — a twisting motion cuts through the clay cleanly without distorting the bead shape.
Pierce about halfway through, then remove the tool, flip the bead, and pierce from the opposite end until the two channels meet.
As you withdraw the tool, rotate it in the same direction to avoid catching and tearing the interior walls of the hole.
If the hole seems tight, reinsert the tool from one end and gently wiggle it to widen the channel.
For beads with very thick walls, you can use a small drill bit mounted in a pin vise once the bead is leather-hard, though manual piercing is gentler on delicate shapes.
After piercing, check each bead's hole by holding it up to a light source. The light should pass through clearly, showing a straight, unobstructed channel. If you see a dark spot where the two channels did not meet, re-pierce carefully to connect them.
Drying, Trimming, and Preparing for the Kiln
Drying ceramic beads requires more patience than drying larger pottery forms because their small size makes them prone to rapid, uneven moisture loss.
A bead that dries too quickly will develop cracks around its hole or on its surface.
The goal is slow, even evaporation over the course of several days.
Immediately after piercing, place each bead on your drying rack, threading them onto wire pins through their holes so no part of the bead touches a solid surface.
This allows air to circulate completely around the bead, promoting even drying. If you do not have a drying rack, balance the beads on sewing needles pushed into a foam block or suspend them on a wire strung across a box.
Cover the assembly loosely with plastic sheeting for the first twenty-four hours, then gradually uncover it over the next two to three days.
Check your beads twice daily during drying. As they approach leather-hard, trim any rough edges or uneven areas with a sharp knife or needle tool, smoothing with a damp sponge.
Any sanding or refining is easiest at the leather-hard stage, when the clay is firm enough to hold a clean edge but soft enough to respond to abrasion without producing dust.
Once the beads are bone-dry — they will feel room-temperature and appear lighter in color — inspect each one for cracks, warping, or blemishes.
Dry beads are fragile; handle them with care. Set aside any that show defects; these can be recycled by soaking them in water and re-wedging the clay.
The surviving beads are ready for their bisque fire.
Glazing Approaches for Jewelry Beads
Glazing ceramic beads presents specific considerations that differ from glazing larger forms. Because beads are handled and worn against the skin, the glaze must be food-safe and durable enough to withstand repeated contact with lotions, oils, and mild abrasion.
Because beads have holes that must remain open for stringing, the glaze must not pool inside the channel.
The simplest and most reliable glazing method for beads is dipping. Prepare a small container of glaze at the consistency of heavy cream.
Hold each bead by its hole using a thin wire or a length of stiff wire bent into a hook, dip it fully into the glaze for a count of three seconds, withdraw it slowly, and allow the excess to drip back into the container.
Touch the bottom of the bead gently against the rim to remove the hanging drip, then suspend the bead from the wire to dry.
The key is to keep the hole clear — any glaze that flows into the channel will close it after firing, and drilling out fired glaze is difficult and risks breaking the bead.
An alternative approach that gives you greater control is brushing. Using a soft, fine artist's brush, apply two to three thin coats of glaze directly to the bead surface, allowing each coat to dry before applying the next.
This method is ideal for multicolor designs, for applying glaze only to specific areas, or for beads with delicate carved details that you want to keep visible through a transparent glaze.
For contrast, consider leaving the interior of carved lines unglazed — the matte bisque against a glossy glaze produces a handsome tactile effect.
For beads that will be strung on leather or cord, consider leaving a narrow band of unglazed ceramic around the hole edges.
This protects the stringing material from the sharp edges of fired glaze, which can cut through cord over time.
Simply wipe a small ring of glaze from each hole opening with a damp brush before firing.
Underglazes and ceramic stains offer another dimension of design. Paint underglaze designs onto bisque-fired beads — floral motifs, geometric patterns, abstract washes — and then apply a clear glossy or matte glaze over the top. This sandwich technique produces crisp, vibrant colors that are fully sealed and food-safe.
Firing: Bisque and Glaze Cycles
Your beads will go through two firings. The first, the bisque fire, transforms the soft, fragile clay body into a hard, porous material that can be handled for glazing without crumbling.
The second, the glaze fire, melts the glaze into a glassy surface and vitrifies the clay body, making it waterproof and durable.
For the bisque fire, arrange your beads on a kiln shelf so they do not touch.
If you have placed them on bead pins or stilt wires, fire them directly on the pins, which hold them stable and allow heat to circulate around the entire bead.
Fire to cone 04 (approximately 1945°F or 1063°C) with a slow ramp — roughly 200°F per hour for the first hour to allow any remaining moisture to escape as steam, then a medium ramp to peak temperature.
Soak for ten minutes and allow a natural cool-down. Opening the kiln before it drops below 200°F can cause dunting — thermal shock cracking — particularly in small, thin-walled forms like beads.
After the bisque fire, inspect each bead. They should be hard, light, and slightly porous.
Test each hole by threading a piece of string through it — any beads where the hole has closed can be gently reamed with a small round file.
You can also sand the bisque surface lightly with fine-grit sandpaper to remove rough spots before glazing.
For the glaze fire, arrange your beads on a kiln shelf coated with kiln wash or set on bead racks.
If you dip-glazed your beads, the wire hangers can serve as stilts. Fire to your clay's published maturity temperature — for cone 6 porcelain, approximately 2230°F (1222°C) — with a medium ramp rate.
A ten-minute soak at peak temperature helps the glaze flow and self-level, producing a more even surface on small bead forms.
Cool naturally.
When the kiln has cooled completely, retrieve your beads. The moment of unwrapping a freshly fired batch is one of the genuine pleasures of ceramic jewelry making.
Colors that looked dull and chalky in the unfired glaze now glow with depth and luster.
The texture you pressed into the soft clay weeks ago is now permanent, preserved in fired glass and ceramic.
Assembling Your Jewelry
With your fired beads in hand, the final creative phase begins: composing them into jewelry.
Before you string, lay out your beads on a flat surface and experiment with arrangements.
Sort them by size and color, then play with symmetrical, graduated, and random sequences. Consider the visual weight of each bead — a large, heavily glazed bead can anchor a necklace, while smaller beads work best as accent pieces between focal elements.
Ceramic beads pair naturally with a wide range of materials. Silver or gold-filled spacer beads protect the ceramic from rubbing against metal clasps and add a professional finish.
Leather cord and waxed cotton thread complement the earthy quality of unglazed or matte-glazed beads.
Silk thread, strung with small knots between each bead, creates a classic, heirloom-quality necklace that showcases each bead individually.
For earrings, use head pins through the bead holes and attach them to ear wires — the lightness of porcelain makes even substantial-looking beads comfortable to wear.
If you are making bead caps, you can fire small ceramic discs with a central hole and a slightly domed profile that cup each bead on either side.
These are rolled from small clay balls, hallowed slightly on one side, pierced, and fired alongside your beads.
Bead caps elevate handmade beads into a polished, professional-looking collection.
Conclusion
Making ceramic beads for jewelry is a craft that rewards patience and experimentation. Each batch teaches you something new — a different way to hold the needle tool, a glaze combination you had not considered, a texture that works better than you expected.
The beads themselves become a record of that learning: you can look at a finished necklace and remember which techniques clicked on that particular afternoon, which discoveries changed how you approach the next batch.
Porcelain beads occupy a unique intersection of two crafts — ceramics and jewelry making — and the maker who works at that intersection develops skills from both traditions.
You learn the patience of clay, its response to moisture and pressure and heat. You learn the precision of jewelry assembly, the tiny decisions about spacing and closure and wearability that separate a strung collection from a thoughtfully designed piece of adornment.
And you learn that the smallest ceramic forms, no bigger than a pea, can carry as much intention and craft as the largest vase.
Start with a small batch of simple round beads. Master the piercing technique. Try one texture.
Fire them, glaze them, string them, wear them. The next batch will be better, and the batch after that will be better still.
And somewhere along the way, you will find yourself reaching for clay not because you need beads, but because there is something in the process itself that keeps calling you back.