Tin Can Treasures: Creating Vintage-Inspired Crafts from Aluminum Cans
A simple, sustainable way to turn everyday materials into something beautifully nostalgic
Sometimes the most charming materials are the ones we almost throw away.
In between busy days and full schedules, creativity often shows up in the most unexpected places—like the recycling bin. Aluminum cans, with their soft metallic surface and subtle sheen, can be transformed into delicate, vintage-inspired designs with just a few simple steps.
This is the kind of craft that feels both resourceful and relaxing. It doesn’t require a big setup or expensive supplies—just a little patience, a careful hand, and a willingness to see beauty in something ordinary.
Why Aluminum Cans Work So Well
Aluminum is surprisingly easy to work with. Once flattened, it becomes thin and flexible—perfect for cutting, embossing, and shaping into decorative pieces.
It also naturally has that soft, worn shine that pairs beautifully with vintage-style crafts. With just a bit of texture or design, it can look like something found in an old keepsake box.
Safety First: A Gentle but Important Note
Before you begin, it’s important to understand that cut aluminum can have very sharp edges. These edges can easily cause small cuts if handled too quickly or without care.
Take your time with each step, and consider using protective gloves when cutting or shaping your pieces. If you have little ones nearby, this is a craft best done during a quiet moment when you can fully focus.
A pair of sturdy scissors (not your fabric scissors) and careful handling will go a long way in keeping this process safe and enjoyable.
Getting Started: Simple Supplies
- Clean, empty aluminum cans
- Strong scissors or tin snips
- Fine sandpaper or an emery board
- A pen or embossing tool
- Cardboard or soft surface for shaping
You likely already have most of these at home, making this an easy craft to begin without extra shopping.
How to Prepare the Aluminum
Start by rinsing your can and letting it dry completely. Then carefully cut off the top and bottom. Make a vertical cut down the side so you can open the can into a flat sheet.
Once flattened, gently smooth the edges using sandpaper or an emery board. This step is especially important—it softens sharp edges and makes the piece safer to handle.
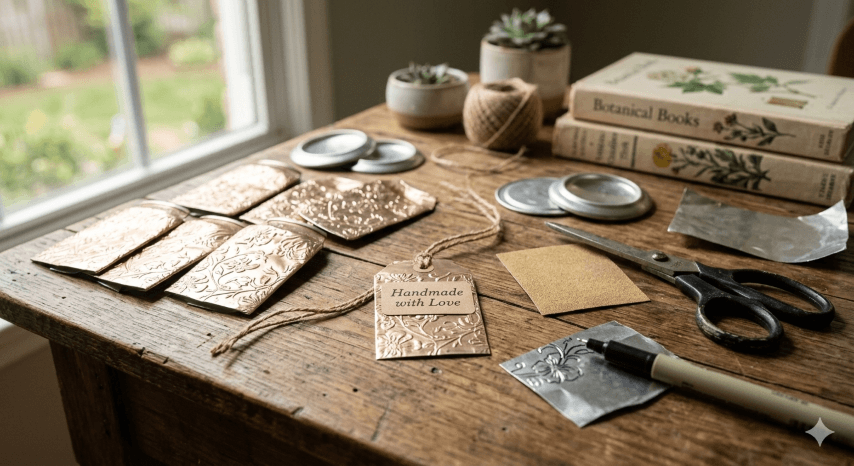
Creating a Vintage Look
The magic happens when you begin adding texture. Place your aluminum sheet on a soft surface like cardboard, then use a pen (with no ink) to gently press designs into the metal.
Try simple patterns like:
- Floral vines
- Leaves and stems
- Soft geometric borders
- Handwritten words or initials
These subtle impressions catch the light beautifully and create that soft, vintage feel.
Simple Project Ideas
Once you have your textured pieces, you can turn them into a variety of small keepsakes.
- Gift tags: Add ribbon or twine for a rustic touch
- Ornaments: Perfect for seasonal decorating
- Scrapbook accents: Layer into memory pages
- Bookmarks: Thin, durable, and beautifully unique
These projects are small enough to finish in one sitting, making them perfect for those short windows of creative time.
A Moment to Slow Down
There’s something quietly satisfying about working with your hands in this way—cutting, shaping, and pressing each detail slowly. It invites you to focus, even if only for a few minutes.
And in a full day, those few minutes can feel like a reset.
Make It Your Own
You can leave your aluminum natural for a soft metallic look, or gently brush on a bit of acrylic paint and wipe it back for an aged effect.
Add tiny holes for stitching with thread, or layer your pieces onto paper for mixed-media projects. There’s no single “right” way—just small variations that make each piece feel personal.
With a little care and creativity, something as simple as an aluminum can can become a lasting, meaningful piece. Sometimes, the most beautiful crafts begin with what we already have.