Introduction
Have you ever watched a video of someone pushing a hollow needle through fabric over and over, watching colorful loops of yarn bloom on the other side, and thought, "That looks so satisfying, but I could never do that"?
I have good news: you absolutely can. In fact, you can learn punch needle embroidery in a single afternoon and complete your first project within a weekend.
Punch needle embroidery — sometimes called punch needle rug hooking or simply punch needle — has been around for more than a century, but it has recently exploded in popularity on social media.
The reason is simple: it is one of the most forgiving, instantly gratifying crafts you can try.
Unlike traditional embroidery where each stitch must be placed with precision, punch needle lets you work quickly and cover large areas with rich, plush texture.
The mistakes that happen along the way often look intentional. The finished piece has a handcrafted warmth that photographs beautifully.
I discovered punch needle about two years ago, during a season when I desperately needed a creative outlet that did not require complex instructions or expensive supplies.
My youngest had just started preschool, and I had maybe forty-five minutes of quiet time each day — not enough to set up a full painting studio or dive into a complicated knitting pattern.
Punch needle fit perfectly into those small windows. I could pick it up, make a few rows of loops, and set it down without losing my place.
The rhythm of punching was calming in a way I had not expected, almost meditative.
In this guide, I will walk you through everything you need to start punch needle embroidery: the simple kit of supplies, how to set up your fabric, the basic punching technique, how to choose a beginner design, and how to finish your piece so it lasts.
By the end of this article, you will have everything you need to make your first punch needle project.
What Is Punch Needle Embroidery?
Punch needle uses a specialized hollow needle with an eye near its tip. You thread yarn through the hollow handle and out through the eye, then punch the needle through a woven fabric backing.
As you push the needle in and pull it back out, the yarn catches on the fabric and forms a loop on the opposite side.
Repeat this thousands of times, and you build a dense, textured surface of loops that can form any design you can draw.
The technique is closely related to traditional rug hooking, which uses a hook to pull loops of yarn or fabric strips through a backing.
Punch needle is faster because the needle does all the work in a single motion — in and out.
It is also more portable; you do not need a large frame or stand. A small hoop or a simple frame that fits in your lap is all you need.
What makes punch needle so beginner-friendly is that the tool does most of the hard work.
You do not need to master different stitch types or tension control like you do with knitting or crochet.
You simply push the needle in, pull it out, and move to the next spot.
The needle's design ensures that every loop is approximately the same height, so even your first attempts look consistent and professional.
What You Will Need
One of the things I love most about punch needle is how short the supply list is. You can buy everything you need for a first project for about the cost of a nice dinner out.
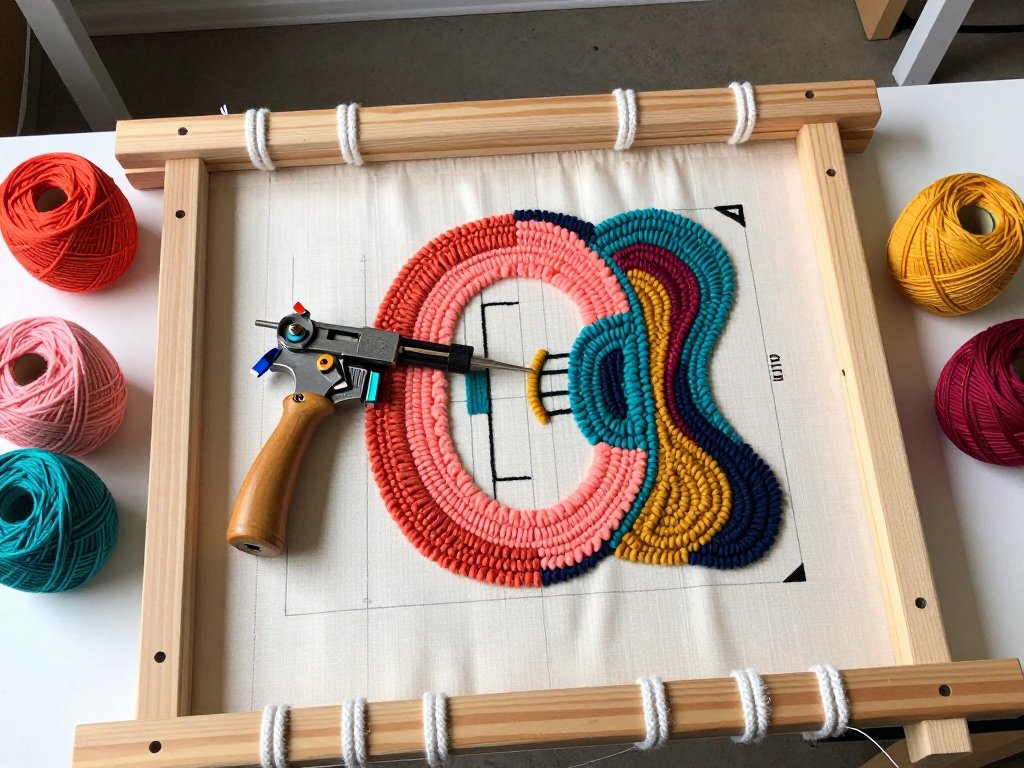
The Punch Needle Tool
Your punch needle is the most important piece of equipment. There are two main types, and understanding the difference will save you frustration.
- Adjustable punch needles have a depth adjustment that lets you control how long the loops are. A longer loop depth (around half an inch) creates a fluffy, rug-like texture. A shorter depth (around quarter inch) creates a tighter, more embroidered look. For beginners, an adjustable needle is the best choice because it lets you experiment with both textures. Look for brands like Ultra Punch or Oxford, which are reliable and widely available. They cost about $15 to $25.
- Fixed-depth punch needles are simpler and less expensive, but they only produce one loop height. If you are certain you only want to make rugs or only want to make fine embroidery, a fixed-depth needle can work. But most beginners benefit from the flexibility of an adjustable needle.
The needle itself is hollow, with the eye positioned near the tip on the side of the shaft.
This is different from a regular sewing needle, where the eye is at the top.
The side eye allows the yarn to exit smoothly as you punch, creating a clean loop every time.
Fabric Backing
The fabric you punch into needs to be sturdy enough to hold the yarn loops without tearing.
The gold standard for punch needle is a fabric called monk's cloth, a loosely woven cotton fabric with an even grid of threads.
The grid helps you keep your stitches straight and evenly spaced.
Other options include weavers cloth, which has a tighter weave and produces a finer finished surface, and burlap, which is inexpensive but less durable.
For a first project, start with monk's cloth. It is forgiving, easy to find online or at fabric stores, and costs about ten dollars per yard — enough for several small projects.
Do not use standard cotton quilting fabric or canvas. They are too tightly woven for the punch needle to pass through, and you will spend more time fighting the fabric than enjoying the craft.
Yarn
Worsted weight (#4) acrylic yarn is the ideal choice for beginners. It is inexpensive, comes in hundreds of colors, and glides through the punch needle smoothly.
Cotton yarn works too but has less stretch, which can make it harder to maintain consistent tension.
For your first project, pick three to four colors of acrylic worsted weight yarn in shades that make you happy.
One ball of each color (about 100 grams each) is enough for a small 8-by-10-inch piece.
Frame or Hoop
The fabric must be stretched taut while you work. A quilting hoop (the kind with a screw adjustment) works well for small projects up to about 12 inches.
A scroll frame is better for larger pieces because it keeps the fabric evenly tensioned across the full surface.
Some crafters even use a simple wooden picture frame with the fabric stapled to it.
The most important thing is that the fabric is drum-tight. Loose fabric causes the punch needle to skip, creating uneven loops and missed stitches. If you can tap the fabric and hear a sound like a drum, the tension is right.
Additional Supplies
- Fabric scissors for trimming yarn ends
- A yarn needle for weaving in loose ends on the back
- A water-soluble marker or washable pencil for drawing your design on the fabric
- Latex rug adhesive (if you are making a rug or wall hanging that needs to hold its shape)
- A small spray bottle of water to moisten the yarn if it starts to fuzz in the needle
Setting Up Your Fabric
Proper setup makes the difference between a frustrating first session and a joyful one. Here is how to set up your project step by step.
Step 1: Cut your monk's cloth to a size about four inches larger than your hoop or frame on each side. This extra border gives you room to grip and adjust the fabric.
Step 2: Draw or trace your design onto the fabric using a water-soluble marker. Keep it simple for your first project — a heart, a leaf, a simple flower shape.
The design should have clear outlines and large enough sections that you are not trying to punch in tiny, tight curves.
Step 3: Place the fabric over your hoop or frame, centering your design. Tighten the hoop until the fabric is drum-tight. If you are using a scroll frame, roll the fabric evenly onto both bars and tighten the wing nuts firmly.
Step 4: Thread your punch needle. Insert the yarn through the hollow handle from the top and guide it out through the eye near the tip.
Leave about two inches of yarn extending from the eye. Most needles have a threader wire that makes this easier — if yours came with one, use it.
Step 5: Adjust the loop depth on your needle. For a first project, set it to about medium depth (around three-eighths of an inch). This produces a nice plush texture without using too much yarn.
The Basic Punching Technique
Now for the fun part. Here is how to make your first loops.
Hold the needle like a pencil. Grip it near the base, with the bevel (the slanted opening) facing in the direction you plan to move. If the bevel faces forward, the loops will lie flat and smooth. If it faces backward, the loops may snag or pull out.
Push the needle through the fabric. Insert it all the way until the handle touches the fabric surface.
You should feel the needle pass through the weave with a slight pop. If it resists, your fabric may be too tight or your needle may be too blunt.
Do not force it — adjust the tension or try a different spot.
Pull the needle back out. Lift it straight up, following the same path it entered.
The yarn should stay in the fabric, forming a loop on the opposite side. If the loop pulls out when you withdraw the needle, you are pulling too quickly or at an angle.
Slow down and lift straight up.
Move to the next spot. Insert the needle about one thread-width away from your previous hole. Continue punching along your design line, keeping the stitches close together. The completed loops should touch each other, with no gaps of bare fabric visible between them.
Work from the outlines inward. Start by punching along the outline of each design element to define the shape, then fill the interior with rows of stitches.
For the fill, you can work in straight rows, following the contour of the shape, or in a spiral from the outside in.
Any pattern that keeps the stitches close together works.
Finishing a color area. When you finish one section, cut the yarn at the needle, leaving a two-inch tail. Thread the new color and continue. Do not worry about the tails on the back — they are secured later.
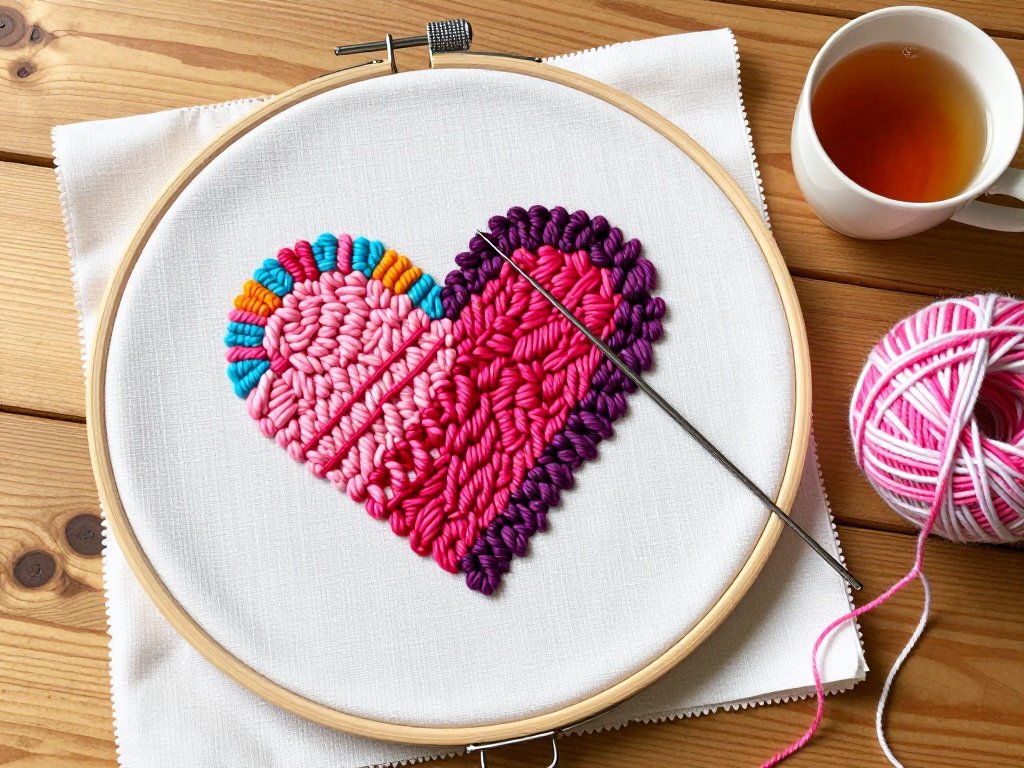
Your First Design: A Simple Heart
Let me walk you through a complete beginner project. A small heart design is perfect for your first punch needle piece — the shape is simple, it has no sharp corners (which are tricky for beginners), and it makes a lovely gift or decoration.
Supplies for this project:
- Monk's cloth, about 10 by 10 inches
- 8-inch quilting hoop
- Red or pink worsted weight yarn for the heart (one small ball)
- White or cream yarn for the background (one small ball)
- Adjustable punch needle set to medium depth
- Water-soluble marker
Step 1: Draw a heart shape about four inches tall in the center of your monk's cloth. If drawing freehand feels intimidating, trace a heart shape from a piece of paper. The outline should be bold and clear.
Step 2: Mount the fabric in your hoop, centering the heart design. Tighten until the fabric is drum-tight.
Step 3: Thread your needle with the red yarn. Starting at the top left curve of the heart, punch along the outline. Keep your stitches close together — about one thread-width apart. Complete the entire outline of the heart before filling the interior.
Step 4: Fill the interior of the heart with rows of stitching. Start from one edge and work across to the other side, keeping rows parallel and close together.
Overlap the outline slightly to ensure there are no gaps. The filling should feel dense and solid when you run your fingers over the back of the hoop.
Step 5: Switch to the white or cream yarn. Fill the background area around the heart in the same way, working from the heart outward to the edges of your hoop. Keep the white stitches close to the red ones so no bare fabric shows between them.
Step 6: When the entire hoop area is filled, examine the back (the loop side). If you see any bare spots, flip the hoop over and add more stitches from the front.
Step 7: Remove the fabric from the hoop. Trim any long yarn tails on the front (the side you punched from) to about half an inch.
Step 8: If you plan to frame the piece, you are done. If you are making a wall hanging or rug, apply a thin layer of latex rug adhesive to the front (the punch side) to secure all the loops.
Let it dry for 24 hours before cutting the fabric to shape.
That is it. Your first punch needle project is complete. Hold it up and admire the texture — the way the light catches the loops, the softness of the yarn under your fingers, the knowledge that you made this from a ball of string and a simple needle.
Tips for Better Results
These are the tips I wish someone had told me before my first project. They will save you time, yarn, and frustration.
Keep your stitches close. Beginners almost always space their stitches too far apart. The loops should be touching. If you can see fabric between your stitches, they are too far apart. Dense stitching is the secret to a professional-looking finish.
Work in good lighting. Punch needle requires you to see the tiny gaps between threads of monk's cloth. Natural daylight is ideal. A bright desk lamp works well for evening sessions. If you find yourself squinting, add more light — your results will improve immediately.
Take breaks. Punching for more than an hour without a break can strain your hand and wrist.
Set a timer for forty-five minutes, then stand up, stretch, and shake out your hands.
This is not just good for your body — it also gives you a fresh perspective on your design.
Embrace imperfections. Unlike machine-made textiles, hand-punched pieces have natural variation in loop height and spacing.
That is not a flaw. It is the evidence of human hands at work, and it is what makes your piece unique.
I have a small wall hanging from my first project that has a noticeably uneven loop in the top right corner.
Every time I see it, I remember learning to trust the process. I would not change it for anything.
Practice on scrap first. Before you start your actual project, spend ten minutes punching on a scrap piece of monk's cloth.
Practice straight lines, curves, and turning corners. Get a feel for how much pressure the needle needs and how fast you can move while maintaining consistent loops.
Those ten minutes of practice will save you an hour of frustration on your real project.
Change the needle depth to create texture. Once you are comfortable with the basic technique, try changing the needle depth in different areas of the same piece.
Shorter loops (quarter inch) create a flat, smooth surface that works well for backgrounds. Longer loops (half inch or more) create a fluffy, dimensional surface that stands out from the fabric.
Combining both depths in a single piece adds visual interest and a professional touch.
Troubleshooting Common Problems
The loops pull out when I remove the needle. This is the most common beginner frustration.
The fix is almost always one of these: the fabric is not tight enough, you are pulling the needle out at an angle instead of straight up, or you are moving too fast.
Tighten the fabric, slow down, and lift straight up. If the problem persists, check that your needle depth is set correctly — if it is too shallow, the loops may not catch in the weave.
The yarn keeps jamming in the needle. Yarn jams happen when the yarn is too thick for the needle, the needle is dirty, or the yarn has knots or slubs.
Try a thinner yarn (sport weight or fingering weight instead of worsted), clean the needle with a pipe cleaner or compressed air, or switch to a fresh ball of yarn.
Acrylic yarn is less prone to jamming than wool or cotton.
The fabric is fraying at the edges. Monk's cloth frays easily. Before you start punching, seal the edges with a thin line of fabric glue or clear nail polish. Alternatively, bind the edges with masking tape. This prevents the fabric from unraveling as you handle it.
I can see bare fabric between my stitches. Your stitches are too far apart. Punch additional rows to fill the gaps. The loops will compress together and hide the fabric completely. A finished punch needle piece should feel like a solid surface of yarn, not like individual scattered loops.
The needle is hard to push through the fabric. Either the fabric is too tight or the needle is too blunt for that particular weave.
Try loosening the hoop slightly and see if the needle passes through more easily. If the fabric is very tightly woven, switch to monk's cloth or weavers cloth with a more open weave.
Finishing Your Piece
How you finish your punch needle piece depends on what it is destined to become. Here are the most common finishing methods.
For framed art: Trim the excess fabric to about one inch beyond the hoop or frame.
Fold it to the back and glue or stitch it in place. If you used a quilting hoop as your working frame, you can mount it in a larger display hoop or a standard picture frame with a deep inset.
For wall hangings: Apply a thin layer of latex rug adhesive to the back of the piece (the side you punched from).
Let it dry completely, then cut the fabric to the shape of your design, leaving a half-inch border.
Glue the border to the back with more adhesive. Attach a hanging rod or dowel to the top by stitching a fabric sleeve and threading the rod through it.
For pillows: After applying adhesive and letting it dry, cut the fabric to your desired shape with a one-inch seam allowance. Sew the punch needle piece to a backing fabric, leaving an opening for stuffing. Insert pillow form or stuffing, then sew the opening closed by hand.
For rugs: This requires the most finishing work. Apply a generous coat of latex rug adhesive to the back, pressing it into the loops with a putty knife.
Let it cure for 48 hours. Apply a second coat to the back, then press a piece of felt or non-slip rug pad into the wet adhesive.
Trim away excess fabric. Let the rug cure for another 24 to 48 hours before placing it on the floor.
Conclusion
Punch needle embroidery surprised me. I picked it up expecting a simple, pleasant way to pass the time, and I discovered a craft that felt like coming home.
The rhythm of the needle, the soft sound of yarn passing through fabric, the slow emergence of color and texture — it is a sensory experience that cannot be captured in a video, no matter how satisfying the content looks on your screen.
That first heart I made, slightly lopsided and far from perfect, still hangs in my kitchen. It reminds me that I do not need to be an expert to create something beautiful. I just need to show up, make a few loops, and trust the process.
If you have been watching punch needle videos and thinking, "That looks nice, but it is probably harder than it looks," let me reassure you: it is actually easier.
The hardest part is threading the needle, and even that takes less than a minute once you have done it a few times.
Everything after that is pure, satisfying progress.
So pick up a needle, some monk's cloth, and a ball of yarn in a color that makes you smile.
Set aside an afternoon, make yourself a cup of tea, and start punching. You will have something beautiful to show for your time by dinner — and a new craft that fits into the small, precious pockets of quiet that make up a busy life.