Introduction
A pumpkin candle centerpiece is the rare fall project that looks considered and costs almost nothing. It is also the rare one that can fail quietly, weeks after you thought you were finished.
A shell that never dried properly will sweat under a flame. A candle set two inches too high will scorch the rim before the first hour is out. Both are easy to avoid if you build in the right order.
This guide makes one pumpkin, start to finish. You will choose it, cut it, scoop it, dry it, line it, size the candle, and level it. Nothing here is about styling a whole table.
Budget about an hour of hands-on work. Then budget several days of waiting while the shell dries. That waiting is the step most tutorials skip, and it is the one that decides whether this works.
What You Need Before You Cut
Gather everything first. Once a pumpkin is open, you want your hands free and the clock running.
- One pumpkin, roughly eight to ten inches across, squat rather than tall.
- A thin serrated knife or a small craft saw. A chef's knife is too thick and wedges in the cut.
- A sturdy metal spoon, the kind with a rigid bowl. A flimsy spoon bends against pumpkin flesh.
- A marker for the cut line, and a dry cloth for wiping.
- Newspaper or a cut-open paper bag for the scooping mess.
- A straight-sided glass or half-pint jar that fits inside the pumpkin with room to spare.
- One plain pillar candle, sized after the cavity is measured, not before.
That is the whole list. There is no sealer to buy, no kit to order. If little guests are underfoot while you work, a few Thanksgiving kids' table crafts will keep them busy at the far end of the room.
Choosing the Right Pumpkin
Start with shape, not colour. A pumpkin that is wider than it is tall gives you a broad, shallow cavity, and a broad cavity is easier to work in.
Look for a slightly flat bottom. A pumpkin that already sits still on the shelf will sit still on your table. A round one will rock, and no amount of shimming fixes a shell that wants to roll.
Wall thickness matters more than most guides admit. Thick walls hold their shape through drying but fight the spoon. Thin walls scrape quickly and then scorch at the rim. Aim for a pumpkin that feels solid without being concrete-heavy.
The stem is decoration. A crooked stem, a broken stem, no stem at all — none of it affects the build. A flat bottom affects everything. Choose the flat bottom over the pretty stem every time.
Reject anything with a soft spot, especially near the base. Press the skin with a thumb; it should resist and spring back. Reject hairline cracks around the stem and any bruise that gives under pressure.
Those defects become rot once the inside is wet and warm. You will not notice them on day one. You will notice them on day nine, when the whole thing collapses.
Cutting the Lid
Mark your circle before the knife touches skin. A three-to-four-inch opening is right for most pillar candles, and smaller is better than larger.
A small opening shelters the flame, keeps the glow inside the shell, and leaves more of the pumpkin's face intact. A wide opening turns the pumpkin into a bowl.
- Set the pumpkin on the table and draw a circle around the stem with the marker.
- Hold the knife blade level, parallel to the table, and start at one point on the line.
- Use short, even sawing strokes. Let the serrations cut; do not push down.
- Work all the way around before lifting the piece.
- Cut a small V notch across the cut line, on one side, before you separate the lid.
That notch is a key. It marks the one orientation where the lid seats flush again. Without it you will be rotating a lid for ten minutes every time.
Keep the blade level the whole way around. A cut line that tilts means a lid that rocks, and a rocking lid never sits flat again.
Scooping the Inside
Spread the newspaper. Pumpkin innards travel further than you expect.
- Pull out the loose seeds and strings with your hand first. Most of the mass comes free this way.
- Scrape the inner wall with the spoon, working from the opening down to the base.
- Press firmly and drag. Do not gouge; you are shaving, not digging.
- Stop when the wall is three-quarters of an inch to an inch thick.
- Leave the base thicker than the sides — that weight is what keeps the pumpkin upright.
- Wipe the inside with a dry cloth. Do not rinse it.
Every trace of wet pulp has to go. Strings and seed residue hold water against the flesh, and that moisture is what grows mould three days later.
Feel the wall as you go. Firm, dense, slightly cool flesh is right. A wall that gives under your thumb is too thin, and a thin wall will scorch from the inside once a flame sits in there.
Never puncture the base. Run your fingers over it and check for a nick. A pinhole leak lets air in under the candle and turns a stable flame into a guttering one.
Drying the Shell
This is the part that separates a centerpiece from a science experiment. A hollow pumpkin is a wet sponge wearing a hard hat.
Set the shell in a cool, dry spot with moving air. A shaded porch, a garage shelf, or a counter away from the stove all work. Aim for sixty to seventy degrees.
Give it three days minimum. A full week is better, and it costs you nothing but patience.
Turn the shell once a day so the base dries as evenly as the sides. Set it on a rack or on newspaper you change daily, so moisture does not pool underneath.
A properly dried shell feels different in three ways. It is noticeably lighter. The inner flesh has gone from slick to firm and slightly leathery. The cut rim has drawn in and paled to a soft golden tan.
A damp shell ruins a candle. Moisture fights the flame, makes the wax sweat and pull away from the walls, and feeds mould in the dark. Skip the drying and you build something that fails on its first evening.
Do not try to speed this up in an oven. You will cook the flesh, split the skin, and end up with a soft, sweet-smelling mess.
Sealing the Interior
You need a barrier between hot wax and raw vegetable flesh. There are three approaches, and only one of them is reliable.
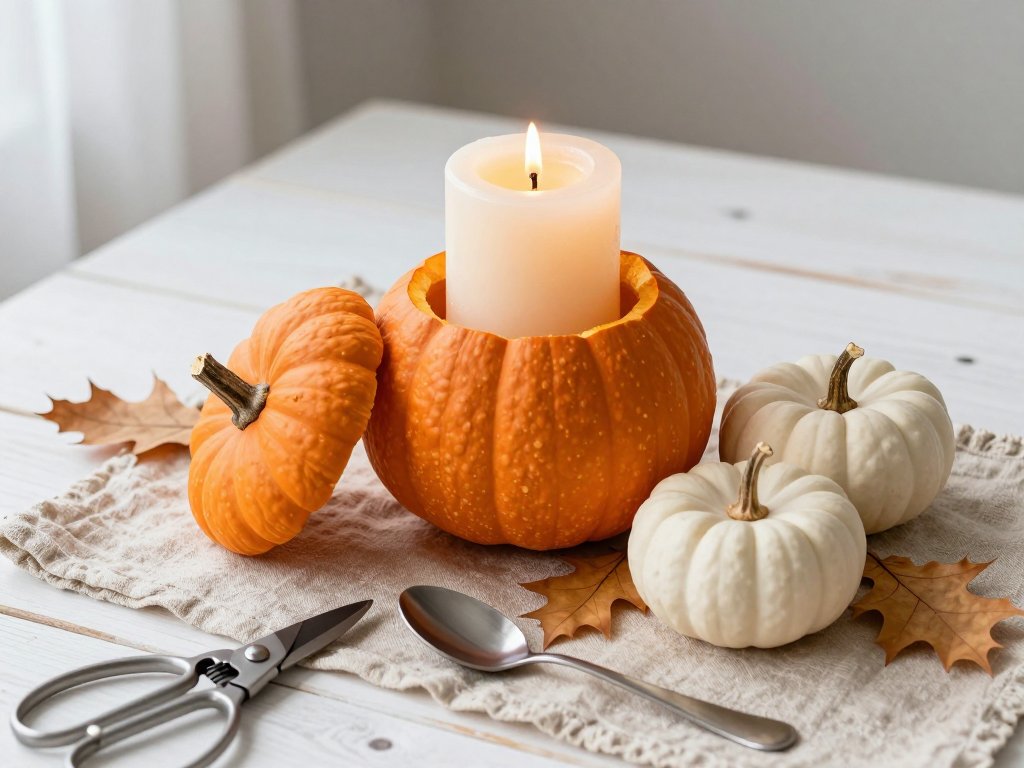
A glass cup or jar set inside is the best option. Choose a straight-sided drinking glass or a half-pint jar that drops in with a finger's width to spare. It is non-flammable, it catches every drip, and it lifts out for cleaning.
A foil liner is the second choice. Press heavy-duty foil against the inner wall and smooth it as flat as you can. It works, but creases channel melted wax sideways, and a torn corner lets wax reach the flesh.
Wax alone is not a barrier. Some tutorials tell you to pour a layer of melted wax inside and call it sealed. Hot wax against damp flesh pulls away as it cools, and the gap underneath is exactly where moisture collects.
Skip spray sealers, lacquer, and varnish. They off-gas near a flame, and some of them are flammable once cured inside a closed shell. Only seal what you can see, and only with something that will not burn.
Never line the inside with plastic. A candle flame and a plastic liner do not belong in the same enclosed space.
Sizing the Candle to the Cavity
Measure before you buy. The cavity's narrowest point is what matters, not its widest.
Choose a pillar roughly one inch smaller in diameter than the opening of your glass cup. That air gap lets you lift the candle out, lets heat escape, and stops the wax from fusing to the glass.
Height is where most builds go wrong. The flame tip should sit at least two inches below the pumpkin's rim.
A candle that stands too high scorches the rim within the first hour. The cut edge darkens, curls, and the lid will never seat again. It also throws soot onto the shell.
A candle that sits too low drowns. Melted wax pools above the wick, the flame shrinks, and it tunnels down one side or goes out entirely.
If the candle is short, raise it. Set it on an inverted glass of the right height, or on a bed of clean sand or rock salt inside the cup. Both are non-flammable and both hold a candle steady.
Trim the wick to a quarter inch before the first light. A long wick is the most common cause of a flame that smokes and gutters.
Making It Stand Still
A wobbling centerpiece is not a small problem. It is a candle moving while it burns.
Set the empty pumpkin on the table and press one corner. It should not rock. If it does, find where it lifts and shim that spot with a thin slice of cork or a folded piece of felt.
For a pumpkin that still wants to travel, seat it in a shallow dish with a ring of removable putty underneath. That holds it without marking the table.
A hidden base helps more than it sounds. A small tile or a wooden disc inside the bottom gives the candle a genuinely flat floor, which the inside of a pumpkin is not.
Check level before the candle goes in, not after. Sight across the rim from two directions, or rest a straight edge on top. Catching a lean now costs a minute. Catching it later costs the wax.
Once the candle is seated, look at it from the side, at table height. That angle shows a tilt your eye misses from above.
Burn Safety for a Real Flame
A candle inside a dried gourd is a short-lived display. Treat it like one.
Never leave it burning unattended, not even for a phone call in the next room. Never burn it near dried leaves, fabric, curtains, or a tablecloth with a loose hem.
Burn in stretches of an hour or two, then snuff it out. A real flame heats the shell from the inside, and a shell that stays warm for four hours softens at the rim.
Leave the lid off whenever the candle is lit. A closed pumpkin with a flame inside is a small oven with no vent.
Use a snuffer rather than blowing the candle out. Breath sprays fine wax droplets across the inside of the shell.
The low-risk option is an LED pillar, and it looks better than most people expect. Choose an amber flicker bulb in a pillar the same diameter as the wax one. It casts the same warm pool of light with no heat, no soot, and no timer anxiety.
For a house with small children or a long evening ahead, the LED is not a compromise. It is the sensible build.
Finishing Touches on the Pumpkin Itself
Keep the details on the object. The pumpkin is the centerpiece; it does not need help from the rest of the table.
Tuck one or two dried oak leaves against the base, flat on the surface. Two reads as intentional. A scatter reads as debris.
Wrap a narrow ribbon twice around the stem and knot it at the back, away from the flame side. A velvet ribbon holds better than satin, which slips.
Dust a little ground cinnamon on the outer shoulder of the pumpkin, not inside it. Warmth from the candle carries the scent without putting powder near the wick.
Rub the cut rim with a few drops of neutral oil on a cloth, then buff it off. The raw edge darkens to a warm brown and stops looking like a cut.
Go light on the oil. A heavy coat stays tacky, collects dust, and gives mould somewhere to start.
Variations Worth Building
The same method scales down and sideways.
Mini pumpkins as votive holders. Cut a two-inch opening, scoop with a teaspoon, and dry for two days. Drop a votive in a small glass votive cup inside. At this size the glass liner is not optional — the wall is too thin to take heat.
A tall gourd as a taper holder. Choose a firm, narrow-topped gourd and bore a shallow socket in the top, sized to the taper's base.
Line the socket with foil and set the taper in straight. Check the balance before you light it, because a taper leans further than a pillar.
An uncarved version, for anyone who does not want to cut. Leave the pumpkin whole. Set a small glass saucer with a votive on top of a squat, flat-topped pumpkin. The pumpkin becomes a pedestal, and it lasts for weeks instead of days.
Each variation keeps the same rule: a non-flammable cup between wax and flesh, and the flame well clear of any dried edge.
Storage and Reuse
A hollowed, dried pumpkin holds its shape for one to three weeks in a cool room. An uncarved one lasts longer, often a month.
When the shell starts to soften at the base or the skin wrinkles, retire it. Do not put a candle in a shell that gives under a thumb.
You cannot store a fresh hollow shell for next year. It dehydrates, shrinks, and moulds in storage, and freezing turns the flesh to mush that never recovers.
What you can reuse is the hardware. Lift out the glass cup, chip off the old wax, and wash it. The cup, the candle snuffer, and the base tile all come back next October.
Clean the spent shell out and compost it. Wax goes in the bin, not the garden.
Troubleshooting the Common Failures
White fuzz inside the shell. The wall was still damp when you sealed it. Scrape the affected area back to firm flesh, wipe with diluted white vinegar, and dry it another three days in open air.
A cracked rim. Usually a cut made with too much downward force, or a shell dried too fast near a heater. Trim the rim below the crack with a shallow saw cut and smooth the new edge.
A candle that tilts. The cup floor is not level, or the candle base is domed. Melt a few shavings of wax onto the cup floor and press the candle into them while they set.
A lid that will not seat. The cut faces have swelled or the original line was never level. Lay a sheet of fine sandpaper on the table and rub the lid's cut face flat against it.
A flame that gutters. Check the wick first, then the draft. A wick over a quarter inch, a gap under the cup, or a doorway breeze will all make a steady flame jump.
If the flame still struggles after those three checks, the shell is probably damp. Take the candle out and give it another few days.
Conclusion
One pumpkin, one candle, and a week of patience gets you a centerpiece that looks like it came from a shop and behaves like something you understand.
Do the drying properly and the rest is easy. The glass cup handles the mess, the measurement handles the flame, and the level check handles the wobble.
Build the first one plain, with a single candle and no ornament. Once you know how your pumpkin dries in your house, the leaves and ribbon take five minutes.
Then make a second, smaller one for the windowsill. It is the same hour of work, and it teaches you more about wall thickness than any guide can.