Introduction
I bought a bag of silk kimono scraps at a flea market for eight dollars and figured kinusaiga would be easy. The photos online make it look like coloring with cloth.
So I grabbed a sheet of packing foam, drew a mountain in pencil, and cut the lines with a dull utility knife. Too shallow. Too far apart.
I tucked the fabric in anyway, admired my work, and went to bed proud. Next morning, every single piece had popped back out. The panel looked like a cat had slept on it.
Two changes fixed it for good: grooves about 5mm deep, and a board that could actually hold a groove. That is the whole secret of this craft.
What Kinusaiga Actually Is
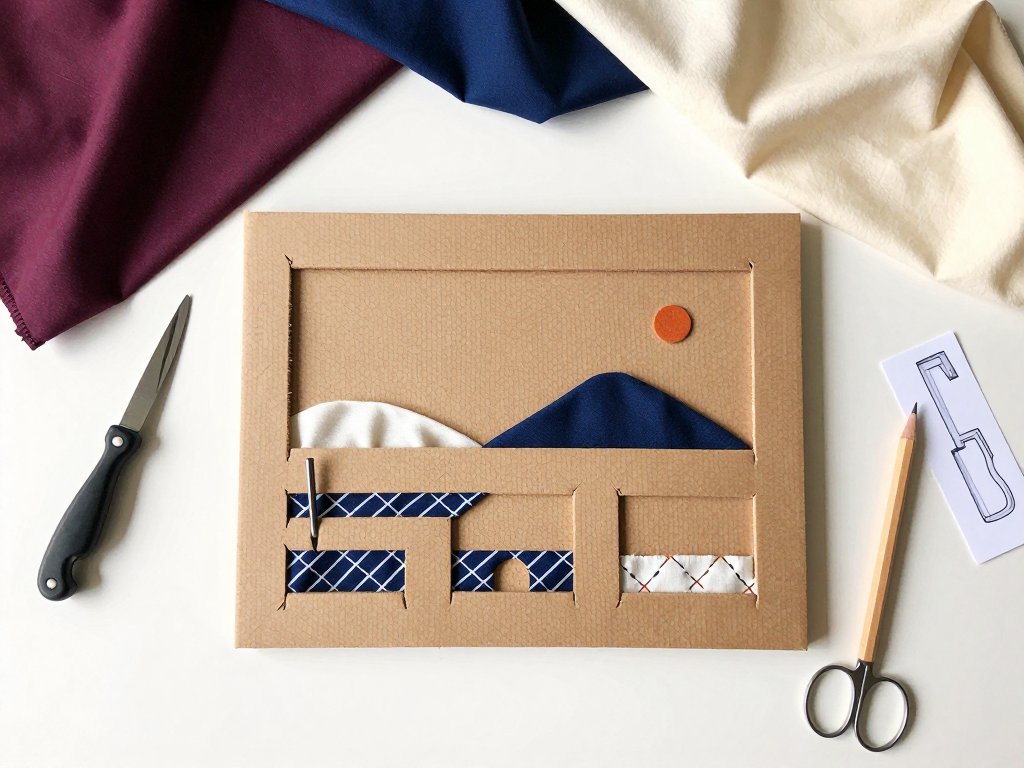
Kinusaiga is a Japanese folk craft that builds a picture by tucking fabric edges into narrow grooves cut into a board. There is no paint. There is no glue holding the surface.
The fabric tension does the work. Each tuck pins itself, and the picture holds because the cloth is stretched under tension against the walls of the groove.
It was revived in the Maebashi area of Gunma Prefecture, where a local teacher named Kuniko Kobayashi is credited with bringing the technique back to life in the 1980s. It grows out of older oshie traditions.
Those older oshie pieces were dimensional — padded, wrapped, layered with cotton batting. Traditional kinusaiga keeps that spirit but flattens it, using a wooden board and silk from old kimono.
Then there is the version sold in craft kits today: a simple foam board with pre-cut grooves, printed fabric sheets, and an awl. It is faster, cheaper, and far more forgiving.
Honestly, that kit version is where almost everyone should start. Traditional kinusaiga is a wooden board and silk. The kit is foam and cotton. Same technique, different budget.
What connects both to older textile arts is the raw material. This is a craft built from cloth that already had a life. Think of the kantha embroidery tradition in India, where old saris are layered and stitched into new cloth.
Kinusaiga and kantha are cousins in spirit. Both take worn fabric most people would toss and turn it into a picture or a texture that reads as deliberate art.
Materials: What You Need and What You Can Substitute
You need less than you think, and most of it probably lives in a kitchen drawer. Here is the honest list with the cheap swap beside every item.
- Board: traditional wood, or a 2cm foam packaging board, or a styrofoam tray for a tiny test piece.
- Craft knife or utility knife: a fresh blade matters more than a fancy handle. Snap off the dull segment.
- Awl or tucking tool: a chopstick, a nail, or a blunt knitting needle works fine for beginners.
- Pencil and tracing paper: for drawing the design at final size before it ever touches the board.
- Thin cardboard: a cereal box panel makes a reusable template if you plan to cut two or three panels.
- Fabric: old silk ties and scarves, kimono scraps, quilting cotton, or a thrifted silk blouse.
- Glue: clear-drying craft glue, used only to anchor the first pieces at the start.
Fabric weight matters more than fabric beauty. Mid-weight cloth tucks best: quilting cotton, silk noil, dupioni, and lightweight wool all grip a groove cleanly.
Thin habotai silk and slippery satin are gorgeous and miserable for a first panel. Save them for later, once your fingers know the tuck.
Shiny fabrics also show every lumped fold. Matte cloth forgives a beginner and photographs better in the finished frame.
The glue point trips people up. Glue is not what holds the surface. You use a dot at the start to keep a piece from sliding while you tuck.
Budget note: your whole first project can come in under $10. A foam board from a package costs nothing, thrifted silk is a few dollars, and a utility knife lasts for years.
If you own a knife and a board already, the per-project cost drops to nearly zero. That is the part I like most about kinusaiga.
Choosing Your First Design
The design is where beginners lose the most time. Pick something with 5 to 8 distinct closed shapes, no thin lines, and no tiny details.
Good first subjects: a simple landscape, a single flower, a pear, a cat silhouette, or one mountain. Each one breaks into fat, friendly shapes you can actually tuck.
Bad first subjects: faces, hair, lettering, feathers, branches, and anything with gaps narrower than a pencil line. Those grooves will not hold fabric.
To simplify, work in layers. Make the background one large piece, the mid-ground one or two shapes, and the subject the rest.
A mountain scene is three shapes: sky as background, mountain as mid-ground, and a sun or a tree as the subject. That is a complete picture with only three tucks to master.
Here is the rule that saves you: build from the back of the picture to the front. Background first, mid-ground next, subject and details last.
Making the Template and Transferring It
Draw your design at final size on paper. Do not scale it on the fly. The board does not shrink, and a 4-inch flower becomes a 4-inch flower.
Print or draw it, then tape the paper flat onto your board. Tape all four sides so nothing shifts while you cut.
Now transfer by cutting through the paper and into the board at the same time. One pass cuts the line and carves the groove in a single motion.
This is the trick that makes kinusaiga beginner-friendly. You never redraw, never guess where the line goes.
Keep your lines joined. Every shape must be enclosed so the fabric has a groove to wrap all the way around.
If a line runs off the edge of the board, fine — that shape is open to the edge and still tucks. But a shape floating with a broken outline will not hold.
Aim for each groove to land 3 to 5mm deep. Shallow grooves are the number one reason fabric pops out overnight, as I learned the hard way.
Cutting the Grooves
Hold the blade straight down. Not angled, not dragged. Straight, like you are stamping a line into the foam rather than slicing a loaf.
Make one clean pass. A second pass widens the groove and chews the edge, and a ragged groove grips worse than a narrow clean one.
Never cut all the way through the board. On a 2cm foam board you want a groove that stops well short of the backing. Cut through and the panel falls apart.
Test the depth with your fingernail. Press your nail into the groove. If the groove comes up to your nail tip, you are close. If it barely marks, go deeper.
The blade angle matters because a tilted cut makes a slanted groove. Fabric tucked into a slanted groove pulls free under the slightest tension.
Replace the blade the moment it starts dragging. A dull blade shreds foam, and shredded foam does not grip cloth.
Curved grooves are not harder than straight ones, but they need shorter cuts. Move the blade in many small presses around a curve instead of one long slice.
Corners are where grooves fail. Cut a hair past the corner point so the fabric has somewhere to sit, then tuck the corner last.
Extra grooves inside one shape are fine if you want texture, but skip them on panel number one. Every added line is another edge to tuck.
Tucking the Fabric: Step by Step
Once the grooves are cut, the picture is mostly done. Tucking is the satisfying part and it goes fast if you follow the order.
- Cut each fabric piece about 1cm larger than its shape on every side. You need enough cloth to reach into the groove.
- Start with a shape in the middle or a small accent piece. This is your practice tuck, and mistakes here cost nothing.
- Lay the fabric over the shape and push the raw edge into the groove with your awl. Press down and away from you.
- Work around the shape in one direction. Clockwise or counterclockwise, just stay consistent so the tension builds evenly.
- Tuck the last edge under the first. This hides the join and locks the piece so it cannot pull loose from one corner.
- Keep the surface smooth by stretching gently rather than bunching. If you see a fold, lift that edge and re-tuck it.
The tension idea is the whole craft in one sentence: the fabric holds itself in the groove. You are not gluing, you are wedging.
If a shape is very small, use tweezers to guide the edge. If a shape is very large, tuck the middle of one edge first, then walk outward.
Layer Order and Overlap
Tuck the background and the large planes first. That means sky, water, ground, and any wide flat area gets tucked before anything sits on top of it.
Then overlap the mid-ground pieces. Their edges disappear into the same grooves the background used, and the picture starts to read as depth.
Save small details for last. A tiny flower, a window, or a bird goes in after the big shapes are anchored and smooth.
Here is the elegant part: a single groove is shared by two neighbouring pieces. The background's edge and the subject's edge both live in that one line.
That shared groove is why kinusaiga looks clean. There are no seams and no stitching. Two colors meet inside one carved line.
You can also work the panel in zones. Finish the sky, stop, look at it from arm's length, then start the mountain. Your eye catches problems better between layers.
When you overlap, tuck the upper piece so it covers the raw edge of the piece below. If the lower edge shows, the join will look sloppy.
Troubleshooting: Six Problems and Their Fixes
Nearly every beginner hits the same six problems. Here is what each one means and how to fix it on the next pass.
- Fabric pulling out: your groove is too shallow. Cut deeper, to the 5mm mark, and re-tuck that piece. Depth beats glue every time.
- Fraying raw edges: seal the tuck line with a little clear glue, or switch to a tighter-weave fabric. Satin frays fast; quilting cotton holds.
- Puckered or lumpy surface: the piece was cut too big. Trim it down so it reaches the groove without folding over itself.
- Visible white gaps along a groove: you did not tuck deep enough, or the overlap is thin. Push the edge deeper and let the upper piece cover more.
- Thin silky fabric tearing: back it with fusible interfacing before cutting. The interfacing gives silk the body to survive a tuck.
- Design reading as a blur: too many small shapes for a first try. Redraw with fewer, larger shapes and the picture will suddenly make sense.
Pick one problem at a time and fix it on the next panel. I fixed my popping fabric first, then my fraying, then my blurry design.
By the fourth panel the fixes had become habits, and the work started looking like the pictures that got me into this craft in the first place.
Finishing and Displaying Your Panel
When the last piece is tucked, flip the panel over. Trim the excess fabric on the back to about a centimeter past each groove.
Do not trim flush. Leave enough overlap that nothing works loose, but not so much that the backing will not sit flat.
Glue a backing card over the finished back. Thin cardboard or mat board works. This covers the raw edges and stiffens the whole panel.
Now frame it. A shadow box is ideal because kinusaiga has slight dimension — the tucked edges catch light and cast tiny shadows.
A simple frame works too, but set the picture back from the glass. Fabric touching glass can trap moisture and stick to the surface over time.
Hang it out of direct sun. Silk fades, and a sunny wall will dull a hand-tucked panel within a season. A shaded hallway is kinder.
Add a felt or cork layer inside the frame if you want the panel to breathe. It also stops the board from rattling against the frame back.
If the picture is small, a picture ledge or a plate stand on a shelf displays it just as well as a hanging frame. Small panels read beautifully grouped in threes.
Cost and Time: What This Really Costs
Your first small panel takes roughly 2 to 4 hours. That is drawing, cutting, and tucking one simple design about 6 by 8 inches.
Most of that time is the template and the first two tucks. Once you feel the tension, the rest of the panel moves quickly.
Material cost per piece is near zero once you own a knife and a board. A thrifted silk blouse yields several panels of usable color.
Run the numbers and a finished hinged panel can cost you under a dollar in fabric. The board, if it came out of a package, cost nothing.
That is why this is one of the cheapest ways to make wall art from fabric remnants. You are not buying supplies, you are salvaging them.
The real investment is the knife blade and the hour you spend learning groove depth. Everything after that is nearly free.
Conclusion
Start with one simple shape. A single pear or one mountain is enough to learn the whole technique in an afternoon.
Your first panel will not be perfect. Mine popped out overnight and looked like a cat slept on it. That is a normal first attempt.
If it does pop out, cut deeper. If it frays, change fabric. If it blurs, redraw with fewer shapes. Those three fixes carry you a long way.
Buy the cheap scraps, use the foam board from your recycling, and tuck one piece of cloth into one groove tonight. Then tuck the next one.