Introduction
There's something special about the Fourth of July, isn't there? The smell of burgers on the grill, the sound of kids laughing in the sprinkler, and that warm golden light just before dusk when everybody gathers on the porch with a sparkler in one hand and a cold drink in the other.
It's my favorite kind of holiday — low-pressure, full of good food, and completely about togetherness.
But I'll be honest with you: between wrangling little ones, figuring out what to bring to the block party, and making sure we have enough bug spray and sunscreen, the last thing I have time for is complicated decorating.
I need projects that I can actually finish — ideally in a single nap time, or while the kids are happily watching their Saturday morning cartoons.
And I need them to not break the bank, because July is expensive enough without adding a craft-store splurge to the mix.
That's exactly why I put together this collection of six patriotic craft ideas. Every single one is beginner-friendly, family-approved, and designed to fit into a real, busy life.
Some take fifteen minutes. Others are perfect for an afternoon of crafting side by side with your kids.
All of them will make your home feel festive and welcoming — because you deserve to enjoy the holiday too, not just stress about it.
Before we dive in, I want to point you toward two tools that have saved me countless times.
First, our Color Palette Generator — if you're ever unsure which shades of red, white, and blue work best together, plug in your starting color and let it do the heavy lifting.
And second, the Craft Budget Calculator — I honestly use this before every project trip.
It keeps me from buying five extra things I don't need and helps me see at a glance how much each centerpiece or wreath really costs.
Total game-changer.
Alright, my friend. Grab your coffee (or your iced tea — it's almost July, after all), and let's get crafting!
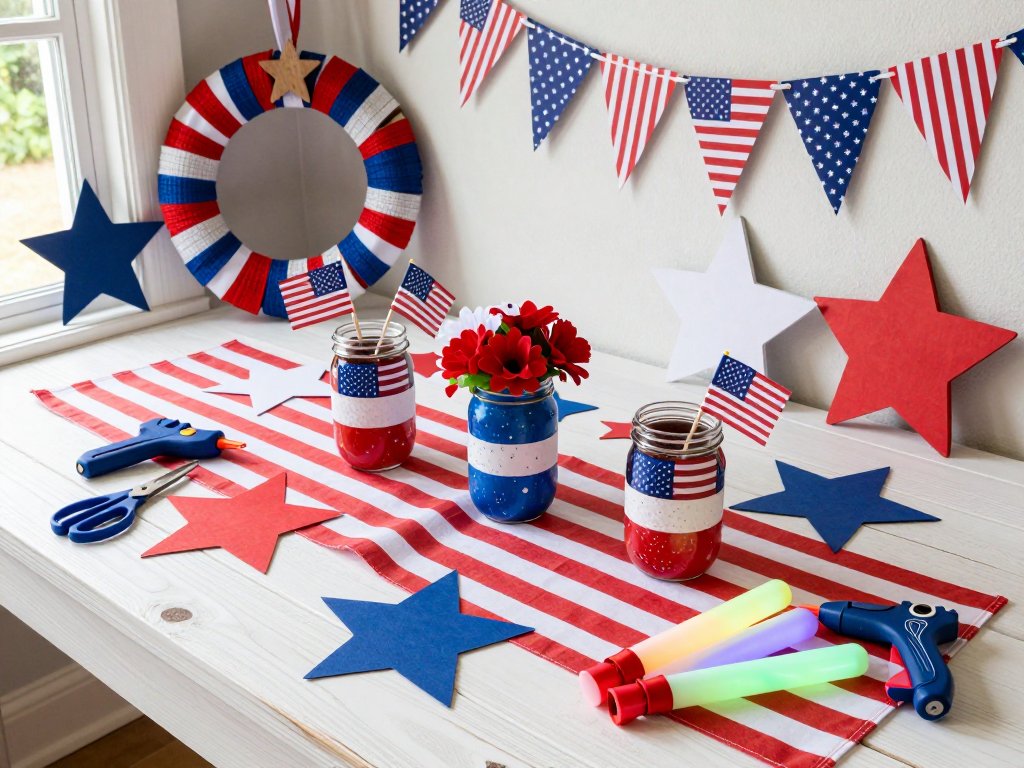
1. DIY Striped Napkins or Table Runner
Let me tell you about the easiest tablescape upgrade you will ever make. It costs next to nothing, takes less than an hour from start to finish, and looks so polished that guests will assume you ordered it from some fancy catalog. I promise I'm not exaggerating.
Here's the secret: you start with plain white fabric. Cotton muslin, an old white bedsheet you no longer use, a flat-woven dish towel — anything with a clean, simple weave works beautifully. Then you create red and blue stripes using either fabric paint or washi tape.
The Washi Tape Method (No-Sew, No-Mess, Kid-Friendly)
This is hands-down my favorite approach when I want the kids to help. You'll need plain white fabric (I buy a yard of cotton muslin at the craft store for about $3–$4), a ruler or measuring tape, scissors, and patriotic washi tape — red, blue, and maybe a silver or gold accent if you're feeling fancy.
A roll of good-quality washi tape runs about $3–$5, and a single roll goes a long way.
Lay your fabric flat on a table. Use the ruler to mark where you want your stripes — I like alternating wide white bands with narrower red and blue stripes, but honestly, any pattern works.
Then just press the washi tape down along your lines. That's it. If you're making napkins, cut your fabric into squares first (roughly 18 by 18 inches), then tape the edges in a striped pattern.
For a table runner, cut a long rectangle about 14 inches wide and as long as your table, then tape stripes running the length of the fabric.
The best part? Washi tape is repositionable, so if a stripe goes crooked — and with little helpers, some will — you just lift it up and try again. Zero frustration, zero waste.
The Fabric Paint Method (More Permanent, Still Easy)
If you want something that will hold up to washing, fabric paint is the way to go.
You can buy small bottles of red, white, and blue fabric paint for about $3–$4 each, or a multipack for around $10.
Use painter's tape to mask off clean stripes on your fabric, then let your kids brush the paint inside the taped sections.
Peel the tape off while the paint is still slightly wet to get crisp edges, and let everything dry according to the paint instructions — usually 24 to 72 hours before washing.
I made a set of striped napkins using this method two summers ago, and they're still going strong.
They've survived multiple barbecues, a spilled grape juice incident, and a run through the washing machine.
The paint doesn't fade, the stripes stay sharp, and every time I pull them out for a cookout, I smile remembering my daughter carefully painting the blue stripe while wearing a paint smock three sizes too big.
Estimated cost: $5–$12 for fabric and tape or paint, depending on what you already have. If you're using an old sheet — free!
2. Red, White, and Blue Mason Jar Centerpieces
I am convinced that mason jars are the craft equivalent of a little black dress. They work for everything. Weddings, holidays, everyday centerpieces — and yes, they are absolutely perfect for the Fourth of July.
For this project, you'll need a few clean mason jars (any size). If you don't have any on hand, a 12-pack of pint-sized jars runs about $10–$12 at the grocery store, and then you have jars for canning tomatoes later — multitasking at its finest.
You'll also want artificial flowers in red, white, and blue (a bundle from the Dollar Store costs $1.25 each, and three bundles will give you plenty), small American flags on sticks (I found a pack of 12 for $3 at the Dollar Store), and some filler like baby's breath or eucalyptus sprigs.
Here's where you can make it as simple or as fancy as you like.
The Quick Version: Fill each mason jar about a third of the way with red and blue tissue paper or shredded paper (blue at the bottom, white in the middle, red on top — get it?
Stars and stripes). Tuck in your artificial flowers and a couple of mini flags. Tie a piece of red, white, or blue raffia or baker's twine around the neck of the jar.
Place them down the center of your picnic table, light a few tea lights in plain glass holders between them, and you're done.
Five minutes per jar, tops.
The Elegant Version: Paint the mason jars first. Use frosted-glass spray paint in a translucent blue or red (about $6 a can) and give each jar a light coat.
Or wrap them in burlap ribbon secured with hot glue, then add a star-shaped button or wooden star on the front.
Fill with flowers, add a flag, and set them on slices of wood or a simple white tray.
This version takes a bit longer — about 30 minutes per jar including drying time — but the result is genuinely stunning.
The Budget-Savvy Version: Skip the flowers entirely and use only mini flags and red, white, and blue striped straws in each jar. Add a battery-operated tea light at the bottom for a soft glow. Total cost per centerpiece? Maybe 75 cents.
I love that this project scales to whatever your table looks like. Two jars for a small family dinner, six for a big block party, or one on the kitchen counter just because it makes you happy.
Use the Craft Budget Calculator to figure out exactly what your centerpiece spread will cost before you head to the store — it's saved me from buying "just one more bundle of flowers" more times than I can count.
Estimated cost: $3–$8 per jar, depending on paint, flowers, and whether you already own the jars.
3. Star-Spangled Dollar Store Wreath
I will never tire of hearing someone say, "Wait, you made that?" when they see a Dollar Store wreath on my front door. This project has become my July tradition, and every year I tweak it just a little. It's genuinely one of the most satisfying crafts I know.
Here's what you need from the Dollar Store (or your local discount craft aisle): a plain foam or grapevine wreath form ($1.25), about three bundles of red, white, and blue artificial flowers or stem picks ($1.25 each), a package of wooden or foam stars ($1.25), a sheet of red or blue burlap ribbon or mesh ($1.25), and a hot glue gun with glue sticks (if you don't own one, a basic glue gun is about $5 and you'll use it forever).
Total investment: about $6–$7 plus the glue gun if you need one.
Start by wrapping your wreath form with burlap ribbon or patriotic mesh — just wind it around, securing the ends with a dab of hot glue.
This gives your wreath a nice full base. Then snip the flower stems down to about two to three inches and start arranging them around the wreath.
I like to cluster them in groups — a little cluster of blue flowers at the top left, red flowers at the bottom right, white flowers scattered throughout — rather than spacing them evenly.
It looks more intentional and organic.
Glue the stars on top of the flowers or directly onto the ribbon. You can paint them first if they're unfinished wood — a quick coat of red and blue acrylic paint (about $1 per bottle) adds so much personality.
Add a length of ribbon at the top for hanging, and you're done.
The whole project takes about 45 minutes, and about 40 of those minutes are just arranging and rearranging flowers until they look right (which is honestly the fun part). Hang it on your front door, above the mantel, or on a garden fence.
One thing I love about this wreath: since everything came from the Dollar Store, I don't worry about it getting rained on or sun-faded.
If it gets a little worn by the end of the holiday weekend, I just make a new one next year.
No guilt, no pressure, just a cheerful front door that says "Welcome, and happy birthday, America!"
Estimated cost: $6–$12 (under $10 if you already have a glue gun).
4. Painted Wooden Star Decorations
These stars are my secret weapon. I use them indoors, outdoors, on the porch, at the party — they're endlessly versatile and incredibly forgiving to make. If your kids are anything like mine, they'll want to paint every single star in the bag, and that's a wonderful thing.
You can find unfinished wooden stars at craft stores and Dollar Stores in every size imaginable.
A bag of six small stars (about 4 to 6 inches across) costs $2–$4. Larger individual stars — the kind you'd hang on a wall or display in your yard — are usually $3–$6 each.
I grab a mix of sizes so I have options.
Set up a painting station with red, white, and blue acrylic craft paint (about $1 each at a discount store) and some foam brushes or regular paintbrushes.
Lay down newspaper or a vinyl tablecloth, put the kids in clothes you don't mind getting messy, and let everyone paint their own stars.
Some will be solid red, some blue, some a cheerful mix of colors and handprints, and some — if you have a toddler like mine — will end up an indistinguishable but very enthusiastic shade of purple.
They're all beautiful.
Once the paint is dry (a couple of hours, less if you use a hairdryer on low), you have options.
Glue two stars of different sizes together at an angle for a 3D effect. Add a loop of jute twine or ribbon on the back for hanging.
Write the year on one star — it becomes a sweet little keepsake. Attach wooden stars to a longer piece of twine to make a garland.
Or simply prop them on the mantel, on a bookshelf, or in a window.
For outdoor use, I recommend sealing them with a clear acrylic sealer spray (about $5 a can, and one can will cover dozens of stars). It protects against rain and sun and means your stars can live on the front porch or in the garden all through July.
If you want to coordinate colors across all your decorations, pull up our Color Palette Generator before you start painting.
Just enter "patriotic red" or "navy blue" as your base and let it suggest complementary shades.
I discovered a gorgeous soft denim blue that way last year — it paired beautifully with a bold cherry red and kept the whole display from feeling too loud.
Estimated cost: $3–$10 total, depending on the number and size of stars you buy.
5. Simple Festive Paper Banner
I know, I know — paper banners are everywhere on Pinterest. But there's a reason for that.
They're fast, they're almost free, and they make a room feel like a party in about fifteen minutes.
Plus, this is the perfect project for kids who are old enough to use scissors safely — or for you to do while supervising the little ones in the sprinkler.
You'll need scrapbook paper in red, white, and blue patterns. Scrapbook stores and craft stores sell individual sheets for about 60 cents to $1 each, and you'll need maybe six to eight sheets total.
Look for paper with stars, stripes, gingham patterns, or just solid colors. You'll also need twine or baker's string (about $2 for a large spool) and either double-sided tape, a glue stick, or clothespins.
Cut each sheet of paper into triangles — the classic banner pennant shape. A simple trick: fold the paper in half, cut a diagonal from the bottom corner to the top center, and you get two perfectly symmetrical pennants at once.
No template needed. If you want perfectly identical flags, cut a cardboard template first and trace around it.
But honestly? I rarely bother. The slight variations in size and shape make it look handmade and charming.
Arrange your pennants in a pattern you like — I do red, white, blue, red, white, blue — and attach them to the twine.
If you're using tape, fold the top edge of each pennant over the string and tape it in the back.
If you're using clothespins, just clip each pennant to the string. Clothespins are actually my favorite method because (a) my kids can do it themselves, (b) it's easy to rearrange, and (c) the little wooden clothespins add a rustic touch that I love.
Hang your banner across a window, along a fence, above the dessert table, over the grill area — anywhere you want a pop of festive color.
And the best part? When the party's over, you can just fold up the pennants and reuse them next year, or recycle the paper.
No storage headaches.
Estimated cost: $4–$8 for paper and twine. Even less if you already have scrapbook paper in your stash.
6. Sparkler and Glow Stick Party Favors for Kids
Let's be real for a moment. The absolute highlight of the Fourth of July for children is not the bunting or the perfectly arranged centerpieces.
It's the glow-y, sparkly, magical moment when the sun goes down and suddenly everything lights up.
I lean into this hard every year, and I've found a few tricks that make it special without spending a fortune or causing stress.
Sparkler Safety Station: If your kids are old enough for sparklers — usually around age six or older, with close supervision — set up a sparkler station on a flat, non-flammable surface like a concrete patio slab or a metal tray.
Have a bucket of water or sand nearby for used sparklers. You can buy boxes of sparklers at party supply stores or online for about $5–$10 for a box of 50 to 100.
What I do is bundle three or four sparklers together with a red, white, or blue ribbon and a little tag that says "Light up the night!" — instant party favor that doubles as an activity.
Glow Stick Party Favor Bags: For the littlest ones — and honestly, for kids of all ages — glow sticks are the safer, longer-lasting alternative.
A bulk pack of 50 to 100 glow sticks costs $8–$12 online or at a party store.
You can also find glow stick bracelets, necklaces, and glasses in patriotic colors for about $5–$8 per pack.
Here's what I do: I pick up small cellophane treat bags from the Dollar Store ($1.25 for a pack of 25).
In each bag, I put two or three glow sticks (snap them to activate, then drop them in), a glow bracelet, and a small American flag.
I tie the bag shut with red or blue curling ribbon and stack them in a basket by the door.
As families leave the barbecue or as the evening starts to darken, I hand them out.
Instant delight, zero mess, and the kids stay visible in the dark — a win for everybody.
You can also fill clear plastic cups with glow sticks and place them along a walkway or around the patio for an easy, no-electricity lighting effect that kids absolutely adore.
Estimated cost: $5–$15 for a group of 10 to 20 kids. That's about 50 cents to $1.50 per child.
Bringing It All Together
So here's what your July 4th could look like, from a craft perspective, without spending more than $30–$40 total and without spending more than an afternoon making everything:
- A front door wreath that makes you smile every time you come home.
- A festive table runner your kids helped make (and will proudly point out to every guest).
- Mason jar centerpieces running down the middle of the picnic table.
- Wooden stars on the mantel, on the porch steps, or tucked into potted plants.
- A cheerful paper banner hanging across the fence or the dessert table.
- A basket of glow party favors ready to hand out when dusk falls.
That's not a Pinterest fantasy. That's an achievable, real-life Tuesday-afternoon-with-kids reality. And the whole thing comes from places like the Dollar Store, your scrap paper stash, and a few basic craft supplies you probably already have or can pick up for pocket change.
I want to remind you of something important, friend. The goal of these crafts is not perfection.
The goal is not to have a home that looks like a magazine spread. The goal is to create a warm, welcoming space where your family and friends can gather, eat too much potato salad, laugh at old stories, and feel grateful to be together.
If your table runner stripes are a little wobbly — good. That means little hands helped.
If your wreath has more hot glue than flowers on one side — that's a secret, and nobody will notice.
If your painted stars are a little messy — they're full of love, and that's the only ingredient that matters.
Before you head to the store, do me a favor. Open the Craft Budget Calculator and plan your spending so you don't overshoot.
And if you're feeling unsure about color combos, the Color Palette Generator is right there waiting for you.
These tools exist so you can spend less time worrying and more time enjoying.
Wishing you the coziest, loveliest, most joyful Fourth of July. May your burgers be perfectly grilled, your watermelon be perfectly sweet, and your crafts be perfectly — imperfectly — you.
Happy crafting, and happy birthday, America!
— Clara