Introduction
There is something almost magical about candle making. You start with a handful of simple ingredients — wax flakes, a wick, a few drops of fragrance — and end with something that can set the mood of an entire room.
Lighting a candle you made yourself feels different. The flame seems brighter, the scent sweeter, the glow somehow more personal.
And here is the best part: making soy candles at home is remarkably easy. It requires no special skills, no expensive equipment, and no chemistry degree.
If you can melt butter on the stove, you can make a candle. In fact, the entire process, from setup to pouring, takes about thirty minutes of active time.
The hardest part is waiting for the wax to cure — and that is just an excuse to plan your next candle.
Whether you are looking for a new hobby, a way to create personalized gifts, or simply want to fill your home with natural, non-toxic scents, soy candle making is a craft that rewards patience with beauty.
Let us walk through everything you need to know to make your first candle — and make it well.
Why Soy Wax?
Before we get into the process, you might be wondering why soy wax is the recommended choice for beginners. The short answer is that soy wax is forgiving, natural, and performs beautifully.
Soy wax is made from hydrogenated soybean oil, which means it is a renewable, plant-based resource.
Unlike paraffin wax, which is derived from petroleum, soy wax burns cleanly and produces very little soot.
This makes it a healthier choice for your home, especially if you or your family members have allergies or respiratory sensitivities.
Soy wax also has a lower melting point than paraffin, which means it is safer to work with — less risk of burns if you accidentally splash — and your candles will burn longer and cooler.
A soy candle typically burns 30 to 50 percent longer than a paraffin candle of the same size.
That means more hours of enjoyment from each candle you make.
Another wonderful quality of soy wax is its excellent fragrance throw. While the scent may be slightly more subtle than paraffin at first, soy wax holds and releases fragrance oils beautifully, filling a room with a gentle, even aroma rather than an overwhelming blast.
For many candle enthusiasts, this subtlety is exactly what makes soy the superior choice.
What You Will Need
One of the reasons candle making is so accessible is that the supply list is short and most items are easy to find. Here is everything you need to get started:
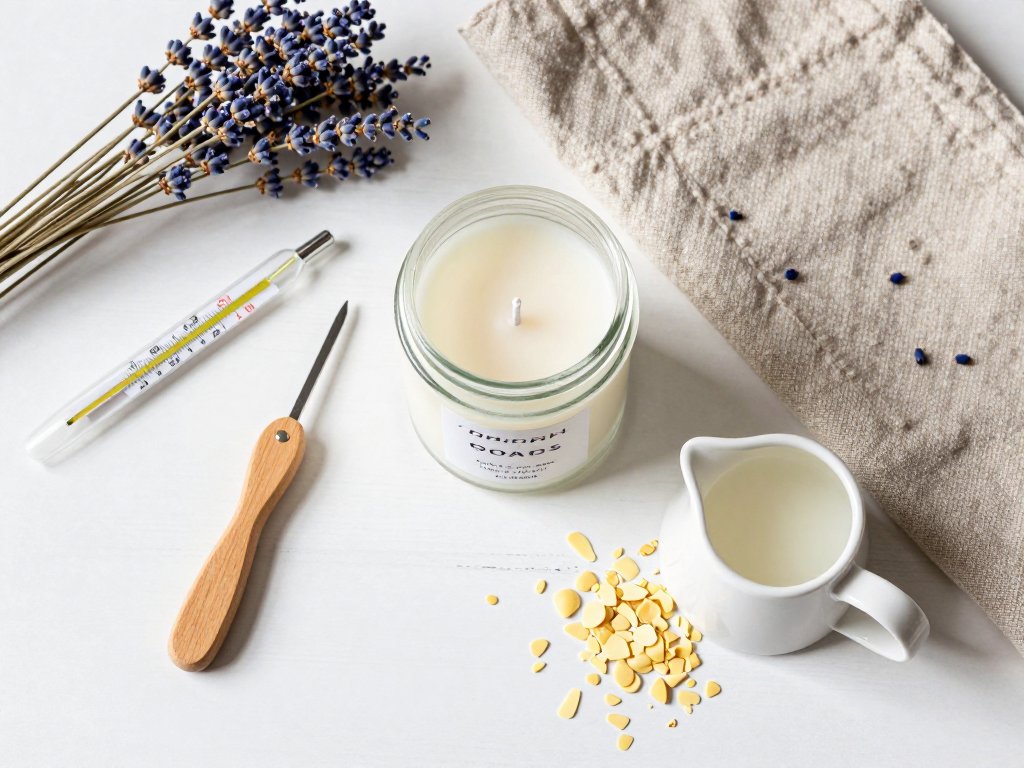
Soy wax flakes. Look for container soy wax, which is formulated specifically for candles poured into jars or tins. A one-pound bag will make two to three 8-ounce candles. You can find it at most craft stores or online.
Candle wicks. Choose pre-tabbed wicks designed for soy wax. The size of the wick matters: too small and the candle will tunnel (melt only in the center), too large and it will burn too hot.
For an 8-ounce jar, a medium cotton wick is usually perfect. Many starter kits include a variety pack so you can experiment.
Containers. Glass jars, ceramic vessels, or metal tins all work beautifully. Mason jars are a classic choice — they are inexpensive, widely available, and have a charming farmhouse aesthetic. Make sure your container is heat-safe and clean before you begin.
A melting pitcher or double boiler. A dedicated pour pitcher made of heat-resistant glass or stainless steel is ideal.
You can also use a clean tin can placed in a saucepan of simmering water — a true double boiler setup.
Do not use your regular cooking pots directly, as wax can be difficult to clean off.
A thermometer. A candy or deep-fry thermometer is essential for monitoring wax temperature. Getting the temperature right is the key to a smooth, crack-free candle surface.
Fragrance oils. Choose oils specifically labeled for candle making. These are designed to bind with wax and release scent evenly as the candle burns. Avoid essential oils for your first few candles — they behave differently in wax and can be tricky to work with.
A wick holder or skewers. You will need something to hold the wick centered and upright while the wax cools. Two wooden skewers or pencils laid across the top of the jar work perfectly.
Optional but helpful: A heat gun or hair dryer for smoothing the candle surface, wick stickers or a dot of hot glue to secure the wick to the bottom of the jar, and a kitchen scale for measuring wax by weight.
Step-by-Step: Your First Soy Candle
Now for the fun part. Here is how to make a beautiful, clean-burning soy candle from start to finish.
Step 1: Prepare Your Workspace
Cover your work surface with newspaper or parchment paper. Soy wax can be messy, and while it cleans up easily with soap and hot water, prevention is always easier than cleanup.
Set out all your supplies within easy reach. Make sure your jars are clean and dry, and attach the wicks to the bottom center of each jar using wick stickers or a small dab of hot glue.
The wick should stand straight up in the center of the jar.
Step 2: Measure and Melt the Wax
Measure your soy wax flakes by weight using a kitchen scale. A good rule of thumb is that 1 cup of wax flakes equals about 4 ounces by weight, but measuring by volume is less precise than weighing.
For an 8-ounce jar, you will need about 6 ounces of wax — the jar's total volume is not all usable because the wax will not fill it to the absolute brim.
Place the wax flakes in your melting pitcher and set the pitcher in a saucepan filled with about 2 inches of simmering water.
Heat gently over medium-low heat. Stir occasionally with a chopstick or silicone spatula. Watch the temperature carefully — soy wax should be heated to between 170°F and 180°F, but never above 200°F.
Overheating can cause the wax to discolor or even catch fire, so keep that thermometer handy.
Step 3: Add Fragrance
Once the wax is fully melted and has reached 170-180°F, remove the pitcher from the heat. Allow it to cool slightly to about 160-165°F before adding your fragrance oil. Adding fragrance at the right temperature ensures it binds properly with the wax.
The standard fragrance load for soy wax is about 1 ounce of fragrance oil per pound of wax (roughly 6 percent).
For a 6-ounce batch of wax, use about 0.4 ounces (roughly 1 teaspoon) of fragrance oil.
Pour the oil into the melted wax and stir gently but thoroughly for 30 to 60 seconds.
You want the fragrance fully incorporated without introducing too many air bubbles.
Step 4: Pour the Wax
Let the wax cool to about 135-140°F before pouring. Pouring at the right temperature prevents cracking, sinking, and separation.
Slowly pour the wax into your prepared jar, holding the pour pitcher close to the jar to minimize splashing.
Fill the jar to about half an inch below the rim — this leaves room for the candle to pool properly when lit.
Pour slowly and steadily. A gentle pour introduces fewer air bubbles and produces a smoother surface. If you do see bubbles rising to the surface, you can gently tap the jar on the counter to release them before the wax sets.
Step 5: Center the Wick and Let It Set
Use your wick holder or skewers to hold the wick perfectly upright and centered. The wick should not touch the sides of the jar — if it does, it will create a hot spot that can crack the glass or cause uneven burning.
Now comes the hardest part: waiting. Let the candle sit undisturbed for 24 to 48 hours.
Yes, it will look solid after just a few hours, but the wax needs time to fully crystallize and bond with the fragrance.
Burning a candle before it is fully cured can result in a weak scent throw and a shorter burn time.
Patience is the secret ingredient in candle making.
Step 6: Trim the Wick and Enjoy
Once the wax is fully set, trim the wick to about a quarter of an inch above the wax surface. A wick that is too long will produce a tall, smoky flame and excess soot. A quarter inch gives you a clean, steady flame and a full melt pool.
Light your candle and let it burn until the melted wax reaches the edges of the jar — this first burn is critical.
If you extinguish the candle before the melt pool reaches the edges, the candle will tunnel, creating a ring of unmelted wax around the sides that will never burn properly.
The first burn can take 2 to 4 hours depending on the size of your jar, so plan accordingly.
Troubleshooting Common Candle Problems
Even experienced candle makers encounter issues from time to time. Here are some common problems and how to fix them:
Tunneling. If your candle burns only in the center, leaving a ring of unmelted wax around the edges, the wick is too small for the container. Try a larger wick next time, or ensure your first burn is long enough to create a full melt pool.
Frosting. White, crystallized patches on the surface of soy candles are called frosting. This is a natural property of soy wax and does not affect the burn quality.
To minimize frosting, pour at a slightly cooler temperature (around 130°F) and avoid rapid cooling.
Some candle makers embrace frosting as part of soy's natural charm.
Sinking. A well or crater in the center of the candle surface after cooling is caused by trapped air and uneven cooling.
Prevent this by pouring at the right temperature and tapping the jar gently to release air bubbles.
If a sinkhole appears, you can do a second pour: melt a small amount of wax, let it cool to 135°F, and pour it into the sinkhole.
Let it set for another 24 hours.
Weak scent throw. If your candle smells wonderful when unmelted but barely noticeable when burning, the fragrance load may be too low, the wax may have been poured too hot, or the candle was not cured long enough.
Try increasing the fragrance oil to 1 ounce per pound, pouring at 135-140°F, and curing for a full 48 hours.
Rough or bumpy surface. A textured top can result from pouring too cool or cooling too quickly. Use a heat gun or hair dryer on low to gently warm the surface, smoothing it as it remelts. This technique, called a "touch-up pour," gives your candle a professional, glass-smooth finish.
Designing Your Signature Candle
Once you have mastered the basic process, the creative possibilities open up. Here are some ways to make your candles uniquely yours:
Layered candles. Pour a layer in one color and scent, let it set for an hour, then pour a second layer in a complementary color and scent. Lavender and chamomile, vanilla and sandalwood, or citrus and mint are wonderful combinations. Each burn reveals a new fragrance note.
Botanical accents. Embed dried flowers or herbs in the wax for visual beauty. Lavender buds, rose petals, or dried chamomile look stunning suspended in clear soy wax.
Be careful not to add too many botanicals near the wick, as they can become fire hazards.
Keep decorations at least half an inch from the wick.
Custom containers. Thrift stores are treasure troves for unique candle vessels. Vintage teacups, small ceramic bowls, apothecary jars, and even heat-safe glassware make beautiful, one-of-a-kind candle containers. Just make sure they are oven-safe if you plan to heat them, and always leave a half-inch of headspace for safety.
Gift sets. Pair a small soy candle with a handmade match striker (a small ceramic tile with a rough surface) and a bundle of wooden matches tied with twine.
Package in a simple box with a handwritten label that includes the scent name and burn time.
These make thoughtful, personal gifts for housewarmings, holidays, or just because.
Safety First
Candle making is a safe and enjoyable craft, but it does involve hot wax and open flames. A few important safety reminders:
Never leave melting wax unattended. Stay in the kitchen while the wax is on the stove.
Keep a lid nearby to smother any wax fires — never use water to extinguish a wax fire, as it will cause the wax to splatter and spread the flames.
Keep your workspace clear of flammable materials like paper towels, fabric, and loose packaging. And always trim the wick to a quarter inch before each burn to prevent excessive flame height and soot.
Label your candles with the wax type, fragrance, and date made. This is especially important if you are giving candles as gifts — the recipient will know what they are burning and how long it has been cured.
Include a simple burning instruction tag: "Trim wick to 1/4 inch before each burn. Burn within sight.
Keep away from children and pets. Discontinue use when 1/2 inch of wax remains."
Conclusion
There is a reason candle making has become one of the most beloved home crafts. It is accessible, rewarding, and produces something genuinely useful and beautiful. Every candle you pour is a small act of creation — a transformation of simple ingredients into light, warmth, and memory.
Your first candle may not be perfect. The surface might have a small frost patch, the scent might be a little subtle, the wick might need adjusting.
That is perfectly okay. Every candle maker started exactly where you are now, learning with every pour.
The joy is in the process as much as the result — the quiet focus of measuring and melting, the anticipation of watching the wax set, and finally, the pride of lighting something you made with your own hands.
So go ahead and melt that first batch of wax. Pick a scent that makes you happy — vanilla, lavender, fresh linen, or warm apple cider.
Choose a jar that feels special. And know that you are not just making a candle.
You are making a moment, a mood, a small piece of warmth that you can light whenever you need it most.