Introduction
There is something almost magical about placing a handmade crown on a child's head and watching their face light up.
In a world of mass-produced party decorations and disposable everything, a felt birthday crown offers something different: it is intentional, personal, and built to last.
It says, "You are special, and I made this just for you."
This project has deep roots. The tradition of birthday crowns reaches back centuries to Scandinavia, where children wore decorated wreaths called födelsedagskrona on their special day — a symbol that the child was king or queen for a day.
In Denmark, the custom spread through bakeries that tucked paper crowns around cakes, and in Germany, the Geburtstagskrone became a staple in kindergartens.
Today, felt birthday crowns have evolved into a beloved DIY project that combines historical charm with modern practicality.
Whether you are sewing for a first birthday, a fifth, or a fiftieth, this tutorial walks you through everything you need to create a beautiful, reusable felt crown.
You do not need advanced sewing skills — just a little patience, a few basic supplies, and the willingness to try something new.
I promise the result will be treasured far longer than any store-bought alternative.
Why Felt Is the Perfect Material for Birthday Crowns
Felt has been a staple of Nordic crafting for generations. Boiled wool felt — valkfelt, as it was known in traditional Scandinavian textile work — was valued for its durability, warmth, and the fact that it does not fray.
Modern craft felt shares these same qualities, making it an ideal material for a project that will be worn, hugged, dropped, and possibly even napped in before the birthday candles are blown out.
Felt offers three distinct advantages for crown making. First, its edges do not unravel, which means you can cut intricate shapes — points, scallops, stars, even tiny animal ears — without hemming or finishing seams.
Second, felt holds its shape beautifully. A well-made felt crown stands upright on its own, creating that regal silhouette that makes a child feel truly special.
Third, felt is forgiving. If you make a cutting mistake, you can usually patch it or redesign on the spot without wasting material.
You have several felt options to consider. Wool-blend felt, typically a mix of 35 to 60 percent wool with rayon or viscose, offers the best balance of softness, durability, and cut quality.
It costs more than acrylic felt but produces a crown that will last for years and pass down to younger siblings.
Acrylic craft felt, available at any craft store for about fifty cents per sheet, works perfectly for beginners and for crowns that may get heavy use and need replacing.
Velour felt adds a plush, velvet-like texture that looks especially elegant for milestone birthdays or adult crowns.
What You Will Need
One of the best things about this project is how few supplies it requires. You likely already own most of these items.
Essential supplies: Two sheets of felt in your chosen colors — one for the crown base and one for the front layer or decorative cutouts.
A third sheet in a contrasting color adds visual interest but is optional. Fabric scissors that are sharp and dedicated to fabric only — using paper-scissors on felt dulls them quickly and produces ragged edges.
A sewing needle and thread in a matching or contrasting color. Small Velcro dots or a length of narrow elastic for the closure.
A small amount of polyester fiberfill if you want the crown points to be lightly stuffed.
Straight pins or fabric clips for holding layers together while you sew. A water-soluble fabric marker or tailor's chalk for tracing your template.
Optional embellishments: Embroidery floss in coordinating colors for decorative stitching along the crown edge. Seed beads, sequins, or small buttons for added sparkle.
Felt scraps in various colors for appliqué shapes — stars, hearts, numbers, or the birthday child's initial.
A hot glue gun can speed up the process, though hand-sewing creates a more durable heirloom piece.
For a truly Scandinavian-inspired crown, consider adding small fabric flowers made from felt or ribbon.
Creating Your Crown Template
Before you cut into your felt, you need a template. Do not skip this step — a good template is the difference between a crown that sits proudly upright and one that flops sideways five minutes into the party.
Start by measuring the head of the person who will wear the crown. For a child aged one to three, the head circumference typically measures about eighteen to nineteen inches.
For ages four to eight, expect nineteen to twenty inches. Adult heads average twenty-one to twenty-two inches.
Add one inch to your measurement for the overlap where the closure will attach.
On a piece of stiff cardboard or a cereal box, draw a rectangle the length of your head measurement plus one inch, and about five to six inches tall.
This height works well for children; for adults, consider seven to eight inches for a more dramatic crown.
Along the top edge, mark points every two to two and a half inches, creating a zigzag or castle-battlement silhouette.
You can make the points rounded like gentle hills, sharp like medieval turrets, or curved like flower petals.
Cut out your template and hold it around the recipient's head to check the fit.
For a more structured crown that stands tall, consider cutting a second identical template from heavy interfacing or a thin craft plastic. This layer, sandwiched between two felt layers, gives the crown body and helps it hold its shape through years of birthday celebrations.
Step-by-Step Assembly
Cutting the Felt
Pin your cardboard template to a double layer of felt — two identical rectangles stacked — and cut around it carefully.
Using a rotary cutter and a self-healing mat produces the cleanest edges, but sharp fabric scissors work beautifully.
If you are adding an interfacing layer, cut that now as well.
Now cut your decorative front layer. This can be a slightly smaller rectangle that will sit centered on the crown, or you can cut individual decorative shapes — stars, hearts, or scalloped panels — that you will arrange across the crown band.
If you want a contrasting edge, cut a thin strip of felt in a second color to stitch along the bottom border.
Stitching the Layers
Place the two felt layers together with the interfacing layer between them. Pin or clip at each point and along the bottom edge.
Using a simple running stitch or a whip stitch, sew around the entire crown about one-quarter inch from the edge.
Use thread that matches your felt for an invisible finish, or use contrasting embroidery floss for a deliberate, decorative look.
If you want the crown points to be lightly stuffed (this gives them a lovely three-dimensional quality), leave a one-inch opening along the bottom edge.
Use a small amount of polyester fiberfill and a chopstick or the eraser end of a pencil to push the stuffing into each point.
Distribute the fill evenly — about a pea-sized amount per point for a child's crown.
Then stitch the opening closed.
Adding Embellishments
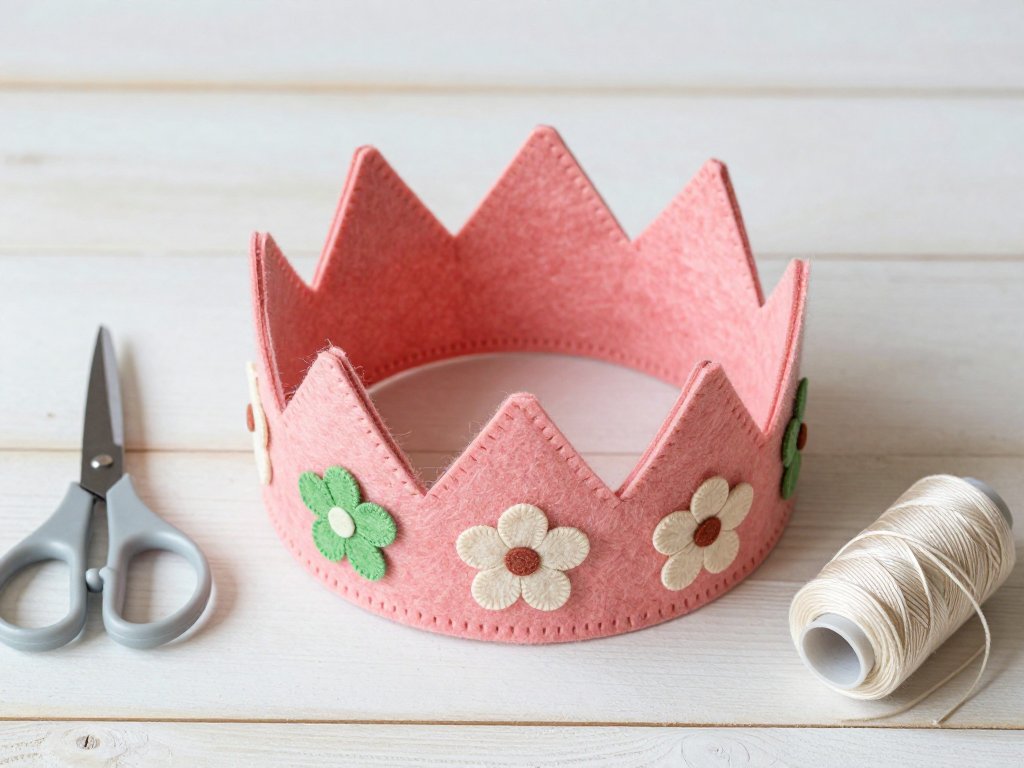
This is where your crown becomes truly personal. For a traditional Scandinavian look, sew small felt flowers along the crown band.
In Swedish tradition, seven flowers are often used — one for each day of the week, symbolizing that every day is a celebration.
For a modern approach, sew on the birthday child's age in large felt numbers, or add their initial surrounded by small star appliqués.
Embroidery adds beautiful detail with very little weight. A line of French knots along the bottom edge, a simple zigzag running stitch between each crown point, or a blanket stitch around the entire perimeter all add texture and visual interest.
If you are adding beads or sequins, sew them on securely — children will touch, tug, and explore every surface of their crown.
Attaching the Closure
The closure needs to be secure enough to stay on an active child but easy enough for a parent to remove quickly.
Sew a Velcro dot to each end of the crown band — one on the inside front and one on the outside back.
For a more adjustable fit, use a button and elastic loop: sew a small button to one end and a loop of narrow elastic to the other.
This allows the crown to stretch slightly during wear and accommodates growth between birthdays.
For babies and toddlers who may pull at the crown, consider sewing a chin strap from narrow ribbon or elastic. Attach it at the bottom edge on each side, forming a gentle loop that sits under the chin. This prevents the crown from being tossed across the room mid-party.
Design Variations for Every Birthday
The Classic Scandinavian Crown
Use white or cream wool-blend felt for the base with red trim and green felt leaves.
Sew seven small fabric flowers along the band — one in the center and three on each side.
Finish with gold embroidery thread for a regal accent. This version connects directly to the centuries-old tradition and works beautifully for a first birthday or a milestone celebration.
The Unicorn Crown
Choose pastel pink or lavender felt for the base, add a small unicorn horn made from gold glitter felt or polymer clay, and sew tiny felt ears on each side of the horn.
Use iridescent sequins scattered across the crown points. Children adore this variation, and it is surprisingly easy to assemble — the horn is simply a cone sewn from a semicircle of felt and stuffed lightly before attachment.
The Nature Crown
Cut crown points into leaf shapes — maple, oak, and birch silhouettes — using green and autumn-colored felt. Add small acorn-shaped beads, felt mushrooms, or embroidered vines winding across the band. This variation pairs beautifully with an outdoor or garden-themed birthday party and suits nature-loving children of any age.
The Knight or Castle Crown
Use gray or silver felt for a medieval look. Cut the top edge into sharp battlements rather than rounded points.
Add a shield-shaped appliqué in the center with the child's age or initial. Sew small "jewels" from faceted beads or button covers along the bottom edge.
This version is especially popular with children who love dragons, knights, and fairy tales.
The Minimalist Adult Crown
Adults deserve birthday crowns too. Use a single layer of high-quality wool felt in a sophisticated color — navy, forest green, or charcoal.
Keep the shape simple and elegant with tall, gentle curves rather than pointed peaks. Add a single fabric flower or a small embroidered motif at the side, offset like a fascinator.
An adult crown makes a wonderful birthday morning surprise and creates a lovely photo tradition that children will remember.
Making It a Yearly Tradition
One of the most beautiful aspects of a felt birthday crown is that it is not a one-time decoration.
It becomes part of your family's birthday traditions. Each year, you bring out the crown on the morning of the birthday, and the child wears it through breakfast, presents, and the cake ceremony.
It appears in photographs year after year, becoming a visual timeline of growth and change.
You can add a small embellishment each year — a new bead, an embroidered number, a tiny charm — to mark the passing of time.
By the time your child turns ten, the crown will be covered in small tokens of celebrations past.
It becomes an artifact of family history, something no store can provide.
For families with multiple children, make a distinct crown for each child in their favorite color, with personalized embellishments that reflect their personality. The crowns become as individual as the children themselves, and pulling them out each birthday morning creates a sense of continuity and belonging.
Caring for Your Crown
Felt crowns require minimal care but benefit from a few simple habits. Store the crown flat or rolled gently in a drawer or box.
Do not hang it by the closure — the weight of the felt will stretch the Velcro or elastic over time.
If the crown becomes soiled, spot-clean with a damp cloth and mild soap. Wool-blend felt can be gently hand-washed in cool water and laid flat to dry.
Acrylic felt should be wiped clean rather than submerged, as it may lose shape when wet.
Keep the crown away from direct sunlight for extended periods, as felt colors — especially bright pinks, purples, and reds — can fade over years of window exposure. A simple cotton bag or tissue paper wrap provides adequate protection between birthdays.
Beyond the Birthday Crown
Once you have mastered the basic felt crown, you will likely find yourself adapting the technique for other celebrations.
These same skills translate beautifully to Christmas nativity crowns, May Day flower crowns, fairy tale dress-up crowns for imaginative play, and even small tiaras for dance recitals or school performances.
The template and assembly method remain the same; only the colors and embellishments change.
Felt crown making also makes a wonderful group activity for a crafting playdate or a birthday party activity for older children.
Pre-cut the felt pieces and set out bowls of embellishments, glue, and thread. Each child leaves with their own handcrafted crown, and the party favor becomes a lasting memory rather than a plastic toy that breaks before dinner.
A Gift from the Heart
If you are making this crown as a gift rather than for your own child, you are giving something extraordinary.
A handmade felt birthday crown costs a few dollars in materials but represents hours of thoughtful work.
It says to the recipient family: I value your child. I took time to create something beautiful just for them.
I believe in traditions that matter.
Include a small note explaining the Scandinavian tradition behind the crown and a suggestion to add an embellishment each year. This transforms the gift from a single craft project into the beginning of a family tradition — a gift that keeps giving year after year.
Conclusion
Making a felt birthday crown is one of those rare projects that delivers far more than the sum of its materials.
For an evening of cutting and stitching, you create something that will appear in birthday photographs for a decade.
You connect your family to a tradition that spans continents and centuries. And you give a child the experience of being crowned — not with something bought from a store, but with something made with love and intention.
The beauty of this craft is that it asks nothing more than you are willing to give.
A simple crown with basic stitching and no embellishments is every bit as meaningful as an elaborate one covered in beads and embroidery.
The crown is not about perfection. It is about showing up, making the effort, and celebrating the people we love.
So pick up your felt and scissors. Measure a small head. Cut a zigzag edge. Stitch with care. And on the next birthday morning, place that crown on a beloved head and watch what happens. You might just start a tradition that lasts a lifetime.
The felt crown is waiting. The birthday is coming. And there is no better time to begin than today.