There is something deeply satisfying about taking a worn-out pair of jeans or a faded vintage sheet and turning it into something beautiful. Fabric flowers give new life to textiles that might otherwise end up in a landfill, and they happen to be one of the most forgiving and rewarding crafts I have ever tried.
Why Fabric Flowers?
For years I bought fresh flowers from the farmers' market every Saturday. They made the kitchen feel alive — until Monday, when the petals started drooping. By Wednesday they were compost. Fabric flowers changed that. They last for years, cost pennies to make, and carry the warmth of their previous life in every thread.
I started making them as a way to use up fabric scraps from other projects. A scrap of cotton here, a frayed collar from a vintage shirt there. Before I knew it, friends were asking for them. Then friends of friends. And eventually, I found myself with a booth at our local city art festival, a table full of fabric blooms, and a story to tell about every single one.
Getting Started: What You Will Need
The beauty of fabric flowers is that you likely already own most of what you need. Here is the full list so you can decide which techniques suit your style:
- Fabric shears — a sharp pair makes all the difference. Dull scissors crush fabric fibers and create uneven edges that won't fray nicely.
- Small detail scissors — for snipping curves and tiny petals
- Hot glue gun and glue sticks — low-temperature works best for synthetic fabrics
- Tacky glue — for delicate work where heat might damage the fabric
- Hand-sewing needle and thread — white and black thread cover most situations
- Cardstock or plastic templates — circles in graduated sizes (2, 3, 4, and 5 inches), petal shapes, and spiral patterns
- Florist wire — 18 to 22 gauge, green if possible
- Wire cutters and pliers
- Floral tape
- Buttons, beads, or felt circles — for flower centers
- Alligator or snap hair clips — if you want to make hair accessories
- Pin backs — for brooches
That might look like a lot, but you can start with just scissors, glue, and a few fabric scraps. Everything else is optional and expandable.
Choosing Your Fabric
Different fabrics create different flower personalities. Here is how I think about them:
Cotton
Cotton is the friendliest fabric for beginners. It cuts cleanly, holds a crease, and does not slip around while you sew. Quilting cotton in particular is perfect — it is slightly stiff, comes in endless prints, and presses beautifully. A cotton daisy will hold its shape for years.
Felt
Felt is the no-fray miracle fabric. You can cut it into any shape, stack layers, and glue them together without a single stitch. It is ideal for children's projects and for flowers that need to be sturdy — think brooches, backpack clips, and hair ties. Wool blend felt is softer and more expensive than acrylic, but both work beautifully.
Silk and Organza
Silk makes the most romantic roses you have ever seen. It drapes and gathers like nothing else. Organza is stiffer and slightly translucent, giving layered flowers a delicate, ethereal quality. Both fabrics fray enthusiastically, which can actually work in your favor for certain styles — a frayed silk edge looks soft and organic, like a real petal. Handle these with care and consider using a flick of clear nail polish on cut edges if fraying gets out of control.
Linen and Vintage Sheets
Old bed linens are an absolute treasure for fabric flowers. The fabric has already been washed dozens of times, so it is soft, flexible, and completely relaxed. Vintage floral prints add another layer of charm — imagine a small rose made from a floral-print sheet that has been in someone's family for forty years.
I find vintage sheets at thrift stores for two or three dollars, and a single flat sheet yields dozens of flowers. Look for 100% cotton or cotton-linen blends. The pre-washed softness makes them easier to gather and shape than brand-new fabric.
One of my favorite techniques with vintage linens is the frayed-edge flower. Cut a circle of fabric, then use a pin to gently pull threads from the edge, creating a soft fringe. Layer two or three of these circles, stitch through the center, and you have a bloom that looks like it came from a cottage garden.
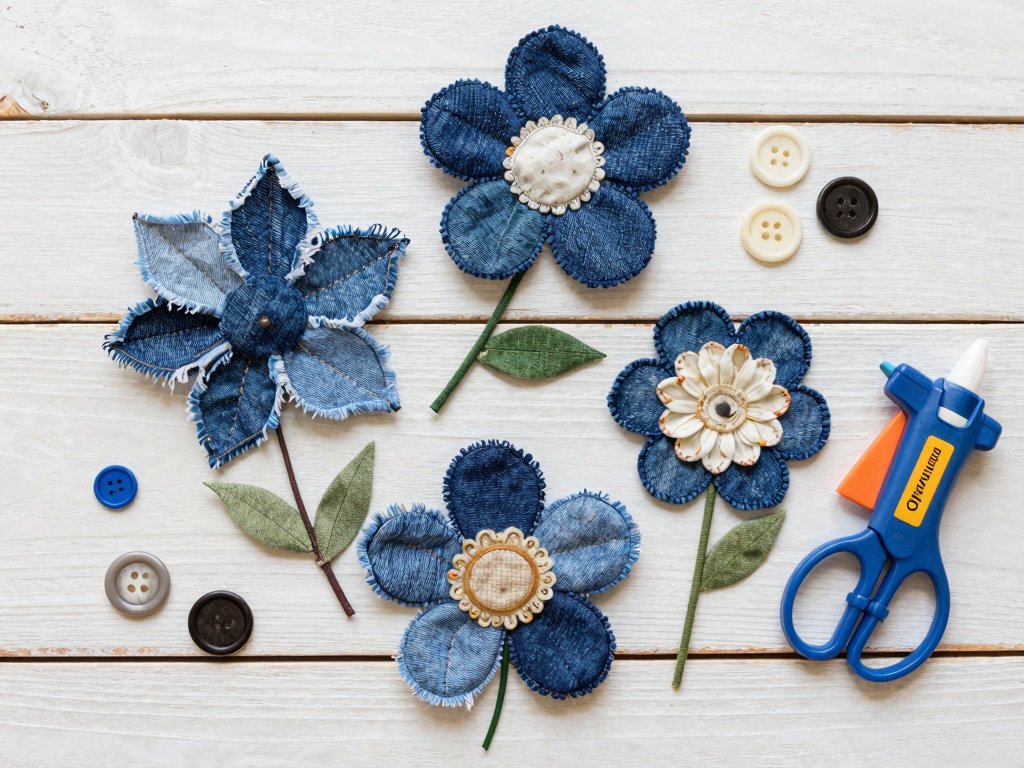
Denim — Especially Distressed Denim
Denim flowers are in a category all their own. They are tough, sculptural, and completely unexpected. The worn parts of old jeans — the knees, the thigh area, the frayed cuffs — create the most interesting textures. Faded indigo, white stress marks, and torn edges all add character to the finished flower.
Some of my best-selling items at festivals have been denim roses made from the legs of men's work jeans. The thicker the denim, the better the rose holds its spiral shape. And the beauty of using distressed denim is that you do not need to hide the wear — you celebrate it. That frayed edge becomes a petal edge. That hole becomes part of the design. Nothing goes to waste.
Five Fabric Flower Techniques
Here are the five techniques I return to again and again. Start with the first and work your way through as you build confidence.
1. The Gathered Strip Rose
This is the technique I teach to absolute beginners because it always works. Cut a strip of fabric 2 to 3 inches wide and 18 to 24 inches long. Fold it in half lengthwise with the right side out. Thread a needle with a double strand of thread, knot the end, and sew a running stitch along the raw edges, about a quarter-inch from the edge. Gently gather the thread until the fabric forms a ruffle. Then roll the strip from one end, stitch the base as you go, and secure the bottom with a few firm stitches or a dab of hot glue. The result is a romantic, ruffled rose that works in cotton, silk, linen, or even lightweight denim.
2. The Spiral Denim Rose
This is the technique that has sold the most flowers at my festival booth. Cut a rough circle of denim (5 to 6 inches across). Starting at the outer edge, cut a spiral inward toward the center, leaving a small circle at the middle — about an inch wide. Start rolling from the outer edge, keeping the base of the spiral aligned as you go. Glue the bottom as you roll. When you reach the center circle, flip it over and glue it flat to the bottom of the rose. The spiral technique works best with stiff fabrics like denim or heavy cotton. The tighter you roll, the smaller and more compact the rose. Leave it looser, and you get a bigger, more open bloom.
3. The Layered Circle Flower
This is the most versatile technique and the one I use for felt, linen, and organza. Cut three to five circles in graduated sizes — say 2, 3, 4, and 5 inches — from your fabric. Stack them from largest on the bottom to smallest on top. Stitch through the center with a needle and thread, pulling tight to create gentle cupping in each layer. Add a button or bead to the center to hide the stitches. For a frayed version, use linen or cotton and pull threads from the edges of each circle before stacking. This creates a soft, shabby-chic flower that pairs beautifully with farmhouse decor.
4. The No-Sew Ruffle Poppy
Cut six to eight large petal shapes (rounded teardrops about 4 inches long) from organza, chiffon, or lightweight cotton. Using a lighter or candle, carefully singe the edges of each petal — this seals synthetic fabrics and creates a slightly curled edge that looks remarkably like a real poppy petal. (Work in a well-ventilated area and keep a bowl of water nearby.) Arrange the petals in a circle, overlapping slightly, and glue the centers together. Add a small circle of black felt and a cluster of black thread or thin wire in the center for the stamen. Glue to a stem wire wrapped in floral tape. These are showstoppers.
5. The Frayed Denim Daisy
Cut a 3-inch circle from a piece of distressed denim — the worn knee area works wonderfully. Cut petal-shaped notches around the circumference, leaving a solid center about an inch wide. Rub the edges between your fingers to encourage fraying. The white interior threads of the denim will emerge and create a lovely fringed look. Layer two of these, offset so the petals show through, and stitch or glue a bright yellow button, a wooden bead, or a circle of bright felt in the center. Attach to a pin back or hair clip. These are lightweight, durable, and fast to make — great for gift sets.
Making the Flowers Last: Sealing and Care
Fabric flowers are surprisingly durable, but a little preparation goes a long way. Here is what I have learned about making them last:
- Fabric stiffener — Commercial products like Stiffen Quick or Aleene's Fabric Stiffener let you shape petals and hold them in place. Just dip, shape, and let dry overnight.
- Mod Podge for Fabric — Brush this onto finished petals for a light protective coating. Always test on a scrap first, especially with dark or printed fabrics.
- Spray sealant — A light mist of Scotchgard Fabric Protector makes denim and cotton flowers water-resistant. This is especially useful if you are selling flowers for outdoor events or as gift toppers that might sit out on a porch.
- Storage — Store finished flowers in a dry, airtight container with a silica gel packet to prevent moisture damage. Cotton and linen can develop mildew if left in damp conditions.
- Cleaning — Most fabric flowers can be gently dusted with a soft brush or hairdryer on cool setting. For heavier dirt, spot-clean with a damp cloth and let air dry completely. Avoid submerging denim flowers — the glue may loosen.
From Kitchen Table to Festival Booth
I set up at my first city art festival three years ago with a folding table, a linen tablecloth, and an anxious hope that someone would stop. They did. And they kept coming back.
Over the years I have learned a few things about selling handmade fabric flowers that I wish I had known from the start:
Pricing
This was the hardest part for me. I started by pricing too low because I was nervous. Do not do that. Your time and creativity have value, and customers who love handmade goods understand that. Here is the pricing structure I eventually settled on:
- Small fabric flower brooches and pins — $10 to $15
- Hair clips and headbands — $12 to $20
- Single stem flowers — $8 to $12
- Small bouquets (3 to 5 stems) — $25 to $40
- Large statement roses or peonies — $18 to $25 each
- Denim flower bouquets — $30 to $45 (these sell fast because people love the story)
I price in whole dollars to make change easy. And I always bundle a few smaller items at a discount — three mini brooches for $25, for example — to encourage people to buy multiples as gifts.
Display
How you show your flowers matters as much as how well they are made. I use a tall wooden branch (cleaned and dried) planted in a heavy ceramic pot. The flowers clip onto the branches at different heights, which draws the eye up and creates a garden effect. I also bring a small mannequin head for hair accessories and a rustic wooden box for brooches.
Vertical displays are essential at crowded festivals. If everything is flat on a table, people have to lean over to see it. Lift your work to eye level and people stop in their tracks.
The Story Sells It
Every fabric flower I sell comes with a story. "This rose is made from a 1970s floral bedsheet I found at St. Vincent de Paul." "This denim daisy came from a pair of work jeans that belonged to a farmer." People love this. They are not just buying a flower — they are buying the story of its materials and the hands that made it.
I print small cards that say "Made from repurposed vintage linens and reclaimed denim" and tuck them into every purchase. The cards cost pennies, and customers mention them in online reviews more often than you would expect.
Packaging
Brown kraft bags stamped with my business name, tied with jute twine. Inside goes the flower, a care card, and a small silica gel packet. The packaging is part of the gift. One customer told me she bought three of my hair clips just because the packaging made her feel like she was unwrapping a present.
Demonstrating at Your Booth
This one tip changed everything for me. I bring a small basket of pre-cut denim spirals and a glue gun, and I assemble a flower while people watch. It draws a crowd every time. People stop, ask questions, and almost always buy. They see the work involved and suddenly the price makes perfect sense. Plus, it starts conversations. "What else can you make from jeans?" is usually the first question, followed by "Do you take custom orders?"
Where to Find Your Materials
One of the best parts of this craft is how inexpensively you can source materials:
- Thrift stores — Vintage sheets ($2–$5), old cotton dresses, linen tablecloths, and denim jackets. Look for 100% natural fibers — they handle glue and stitches better than blends.
- Your own closet — That pair of jeans with the hole in the knee that you have been meaning to throw away. The shirt with the stain that won't come out. The worn-out linen duvet cover from your college apartment.
- Friends and family — Once people know you make fabric flowers, they will start donating their old clothes. I have received bags of denim, silk blouses, and vintage curtains from people who were thrilled to see their old things get a second life.
- Fabric remnants — Ask at your local fabric store if they sell remnants by weight. You can often pick up a bag of mixed cotton and linen scraps for a few dollars.
A Few Things I Wish Someone Had Told Me
When I started, I made every mistake you can imagine. Let me save you a few:
- Do not use high-temperature glue on synthetic fabrics. It melts through silk and polyester in seconds. Low-temp glue is safer and just as strong.
- Test your fabric for colorfastness before you starch or stiffen it. I ruined a batch of vintage sheet flowers by using a stiffener that made the blue dye run. Now I test a small swatch first.
- Denim fuzz gets everywhere. Keep a lint roller next to your workspace. Your coffee, your phone screen, and your cat will thank you.
- Keep a notebook of what sells. I track which colors, sizes, and fabric types move fastest at each festival. At my spring market, small denim flowers sell out. At the fall festival, people want big, romantic fabric roses in jewel tones. The data helps me plan what to make for the next event.
- Take photos of every booth setup. You will forget what worked and what did not by the next festival. A photo is worth a hundred memory-jogging notes.
Finding Your Rhythm
Fabric flowers have become more than a craft for me — they have become a way to slow down and make something meaningful from materials that already hold memories. A vintage sheet might have warmed someone's childhood bed. A pair of work jeans might have been through a thousand sunrises. When I turn them into a flower, that history does not disappear. It becomes part of the bloom.
If you are new to this, start with one technique. Make the gathered strip rose in a cotton fabric you love. Pin it to your bag or your mirror. See how it makes you feel. Then try the spiral denim rose with a pair of old jeans you were about to throw away. You might surprise yourself.
And if you ever decide to take a folding table to a local festival, I hope our paths cross. I will be the one with the wooden branch full of denim roses, a glue gun in hand, and a story ready for every flower on the table.
Have you made fabric flowers from recycled materials? I would love to hear about your creations, your favorite fabrics, and your festival experiences. Drop a comment below or share your photos — nothing makes my day like seeing a pair of old jeans bloom into something beautiful.