Introduction
You know that plain canvas tote you grab for every Target run? The black crossbody you've carried since 2019?
The diaper bag that has seen better days? Give them all a fresh summer makeover with beaded bag charms — the jewelry trend that has taken over TikTok, Instagram, and every craft fair worth visiting.
Bag charms (or "bag chargers") are decorative accessories that clip onto your purse strap, zipper pull, or handle. Think of them as earrings for your handbag. They add personality, color, and movement to any bag, and they are incredibly easy to make yourself — beginner-level, kids-can-help, done-during-nap-time easy.
In this guide, I will walk you through everything you need to know — from the exact supplies to buy to three complete project tutorials you can finish in a single afternoon.
By the end, you will have a charming accessory that costs a fraction of boutique prices and looks exactly how you want it.
1. Why Bag Charms are the Perfect Summer Project
Let me give you three reasons this craft belongs on your summer to-do list.
They are fast. A single charm takes 15 to 30 minutes from start to finish. That is one episode of Bluey, one coffee while it is still hot, or two songs in the carpool line. No elaborate setup, no glue-gun disasters, no half-finished projects haunting your dining table.
They are affordable. A boutique bag charm runs $18 to $45. You can make your own for $3 to $8 depending on your bead choices. Your first charm costs less than a drive-through latte.
They are customizable. Your sister's beach vibe? Shell beads and turquoise. Your best friend's preppy aesthetic? Monogram letter beads in navy and pink. Your toddler's current obsession? An alphabet charm that spells out "MOM" (or "MAMA" — no judgment). Every charm tells a small story.
Bag charms also solve a very real mom problem: they make your bag instantly identifiable in the pile at church nursery, preschool pickup, or the gym daycare. No more grabbing someone else's identical black tote.
2. Supplies You Will Need
Here is the complete materials checklist. I have broken it into three tiers so you can start with what you already have and build up as you go.
Essential Tools
- Chain-nose pliers. Your workhorse. $8 to $15 at any craft store. Look for a fine tip for opening jump rings. Do not use household pliers — they will scratch your findings.
- Wire cutters. Flush-cut jewelry wire cutters ($6 to $12) make clean cuts without sharp edges.
- Scissors. Sharp craft scissors for cutting cord and thread.
- Bead mat. A small felt or silicone bead mat ($5) keeps beads from rolling off the table. A hand towel works in a pinch.
Findings and Hardware
Findings are the metal components that hold everything together:
- Lobster clasps (12mm to 16mm). The clip that attaches to your bag. 14mm is my sweet spot. Match your bag's hardware for an intentional look.
- Jump rings (6mm to 8mm, 18 or 20 gauge). Thicker gauge (18 or 20) so they do not bend open under weight. Buy a mixed pack — you will drop a few.
- Crimp beads or crimp tubes (2mm to 3mm). Secure your beads on flexible cord. Essential for beading wire projects.
- Split rings. Tiny keyring-style rings that add an extra security layer between your charm and your bag.
- Head pins and eye pins (2 inches, 21 gauge). For making dangling bead drops and tassel components. 21-gauge fits most bead holes while staying sturdy.
Beads and Stringing Materials
Here is where the fun begins. For bag charms, you want beads that are large enough to see and sturdy enough to survive daily life.
- Pony beads (6mm to 9mm). Classic plastic beads in every color. Lightweight, durable, and cheap. A 500-piece mix costs about $5 and will make dozens of charms.
- Wooden beads (8mm to 12mm). Great for boho aesthetics. Pair beautifully with neutral-toned bags and leather. Leave them natural or stain them with tea for an aged look.
- Acrylic beads (8mm to 14mm). Modern, lightweight, and available in incredible shapes — flowers, stars, fruit slices, geometric forms. The backbone of most trendy bag charms.
- Gemstone beads (6mm to 10mm). Amethyst, rose quartz, howlite, and tiger's eye are affordable. Natural stone is heavier, so use fewer or pair with lighter accent beads.
- Glass beads and crystals. Czech glass beads and faceted crystals add sparkle without much weight. A few well-placed crystal beads elevate a charm from "kids' craft" to "actually looks expensive."
- Alphabet beads (8mm to 10mm). Flat letter beads that let you spell names, words, and inside jokes. Buy a set with multiples of common letters (E, A, I, O, N, S, T, R) so you have enough vowels.
- Charm pendants (10mm to 20mm). Small metal or acrylic charms — stars, hearts, flowers, initials. Add a focal point to your design. Repurpose old earrings that have lost their mate.
Stringing materials: For most bag charms, use either 0.5mm to 0.8mm stretch cord (elastic) for stretchy charms that slide over a bag strap, or 0.5mm beading wire (7-strand or 19-strand) for sturdier charms with a clasp.
3. Basic Techniques
These four techniques will cover almost every bag charm you ever want to make. Practice each one once, and you will be ready for any project.
Technique 1: Opening and Closing Jump Rings
This is the single most important jewelry-making skill.
- Hold the jump ring with two pairs of chain-nose pliers (or one pair of pliers and your fingernails).
- Twist the ends apart sideways — not like a keyring. Pulling distorts the circle and weakens the metal.
- Slide your clasp, charm, or other ring onto the open gap.
- Twist the ends back together until they meet flush. You should not be able to feel a gap with your fingernail.
Pro tip: Practice on a few jump rings before you start your actual project. Once you get the muscle memory, it becomes a satisfying, almost meditative motion.
Technique 2: Stringing Beads on Cord or Wire
- Cut a piece of cord or beading wire about 8 inches longer than your desired finished length. It is always better to have too much than too little.
- String your beads in your planned order. Lay them out on your bead mat first to preview the pattern.
- If using stretch cord, tie a surgeon's knot (double loop the thread before pulling tight) and dab a tiny drop of super glue or jewelry glue on the knot. Let it dry completely before trimming the tails.
- If using beading wire, finish with a crimp bead: thread the wire through the crimp, then back through the last bead, pull tight, and crimp the tube flat with your chain-nose pliers.
Technique 3: Making a Beaded Dangle with a Head Pin
A dangle is a single bead or bead stack that hangs from a charm or directly from your bag. This is the technique used for most charm pendants.
- Thread your bead or beads onto a head pin. The head pin has a flat stop at one end, like a nail, so the beads do not fall off.
- Leave about 8mm of wire above your top bead.
- Using chain-nose pliers, bend the wire at a 90-degree angle right above the bead.
- Grasp the very tip of the wire with your round-nose pliers (or the tip of your chain-nose) and roll it into a loop. Trim any excess wire with your flush cutters.
- Attach this loop to your charm base or directly to a jump ring using Technique 1.
Technique 4: Attaching the Clasp
- Open a jump ring using Technique 1.
- Slide your finished bead strand or charm assembly onto the open ring.
- Slide the lobster clasp onto the same ring.
- Close the jump ring securely.
- Test the clasp by gently tugging. If it holds, you are done. If the jump ring gap shows, twist it closed a fraction more.
4. Project One: Personalized Alphabet Charm
Time: 20 minutes Cost: $3 to $5 Difficulty: Beginner
This is the perfect first project. It makes a great gift, a conversation starter, and a lovely way to make your bag unmistakably yours.
What you need:
- 8 to 12 alphabet beads spelling your word or initials (8mm to 10mm)
- 2 to 4 accent beads (small acrylic or glass beads in a coordinating color)
- 1 charm pendant (optional — a star or heart is cute at the bottom)
- 18 inches of stretch cord (0.5mm or 0.8mm)
- 1 lobster clasp (14mm)
- 2 jump rings (7mm, 18 gauge)
- Chain-nose pliers
- Scissors
- Super glue or jewelry glue
Instructions:
- Lay out your beads in order on your bead mat. Spell your word, then add one accent bead on each end to frame the letters.
- Cut your stretch cord to about 14 inches. Fold it in half — this gives you a doubled cord that is extra strong.
- Tie a loose overhand knot about 2 inches from the fold end, creating a small loop. This loop is where your clasp will attach.
- Thread your beads onto the doubled cord in your planned order. Use a bead stopper or a piece of tape on the far end to keep beads from sliding off.
- Once all beads are on, tie a second overhand knot at the end, again about 2 inches from the last bead, creating a second loop.
- Trim any excess cord close to the knots. Dab a tiny drop of glue on each knot and let dry for 10 minutes.
- Use a jump ring (Technique 1) to attach the lobster clasp to the top loop.
- Optionally, attach a small charm pendant to the bottom loop using your second jump ring.
Wear it: Clip the charm to the zipper pull of your handbag, the D-ring of your diaper bag, or the strap loop of your crossbody. Spell your name, your child's name, or a word like "JOY" or "MAMA."
5. Project Two: Gemstone and Crystal Elegance Charm
Time: 25 minutes Cost: $6 to $12 Difficulty: Beginner to Intermediate
This charm looks expensive and feels substantial. It uses natural gemstone beads paired with sparkling crystal accents for a charm that dresses up any bag — from a work tote to a date-night clutch.
What you need:
- 10 to 14 gemstone beads (6mm to 8mm — rose quartz, amethyst, howlite, or lapis)
- 4 to 6 crystal or Czech glass beads (4mm to 6mm — use them as spacers between gemstone beads)
- 1 focal charm pendant (a gold or silver-plated initial, flower, or geometric shape)
- 12 inches of beading wire (0.5mm, 19-strand)
- 2 crimp beads (2mm)
- 1 split ring (8mm)
- 1 lobster clasp (14mm)
- 2 jump rings (7mm, 18 gauge)
- Chain-nose pliers
- Wire cutters
- Crimping pliers (optional but helpful)
Instructions:
- Cut a 12-inch piece of beading wire. String a crimp bead onto one end, then thread the wire back through the crimp to create a small loop. Crimp securely.
- String your beads in alternating pattern: crystal, gemstone, crystal, gemstone. Vary the colors for visual interest — for example, pale rose quartz beads separated by clear crystal spacers create an airy, romantic look.
- When you reach your desired length (about 6 to 7 inches for a standard charm), string your last crimp bead.
- Thread the wire tail through your split ring, then back through the crimp bead and into the last bead. Pull tight so the wire is snug but not cinched, then crimp the bead closed.
- Trim the excess wire tail close to the crimp.
- Use a jump ring to attach your focal charm pendant to the bottom of the strand, looping it through the split ring at the bottom.
- Use another jump ring to attach the lobster clasp to the split ring at the top.
Wear it: This charm shines on neutral bags — beige canvas, black leather, navy. It also makes a beautiful bridesmaid gift or birthday present when you match the gemstone to the recipient's birthstone.
6. Image: AI-Generated Visual Prompt
Use the following prompt with an AI image generator (such as Midjourney, DALL-E, or Stable Diffusion) to create a featured image for this article.
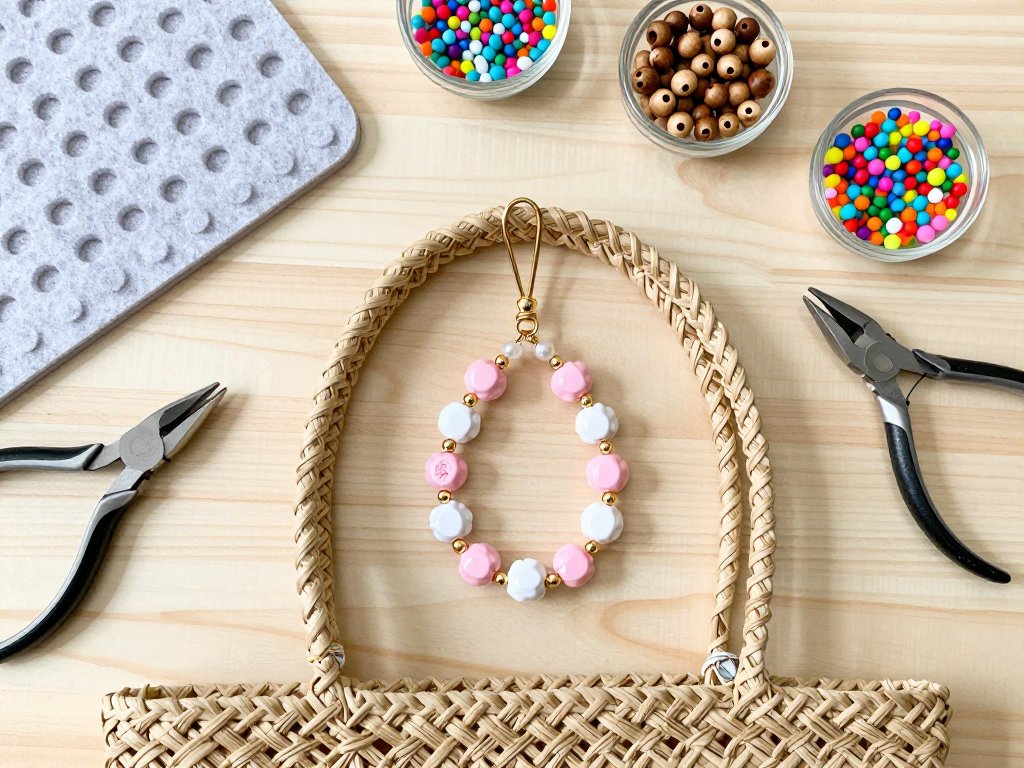
A flat-lay photography composition on a light wooden table of DIY bead bag charm supplies and finished projects.
In the center, a completed bag charm made with pastel pink and white acrylic flower beads, gold spacer beads, and a gold lobster clasp, clipped onto a woven straw tote bag handle.
Surrounding it are neatly organized crafting tools — silver chain-nose pliers, wire cutters, a felt bead mat — and small glass bowls filled with assorted beads: 8mm pony beads in rainbow colors, 10mm wooden beads, faceted crystal spacers, and letter beads spelling "MAMA" and "JOY." A small jar of jump rings and a lobster clasp sit beside a spool of clear stretch cord.
Soft natural lighting from a window, warm wood tones, cream linen background, slight shadows for depth.
Style: clean, bright, aspirational craft photography, shallow depth of field with the finished charm in sharp focus.
High detail, inviting and organized aesthetic. Resolution: 16:9 aspect ratio.
7. Project Three: Boho Tassel and Wooden Bead Charm
Time: 30 minutes Cost: $4 to $8 Difficulty: Intermediate
Tassel charms add fabulous movement and texture to any bag. When you walk, the tassel swings and sways — it draws the eye and feels satisfyingly tactile. This version pairs a handmade suede or embroidery floss tassel with wooden beads for a warm, earthy boho look.
What you need:
- Embroidery floss or suede cord (about 3 yards for a full tassel)
- 6 to 8 wooden beads (8mm to 12mm)
- 2 to 4 small accent beads (metal or ceramic in coordinating earth tones)
- 1 bead cap (a small metal cup that sits over the top of a bead — adds polish to the tassel top)
- 1 head pin (2 inches, 21 gauge)
- 1 lobster clasp (14mm)
- 2 jump rings (7mm, 18 gauge)
- 1 small piece of cardboard (about 3 inches wide)
- Chain-nose pliers
- Wire cutters
- Scissors
- Jewelry glue
Instructions:
- Make the tassel: Wrap your embroidery floss or suede cord around the cardboard about 30 to 40 times. The more wraps, the fuller your tassel. Cut the wraps at the bottom edge of the cardboard so you have a bundle of equal-length strands.
- Cut a separate 6-inch piece of floss or cord. Tie it tightly around the top of your bundle (about 0.5 inches from the top edge) with a double knot. This creates the tassel's head.
- Fold the tassel in half so the strands hang down evenly. Wrap another short piece of floss or cord around the bundle about 0.5 inches below the fold to create a neat neck. Tie tightly and trim the ends.
- Attach the tassel to beads: Thread your head pin through the bead cap (if using), then through one large wooden bead, then through the tassel's folded top, then back through the wooden bead and bead cap. The bead and cap should sandwich the tassel's head.
- Create a loop at the top of the head pin using Technique 3. Trim any excess.
- Thread the remaining wooden beads and accent beads onto a 4-inch piece of beading wire or stretch cord in an alternating pattern.
- Attach the bead strand to the tassel's top loop using a jump ring.
- Attach the lobster clasp to the top of the bead strand using another jump ring.
Wear it: Boho tassel charms look incredible on straw bags, canvas totes, and leather crossbodies. They also make fantastic keychain charms for your car keys or house keys — the tassel makes them easy to find at the bottom of your bag.
8. Tips for Making Durable Bag Charms
A bag charm goes through a lot. It gets caught in zippers, knocked against tables, dropped on sidewalks, and handled by curious little fingers. Here is how to make sure yours lasts.
Use quality findings. The lobster clasp and jump rings are the weakest points of any charm.
Spend the extra dollar on findings that feel solid, not flimsy. If the clasp feels light and bends easily when you squeeze it, it will fail within a month.
Look for findings labeled "lead-free" and "nickel-free" — they tend to be better quality.
Double up on security. When attaching your clasp, use two jump rings instead of one. Even if one ring fails (which is rare but possible), the second ring keeps your charm attached to your bag. This is especially important for charms you plan to wear daily.
Match your metal to your bag. If your purse has gold-toned hardware (zippers, buckles, rivets), use gold-toned findings for your charm.
If the hardware is silver, use silver. The charm will look intentional and polished rather than like an afterthought.
Many manufacturers make findings in both finishes, as well as antique brass and rose gold.
Avoid beads that are too heavy. Natural stone beads larger than 10mm and metal beads add significant weight.
A charm that is too heavy will stretch elastic cord, strain the clasp, and beat against your bag when you walk.
Stick to lightweight materials — acrylic, plastic, wood, hollow glass — for charms longer than 6 inches.
If you want gemstone beads, use 6mm to 8mm sizes and keep the strand short.
Reinforce knots. Any knot in your charm should be sealed with a drop of clear-drying jewelry glue or super glue. Even tight knots can loosen over time, especially if you use stretch cord. Let the glue cure for at least 10 minutes before clipping the charm to your bag.
Store properly when not in use. When you swap bags for a different outfit, do not leave your charm crumpled at the bottom of your purse.
Clip it to a carabiner or hang it on a small hook near your bag storage area.
Proper storage prevents bent jump rings, scratched beads, and tangled cord.
Clean gently. Beads accumulate hand oils, lotion, and dust over time. Clean your bag charms with a soft, slightly damp cloth.
Do not soak them in water, especially if you used wooden beads (water ruins the finish) or glued knots (water weakens the bond).
For gemstone beads, a gentle wipe with a dry microfiber cloth restores their shine.
Test before gifting. If you are making charms as gifts, give each one a five-second stress test before wrapping it up.
Tug the clasp, check that jump rings are fully closed, and gently pull the beads to make sure they are secure.
It takes almost no time and prevents the disappointment of a charm that breaks on the recipient's first wear.
9. Make Matching Sets
Here is one of my favorite things about bag charms: they are quick enough that you can make a whole set in an evening, and they make incredible coordinated gifts.
Mom-and-me sets. Make a matching charm for your purse and a smaller version for your daughter's backpack or your son's lunch bag. Use the same beads and color scheme but scale down the length. Kids love having a charm that mirrors yours — it is a tiny daily connection.
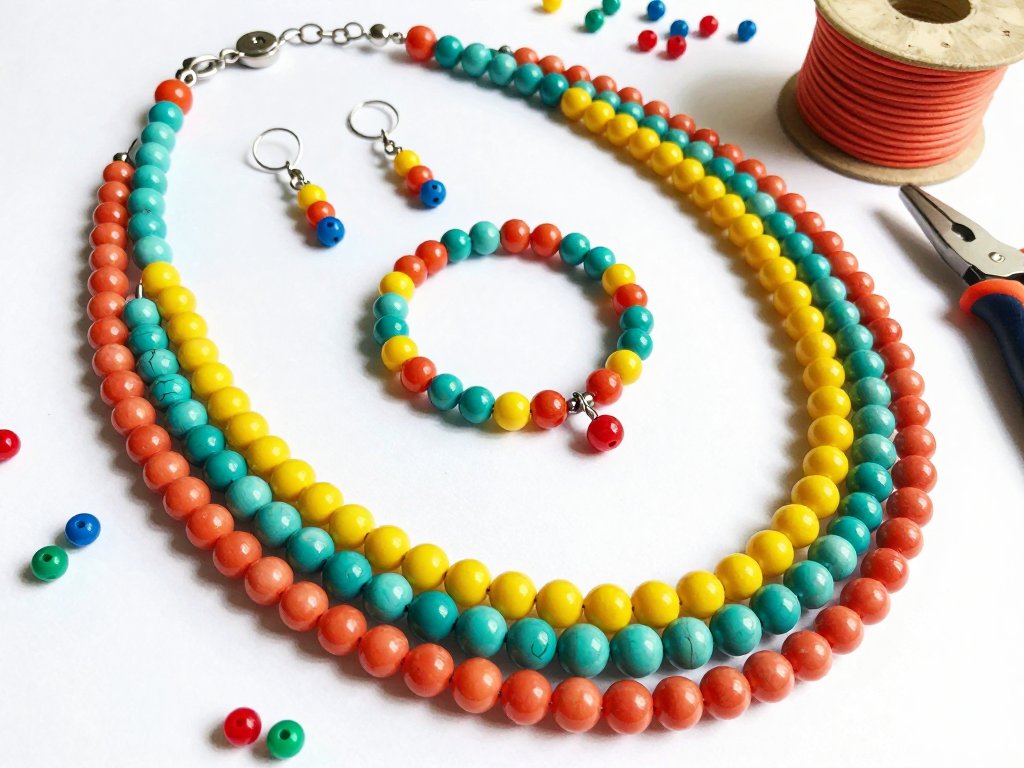
Friend gift sets. Pick a color palette — for example, coral and turquoise for summer — and make four or five charms for your closest friends.
Package each one in a small organza bag or tied to a handmade card. The total cost per gift is about $5, and the sentiment is priceless.
Seasonal rotation sets. Make one charm for each season: pastel florals for spring, bright rainbow for summer, warm earth tones for fall, and icy sparkle for winter. Swap them out as the weather changes. It is like giving your wardrobe a refresh without buying a new bag.
Bag wardrobe sets. If you are a one-bag person (and what mom is not, really), make several charms that match different outfits.
Clip on a neutral wooden bead charm with your everyday jeans, switch to a sparkly crystal charm when you dress up for date night, and grab the bright rainbow alphabet charm when you need a mood boost on a Tuesday morning.
Conclusion
Bead bag charms are one of those rare crafts that deliver instant satisfaction, real-world use, and genuine creative joy — all in under 30 minutes.
They do not require a dedicated craft room, expensive equipment, or skills you have to build over weeks.
Just beads, pliers, and a quiet half-hour while the kids are occupied.
I hope this guide gives you the confidence to start. Pick your favorite colors, gather your supplies, and make one charm tonight.
Clip it onto your everyday bag and see how it makes you feel every time you catch a glimpse of it — a small, handmade reminder that you made something beautiful with your own hands.
And when someone at the grocery store stops you to say "I love your bag charm," you get to smile and say, "Thanks — I made it." That feeling never gets old.
Happy beading, mamas. You have got this.
— Sophie Bennett