Introduction
If you have spent any time on social media lately, you have probably noticed them: carefully styled walls covered in pegboards, floating shelves, hanging plants, and neatly arranged craft supplies.
They are called hobby walls, and they have become one of the most popular home decorating trends of the past few years.
But unlike many Instagram trends that look beautiful in photos but fall apart in real life, the hobby wall is genuinely useful.
The idea is simple: instead of tucking your craft supplies away in closets and drawers, bring them out into the open and display them on your wall.
Your yarn collection becomes art. Your favorite paintbrushes become a sculpture. Your scissors, washi tape, and cutting mats become part of your room's décor.
The result is a space that is both functional and inspiring — a constant visual reminder of the creative projects that bring you joy.
In this article, I will walk you through exactly what you need to create your own craft display wall, from the basic hardware to the styling principles that make these walls work.
Whether you have a dedicated craft room or a small corner of your living room, you can create a hobby wall that suits your space, your budget, and your style.
Why Build a Craft Display Wall?
Before we talk about how to build your wall, let us talk about why you might want one in the first place. A well-planned display wall offers several practical benefits that go beyond aesthetics.
You will actually use your supplies. When your materials are hidden in boxes and bins, it is easy to forget what you own.
A display wall puts everything in plain sight. You will reach for that package of specialty paper, that set of embroidery hoops, or that half-used skein of yarn far more often when you can see it every day.
Your space will feel larger. This seems counterintuitive — putting things on the wall should make a room feel more cluttered, right?
But when supplies are organized vertically rather than piled on a desk or shoved into a closet, the room actually feels more spacious.
The eye moves across the wall rather than settling on a messy surface.
You will save money. How many times have you bought a duplicate of something because you could not find the original? Open storage eliminates this problem entirely. When you can see every spool of ribbon and every tube of paint at a glance, you buy only what you actually need.
It makes crafting more inviting. A dedicated creative space, even a small one, signals to your brain that it is time to make something. Walking past a wall of beautiful, organized supplies is a gentle daily invitation to sit down and create.
Choosing Your Wall System
There are four main approaches to building a craft display wall. Each has its own strengths, and the right choice depends on what you make, how much space you have, and your budget.
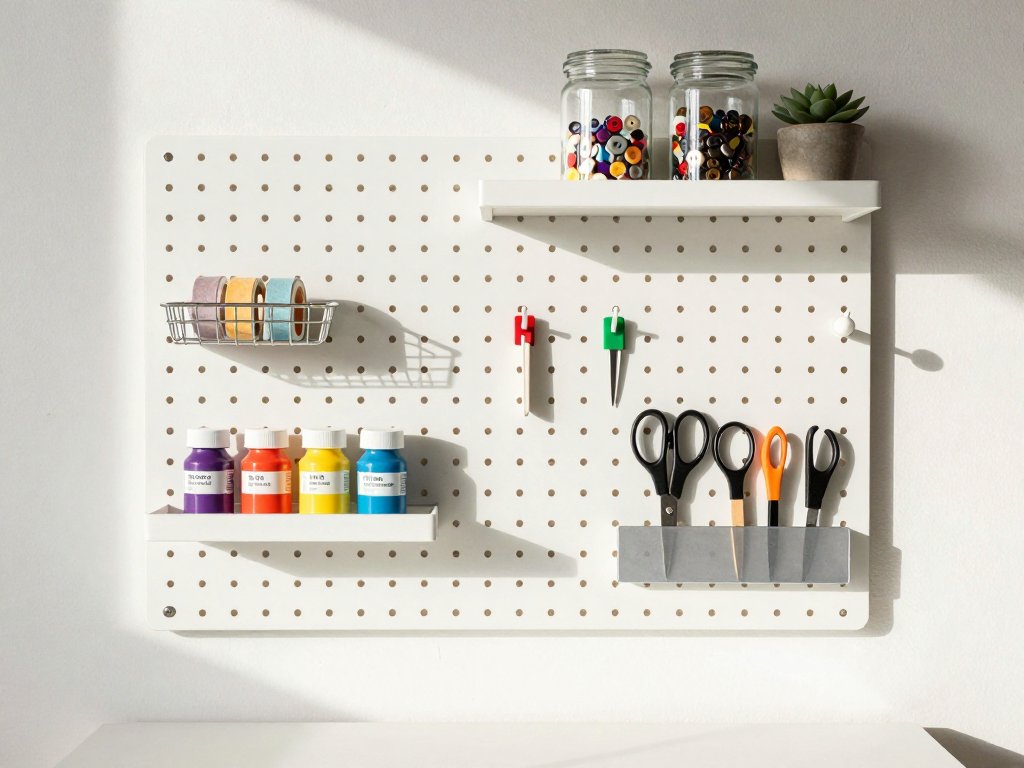
Pegboard Walls
Pegboards are the most versatile option for craft storage. They consist of a perforated board mounted to the wall, with hooks, shelves, baskets, and accessories that you can rearrange freely.
The classic hardboard pegboard found at hardware stores costs about ten dollars for a four-by-two-foot panel and gives you hundreds of configuration options.
I recommend the larger-hole pegboard (one-quarter inch) for craft use, as the hooks are sturdier and can hold heavier items like cutting mats and small power tools.
What you can store on a pegboard: Scissors, rulers, and cutting tools on standard hooks.
Small baskets for washi tape, glue sticks, and thread spools. Clear acrylic shelves for paint bottles and ink pads.
Paper towel holders for ribbon rolls. Magnetic strips mounted to the pegboard for metal tools and scissors.
Pegboard also accommodates wire spools, embroidery hoop frames, and rolled-up posters or patterns.
For a polished look, paint your pegboard to match your wall color before mounting it.
White pegboard blends into the wall and makes your supplies the focal point. Black pegboard creates a dramatic gallery-wall effect.
A pegboard painted the same color as your wall shelves and frames creates a cohesive, built-in look.
Floating Shelf Walls
Floating shelves offer a cleaner, more furniture-like look than pegboard. They work best for displaying supplies that are visually appealing on their own — organized jars of buttons, stacked rolls of fabric, collections of paint tubes arranged by color.
Floating shelves are also excellent for displaying finished projects alongside your materials, creating a gallery that celebrates both the process and the result.
What to put on floating shelves: Glass jars filled with buttons, beads, and sequins arranged by color.
Small potted plants or dried flowers for visual balance. Stacked books on craft techniques and art history.
Finished projects — a knitted scarf, a painted canvas, a ceramic mug. Baskets or bins for larger items like yarn skeins and fabric fat quarters.
Framed photos or small artworks mixed in with supplies for a curated look.
Floating shelves come in a range of materials and prices. Basic MDF shelves from a home improvement store cost about eight to fifteen dollars each and can be painted or stained to match your décor.
Solid wood shelves are more expensive but offer better durability for heavier items. Acrylic shelves create a modern, almost invisible look that puts the focus entirely on what you display on them.
Magnetic Walls
A magnetic wall is exactly what it sounds like: a section of wall covered with a magnetic surface, usually a sheet of galvanized steel or a roll of magnetic paint applied over a metal primer.
This approach works beautifully for anyone who works with metal tools — scissors, needles, cutting dies, and small implements — as they simply stick to the wall.
Magnetic walls are also excellent for displaying patterns, reference photos, and works in progress.
How to create a magnetic wall: The easiest method is to purchase a sheet of galvanized steel (about fifteen dollars for a two-by-four-foot sheet at most hardware stores).
Have the store cut it to size, sand the edges smooth, and mount it to your wall with heavy-duty mounting tape or screws through pre-drilled holes.
For a finished look, frame the sheet with trim molding painted to match your wall.
Magnetic paint alone is rarely strong enough to hold tools — you need the metal sheet underneath for real holding power.
What to put on a magnetic wall: Scissors, seam rippers, and small cutting tools. Metal knitting needles and crochet hooks.
Patterns and reference photos held with magnetic clips. Small shelves with magnetic backs for lightweight items.
A calendar or task list for tracking project deadlines. Inspirational images, postcards, and swatches that you swap out seasonally.
Grid Panel Walls
Grid panels, sometimes called wire grid walls or retail display grids, offer a middle ground between pegboards and shelves.
They consist of metal wire grids mounted to the wall with hooks and accessories similar to pegboard systems.
Grid panels have a lighter, more open appearance than pegboard and work especially well in small spaces where you want to maintain a sense of airiness.
What to put on a grid panel: Lightweight baskets for small supplies. Hooks for hanging scissors, rulers, and aprons.
Small shelves for paint bottles and markers. Clips for holding patterns, photos, and notes. String lights woven through the grid for ambiance.
The open nature of grid panels also makes them excellent for drying flowers or hung herbs, adding a natural element to your craft space.
Grid panels are available from home organization stores, office supply retailers, and online marketplaces. A standard four-panel set (each panel about fourteen by twenty inches) costs between twenty-five and forty dollars and covers a four-foot-wide section of wall.
Planning Your Display Wall Layout
Before you start hanging anything, take time to plan your layout. This step saves you from drilling unnecessary holes and helps you create a wall that is both functional and attractive.
Step one: Gather everything you want to display. Pull out all the supplies you use regularly and group them by category: cutting tools, adhesives, marking tools, yarn, fabric, paper, paints, brushes.
Be honest about what you actually use versus what you think you should display. A display wall works best when it holds your active supplies, not every art supply you have ever owned.
Step two: Measure your wall space. Mark the area you want to use with painter's tape, including any furniture or fixtures below that will share the space.
Account for outlet locations, light switches, and door swings. A standard display wall works best when it is between twenty-four and forty-eight inches wide and extends from about waist height to a few inches below the ceiling.
Step three: Choose your primary storage method. Based on what you are storing and your room's style, choose one of the four wall systems described above.
Most hobby walls use a single system consistently, which creates a cohesive look. If you want to combine systems — for example, using a pegboard for tools and a floating shelf above for jars — make sure the systems share a visual language: same color, same hardware finish, same spacing.
Step four: Arrange by color and frequency of use. This is the principle that separates a beautiful display wall from a cluttered one.
Group items by color whenever possible. Store your most-used supplies at eye level and your occasional-use supplies higher or lower.
Leave some empty space — about twenty percent of your display area — to let the eye rest and to accommodate future additions.
Essential Tools and Hardware
Here is exactly what you need to build your display wall, organized by system.
For any system: A stud finder for locating wall studs. A level to ensure shelves and panels are straight. A drill with appropriate bits for your wall type (drywall anchors for hollow walls, wood screws for studs). Painter's tape for marking positions before drilling. A tape measure.
For pegboard: One-quarter-inch hardboard pegboard panel. Pegboard mounting hardware or furring strips to create an air gap behind the board. Assorted pegboard hooks: single hooks, double hooks, loop hooks, basket hooks, and shelf brackets. Small wire baskets and clear acrylic shelves. Pegboard-compatible magnetic strips and cup hooks.
For floating shelves: Shelf brackets or hidden mounting hardware rated for at least twice the weight you plan to place on each shelf. Shelves cut to your desired length and finished with paint, stain, or sealant. Level and measuring tape. Decorative shelf brackets if you want visible hardware.
For magnetic walls: Galvanized steel sheet cut to size. Heavy-duty mounting tape or screws. Sandpaper for smoothing cut edges. Trim molding and paint for a framed finish. Strong neodymium magnets or magnetic clips for holding items. Small magnetic containers for lightweight supplies.
For grid panels: Wire grid panels and mounting hardware. Assorted grid hooks and clips. Wire baskets and small shelves designed for grid systems. Zip ties for attaching additional accessories.
Styling Your Display Wall
Once your wall system is installed, the fun part begins: arranging your supplies into a display that feels curated rather than chaotic. Here are the styling principles I have found most helpful.
Create visual zones. Divide your wall into rough thirds. The top third is for lighter, more decorative items — dried flowers, small framed art, finished projects.
The middle third, at eye level, holds your most-used supplies. The bottom third can hold heavier items in baskets or bins, or larger tools that need more space.
Use containers consistently. Transfer your supplies into matching containers whenever possible. Clear glass jars for small items like buttons and beads. Uniform metal tins for clips and fasteners. Matching ceramic cups for paintbrushes and pencils. Consistent containers create a clean, intentional look even when the contents vary.
Leave breathing room. Resist the urge to fill every hook and every inch of shelf space.
A display wall should look inviting, not overwhelming. Leave some hooks empty. Put only three or four jars on a shelf that could hold six.
The empty space makes what you do display feel more intentional and more valuable.
Change with the seasons. One of the great pleasures of a display wall is that it is easy to update.
Swap out colors as the seasons change. Bring in spring pastels, summer brights, autumn earth tones, and winter metallics.
Rotate in new projects and retire completed ones. A display wall that changes with the seasons stays fresh and engaging year-round.
Add personal touches. Mix in a few non-craft items that reflect your personality: a small plant, a family photo, a postcard from a favorite trip.
These items soften the utilitarian look of tools and supplies and make the wall feel like part of your home rather than part of a store display.
Budget-Friendly Options
You do not need to spend a lot of money to create a beautiful craft display wall. Here are my favorite budget strategies.
Repurpose what you already own. That old picture frame? Remove the backing, add chicken wire or hardware cloth, and you have a rustic display grid.
A wooden pallet? Sand it, paint it, and mount it as a rustic shelf unit.
Mason jars? Mount the lids to the underside of a shelf with screws and screw the jars on for instant, removable storage.
Shop secondhand. Thrift stores and flea markets are excellent sources of display hardware. Look for wooden crates that can be mounted as cubbies. Old kitchen cabinet doors can be painted and fitted with hooks. Vintage picture frames with deep backs can hold small shelves and become shadow-box displays.
Start small. If a full wall system is out of budget, start with a single pegboard panel or one floating shelf. A small, well-organized display area is more effective than a large, half-empty one. You can expand over time as your collection grows and your budget allows.
Use command strips. For renters or anyone who does not want to drill into walls, heavy-duty command strips and hooks can hold surprisingly heavy loads.
Use them for lightweight shelf systems, grid panels, and magnetic sheets. They will not work for full pegboard installations, but they are excellent for smaller display solutions.
Conclusion
A craft display wall is one of those rare projects that improves both your space and your creative practice.
It makes your supplies accessible, your space more beautiful, and your creative life more organized.
It turns a blank wall into a daily source of inspiration and reminds you, every time you walk past it, that you are someone who makes things.
The best part is that there is no wrong way to do it. Your display wall can be as simple as a single floating shelf with your favorite paintbrushes in a jar, or as elaborate as a floor-to-ceiling pegboard system with every tool within arm's reach.
It can cost ten dollars or three hundred. It can be finished in an afternoon or built over the course of a year.
What matters is that it works for you — that it makes you want to sit down, pick up your tools, and create something beautiful.
Your wall is ready. Your supplies are waiting. And there has never been a better time to bring them out into the light.