Introduction
Summer is here, and if you're like most moms, you've already heard the words every parent knows by heart: "I'm bored." The days stretch long, the sun beats down, and keeping little hands busy without resorting to more screen time can feel like its own full-time job.
The good news? You don't need expensive supplies, elaborate setups, or hours of prep time to create memorable summer moments. All you need is paper. A simple stack of colorful origami paper — or even printer paper cut into squares — can unlock an afternoon of quiet creativity, gentle focus, and surprising pride.
Origami is one of those rare crafts that works for almost every age. A preschooler can fold a simple boat with help. An older child can tackle a jumping frog independently. And you? You get to sit back, fold alongside them, and enjoy a few moments of calm in a busy day. There's something deeply satisfying about transforming a flat square into something three-dimensional with nothing but your hands.
What You'll Need
The beauty of origami is that the supply list is almost laughably short:
- Origami paper — 6-inch squares in assorted colors. A pack of 50 costs around $5 at craft stores or online.
- A flat, clean surface — a dining table or kitchen counter works perfectly.
- Optional: A bone folder or the back of a spoon for crisp creases (not necessary, but satisfying).
- Optional for kids: Googly eyes, markers, or stickers to decorate finished pieces.
That's it. No glue. No scissors. No expensive kits. Just paper and patience — two things that make summer afternoons feel a little more manageable.
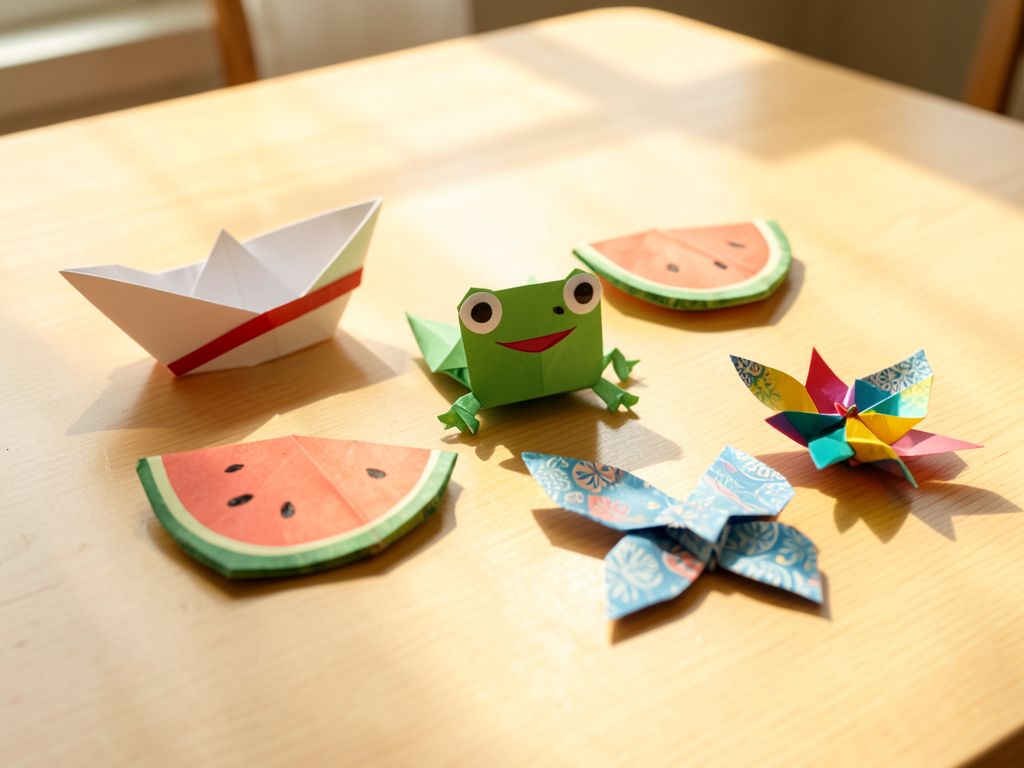
Project 1: The Classic Paper Boat
Let's start with the origami that every child should know — the humble paper boat. It's simple enough for a 5-year-old to learn with guidance, and watching it actually float in a bucket of water or a bathtub is pure magic.
Folding Instructions
Start with a rectangular piece of paper. If you're using square origami paper, fold it in half to make a rectangle first. Fold the rectangle in half lengthwise and crease firmly, then unfold. Fold the top corners down to meet the center crease, creating a triangle at the top with a rectangle below. Fold the bottom rectangle flaps up on both sides — one forward, one back. Open the bottom slightly and press the sides together to form a diamond shape. Fold the bottom corner up on both sides. Open again, pulling the top flaps outward, and you'll have a boat!
Pro tip for little hands: If the boat won't stand up properly, try using slightly thicker paper — a page from a magazine works wonderfully.
Once you've made your boat, fill a plastic bin with water and have a "boat race." Add a few drops of food coloring to the water for extra fun. The boats will float for about 10-15 minutes before getting soggy, which is plenty of time for a race or two.
Project 2: The Jumping Frog
This is arguably the most rewarding origami project for kids because it does something — it moves! Once folded, a gentle press on the back sends the frog leaping across the table. It's the kind of simple joy that turns a quiet afternoon into a competition.
Folding Instructions
Start with a square piece of green paper, colored side down. Fold it in half vertically, crease, and unfold. Fold the top corners down to meet the center crease, creating a triangle. Fold the triangle you just created downward so the top edge aligns with the bottom edge of the paper. Now fold the bottom edge up to meet the bottom of the triangle. Fold the bottom corners up to the center, creating the frog's legs. Fold the entire piece in half outward. Finally, fold the bottom section backward to create the spring mechanism.
To make the frog jump: place your finger on the back edge, slide it back slightly, and press down firmly. Release, and watch it fly!
Kids love this one. Make several frogs in different colors and hold a jumping contest. The farthest jumper wins. You'll be surprised how invested everyone gets — including you.
Project 3: Watermelon Slice
Summer wouldn't be summer without watermelon. This adorable origami project uses just two sheets of paper — red and green — and produces a tiny slice that looks good enough to eat. It's perfect for decorating a summer table or using as a pretend-play prop for little ones.
Folding Instructions
Start with a red square. Fold it in half diagonally to create a triangle. Fold the top layer of the bottom point upward to create the white rind area (about a quarter of the way up). Flip the paper over. Fold the left and right corners inward at an angle to round out the watermelon shape. Now take your green square and fold it into a thin strip — fold it in half lengthwise, then fold the edges in to create a long band. Slip the green band over the curved edge of the red piece to create the watermelon rind.
For added charm, use a black marker to add a few tiny seeds to the red section. This step makes kids feel like they're adding the finishing touch to their creation.
Bonus idea: Make a whole plate of watermelon slices. They make cheerful decorations for a summer picnic table or an outdoor tea party with stuffed animals.
Project 4: Easy Butterfly
Butterflies are a staple of summer, and this origami version is surprisingly simple. It takes about five minutes and produces a beautiful, dimensional butterfly that looks lovely taped to a window, hung from a string, or glued onto a handmade card.
Folding Instructions
Start with a square piece of paper, patterned side down. Fold it in half diagonally both ways, unfolding after each. Fold the top and bottom edges to the center crease. Now fold the paper in half from top to bottom. Fold the right side in to the center crease, then repeat on the left. You'll have a shape that resembles a kite. Open the flaps slightly to create the wings. Pinch the center to form the butterfly's body, and gently curl the wings outward.
This is one of those projects where patterned paper really shines. Floral prints, glitter paper, or even pages from a colorful magazine create stunning results. Let each child choose their own paper — the variety in their finished butterflies will be part of the charm.
Make a mobile: String several butterflies at different heights from a stick or embroidery hoop. Hang it near a window where the breeze can make them flutter. It's a beautiful, handmade piece of summer decor that costs nearly nothing to make.
Project 5: The Pinwheel (Windmill)
No summer craft list would be complete without the classic pinwheel. This origami version actually spins when you blow on it or hold it out the car window — yes, really! It's the kind of simple engineering that fascinates kids and adults alike.
Folding Instructions
Start with a square piece of paper. Fold it diagonally both ways and unfold. Cut along each fold line from the corners toward the center, stopping about an inch from the middle. Fold every other corner point into the center. Push a pin through all four points at the center, then push the pin through a straw or a wooden dowel. Leave a small gap between the paper and the straw so the pinwheel can spin freely.
Safety note for younger kids: The pin at the center is sharp. Use a pushpin with a large plastic head, and supervise closely. Alternatively, use a brad fastener instead of a pin for younger children — it won't spin as freely, but it's much safer.
Decorate your pinwheels with markers or stickers before folding. Bright colors and bold patterns look especially beautiful when the pinwheel is spinning. Plant several in a potted plant or garden bed for a cheerful, moving garden decoration.
Tips for a Successful Origami Afternoon
Before you gather the kids around the table, here are a few gentle tips to keep the experience joyful rather than frustrating:
- Pre-fold the first step yourself for younger children. Once they see how easy it is, they'll be more willing to try the rest.
- Emphasize crisp creases. Run a fingernail or the back of a spoon along each fold. Clean creases make clean shapes.
- Let them be imperfect. A lopsided frog that still jumps is more fun than a perfect one. Celebrate the effort, not the precision.
- Keep a stack of extra paper nearby. Mistakes happen, and starting over is part of the process. Having paper within reach keeps frustration low.
- Set up a display area. A windowsill, shelf, or section of the refrigerator where finished origami can live gives kids a sense of accomplishment and pride.
Why Origami Works So Well for Summer
There's something about origami that fits the rhythm of summer. It's quiet without being boring. It's structured without being rigid. It requires focus but not perfection. And it produces something real — a physical object that a child made with their own hands — in a surprisingly short amount of time.
In a world where so much of childhood entertainment is passive and digital, origami offers a gentle counterbalance. It asks children to slow down, pay attention, and trust the process. And when that final fold clicks into place and a flat piece of paper becomes a boat or a frog or a butterfly, the look on their face is worth every careful crease.
Summer is full of long afternoons waiting to be filled. With a square of paper and a little patience, you can turn one of those afternoons into something small but wonderful.
Conclusion
Origami is more than just a craft — it's a quiet invitation to slow down and create something beautiful together. These five projects are designed to be simple enough for beginners, satisfying enough for repeat folding, and versatile enough to adapt to whatever paper you have on hand. You don't need to be "crafty" to make them work. You just need a square of paper and a few minutes.
So the next time you hear "I'm bored" echo through the house, reach for a stack of paper. Fold a boat. Race a frog. String up some butterflies. You might just find that origami becomes as much your summer ritual as ice cream and sunscreen.
And if one of your little ones asks to fold just one more? Say yes. Those are the moments summer is made of.